


How to Make Homemade Lavender Salve to Soothe Skin & Nerves
Lavender salve is a little miracle-worker in a tin. It heals and moisturizes skin, soothes irritation, burns and itching, and can even help heal acne, scrapes, and eczema. Let’s not forget how out-of-this-world wonderful it smells, loaded with essential oils and an aroma that is scientifically-proven to ease anxiety, stress, and sleepless nights. The best news is, it is very easy to make lavender salve! You don’t need to be an experienced herbalist or apothecary regular to do this.
Read along to learn how to make lavender salve at home. I’ll let you in on all the ‘secrets’ of our highly-esteemed homemade lavender salve recipe, and walk you through the simple step-by-step process. Making lavender salve requires only a few steps, supplies and ingredients. We’ll also explore the health benefits of lavender salve and the various ways to use it.
If you have followed along on our homemade calendula salve or DIY cannabis salve tutorials, a lot of this will be familiar to you. Yet lavender definitely has its own unique and noteworthy benefits!
What is Lavender Salve?
Not familiar with salve in general? ‘Salve’ is simply the term for a healing solution that you put on your skin, including creams, ointments, or balms. Generally, salves are fairly thick, shelf-stable, and include nourishing oils such as coconut oil, olive oil, sweet almond oil, or others. Along with a base oil (or several), salves also typically contain natural waxes or butters to bind the ingredients and make them semi-solid at room temperature.
Beeswax is a popular binding agent because it is readily available, easy to work with (especially when purchased in pastilles), and creates perfectly smooth results. Not keen on beeswax? See the ingredient list below for recommended vegan substitutions. When lavender-infused oil (or lavender essential oil) is used in a salve recipe… voila! You create a lovely lavender salve, enhanced with all the medicinal benefits of lavender.
Lavender-infused oil vs. lavender essential oils
As you browse through the short-and-sweet ingredient list below, you’ll note that we prefer to use a combination of homemade lavender-infused oil along with a splash of lavender essential oils when making our homemade lavender salve.
What is the difference? Well, lavender-infused oil is created by steeping dry lavender flowers in a carrier oil of choice over a period of time. As the dry flowers infuse in the oil (later strained), the natural essential oils in lavender are drawn out and into the carrier oil. On the other hand, the lavender essential oils you’ll commonly find in little bottles are made through a distillation extraction process rather than infusion. Essential oils are highly concentrated and not easy to make at home. While there are some home and hobby-size ‘stills’ available, distillation is most often done on a large industrial scale.
We like to use lavender-infused oil because it is a great use for our garden lavender! (Get tips on how to harvest and dry lavender for maximum therapeutic value here.) It adds a nice homegrown element and extra oomph of natural lavender to the salve. However, it also is possible to create homemade lavender salve with plain oil and essential oils only. If you’d like to use lavender-infused oil in this salve recipe, see the instructions to make homemade lavender oil here, and then come back when it’s ready!
Disclosure: This post may contain affiliate links to products for your convenience, such as to items on Amazon. Homestead and Chill gains a small commission from purchases made through those links, at no additional cost to you.

The Health Benefits of Lavender
- The soothing yet cheerful aroma of lavender is both calming and uplifting. It has been proven to help reduce anxiety, stress, depression, and insomnia.
- Scientific studies show that lavender has powerful anti-inflammatory, antibacterial, anti-fungal, and antioxidant properties.
- It is also known to deter pest insects like mosquitoes and flies. This makes lavender a popular ingredient in many natural insect repellents.
- Lavender has the ability to relieve pain and itching, promote new cell growth, and therefore help repair damaged skin tissue and heal wounds.
- In her book “Medicinal Herbs, A Beginner’s Guide”, Rosemary Gladstar explains that lavender is useful in treating a host of infections, including staph, strep, colds, flus, ringworm, and yeast infections. The ability to ease headaches or migraines is also noted.

What can lavender salve be used for?
While lavender is sometimes used in culinary and internal medicine applications, it seems Mother Nature has divinely designed lavender to heal our skin and nerves. Have you noticed that lavender is incorporated into many natural skin care products? It is for more than just a pretty scent! Topically, lavender can ease, heal, or otherwise treat a huge array of skin conditions. Enter: homemade lavender salve!
- Apply lavender salve to irritated skin to reduce swelling, redness, and irritation. This includes rashes, bug bites, burns or sunburn, acne, scrapes, eczema, stings, scars, and psoriasis. I also find lavender salve to be very soothing after shaving, to prevent or treat razor burn. It also helps the little rashes I often get on my arms from rubbing against certain plants in the garden.
- Ailments aside, homemade lavender salve is the perfect solution to everyday chapped lips, rough elbows and feet, or dry hands for general moisture. I love to use lavender salve on my dry cracked cuticles after a long day of digging in garden soil!
- Need a chill pill – minus the pill? Dab some lavender salve around your temples, neck, wrists, and under your nose and take a few deep breaths. Allow the calming aromatherapy properties of lavender help you relax, lean into your meditation or yoga practice, or get ready for a more restful sleep. I keep a tin on my bedside nightstand, and often reach for it in the middle of the night when my thoughts are keeping me awake.
- Lavender oil is generally safe for kids and babies, making homemade lavender salve perfect for things like diaper rash or cradle cap. One study even showed that lavender oil can help treat colic! Never use undiluted essential oils on skin. Double-check your other salve ingredients for safe use on babies as well.
- Last but not least, lavender salve can also shrink skin ulcers, soften the appearance of scars, and lessen the swelling and discomfort of varicose veins.
Wow… that all sounds too good to be true, right?
If you don’t believe me (or all the studies I linked 😉) check out these testimonials from customers that have used our Homestead and Chill organic lavender salve. It has helped people heal everything from cystic acne to persistent large rashes that didn’t respond to other treatment. I am SO delighted and humbled to hear such positive results and feedback. Truly. After all, the desire to help people lead their most naturally healthy life is the whole reason I am here.
So without further ado, let’s teach you how to make your own lavender salve too!

HOMEMADE LAVENDER SALVE RECIPE
Ingredients
- 1 cup of lavender-infused oil (8 ounces) OR 1 cup of your carrier oil of choice, with extra lavender essential oils added as described below. Popular oil options for making salve include jojoba oil, olive oil, sweet almond oil, sunflower oil, coconut oil, and more. To help you decide which type of oil to use, see our lavender oil article. It goes over the unique benefits of a dozen different carrier oil options.
- 3 to 4 tablespoons* of beeswax pastilles, or about 1 ounce if you’re using shaved, block, or other forms of beeswax. *If you opt to also add shea butter, you can use only 3 level tbsp of beeswax pastilles. However if you skip the shea butter, use 4 tbsp beeswax. Vegan options: soy wax or candelilla wax.
- Lavender essential oils (EOs). When using a lavender-infused oil base, I find we only need to add about 20-25 drops of organic lavender essential oil per cup of oil to obtain a lovely (and not overpowering) scent. However, if you skipped the infused oil and are relying on EOs alone, you could add as much as 12 drops of EOs per fluid ounce of carrier oil – or up to 96 drops per cup of oil. Note that is the absolute maximum amount recommended (per the safe dilution ratio for essential oils of 2%) and will result in a very strong-smelling salve. Start with half of that and adjust based on personal preference.
- Optional: 2 tbsp of shea butter or cocoa butter. We love using shea butter, as it is highly moisturizing and rich in vitamins, minerals, essential fatty acids, and antioxidants.
- Optional: other essential oils of choice. Feel free to add a few drops of other essential oils that go well with lavender. For example, chamomile, rose, pink grapefruit, lemon, rosemary, sweet orange, ylang ylang, bergamot, geranium, or sandalwood. Have fun making your own custom blend. Each of these has their own distinct benefits as well!

Other Supplies Needed
- A double-boiler (or make-shift double boiler). For example, a pot within a pot, or a glass pyrex bowl or stainless steel bowl perched on top of a saucepan with water below. The use of a double-boiler is important, to avoid overheating the volatile lavender essential oils and thus reduce its healing potency!
- Small glass jars or salve tins, for storage. We often use 2-ounce amber glass jars or larger 4-ounce jars for personal use or gifts, and these 2-ounce salve tins for easy shipping in the shop.
Recipe yield
The amounts listed above will result in just over 1 cup of finished salve (about 10 ounces, or five 2-ounce tins). Feel free to scale up or down as needed. The general rule of thumb for salve is to use about 1 part of beeswax/butter to approximately 4-7 parts oil. A higher beeswax-to-oil ratio will result in a more firm salve, while going lighter on the beeswax will create a softer salve.
A note on using quality and/or organic ingredients
Whenever we’re making salve, herbal oils, or other homemade body care items, we personally opt to use the best quality ingredients possible. Certified organic is all the better. The goal is to create a healing medicinal end product all! For example, I highly suggest using virgin, unrefined, cold-pressed oils. Some lesser-quality oils use solvent extraction, which contaminants them with hexane – a neurological toxin. I am also leery of non-organic essential oils. Just as the plant’s natural oils become highly concentrated in EOs, so does anything else on the plant!
Instructions
- Have your salve tins, glass jars, or other lavender salve storage containers of choice ready and waiting.
- In the top portion of a double-boiler (or makeshift double-boiler), add 1 cup of lavender-infused oil (or other carrier oil) and 3 to 4 level tablespoons of beeswax (sliding scale notes above). Also add the optional 2 tablespoons shea butter if you choose to use it.
- Next, add enough water to the bottom portion of your double-boiler so that the top bowl or pot is in contact and resting in the water below.
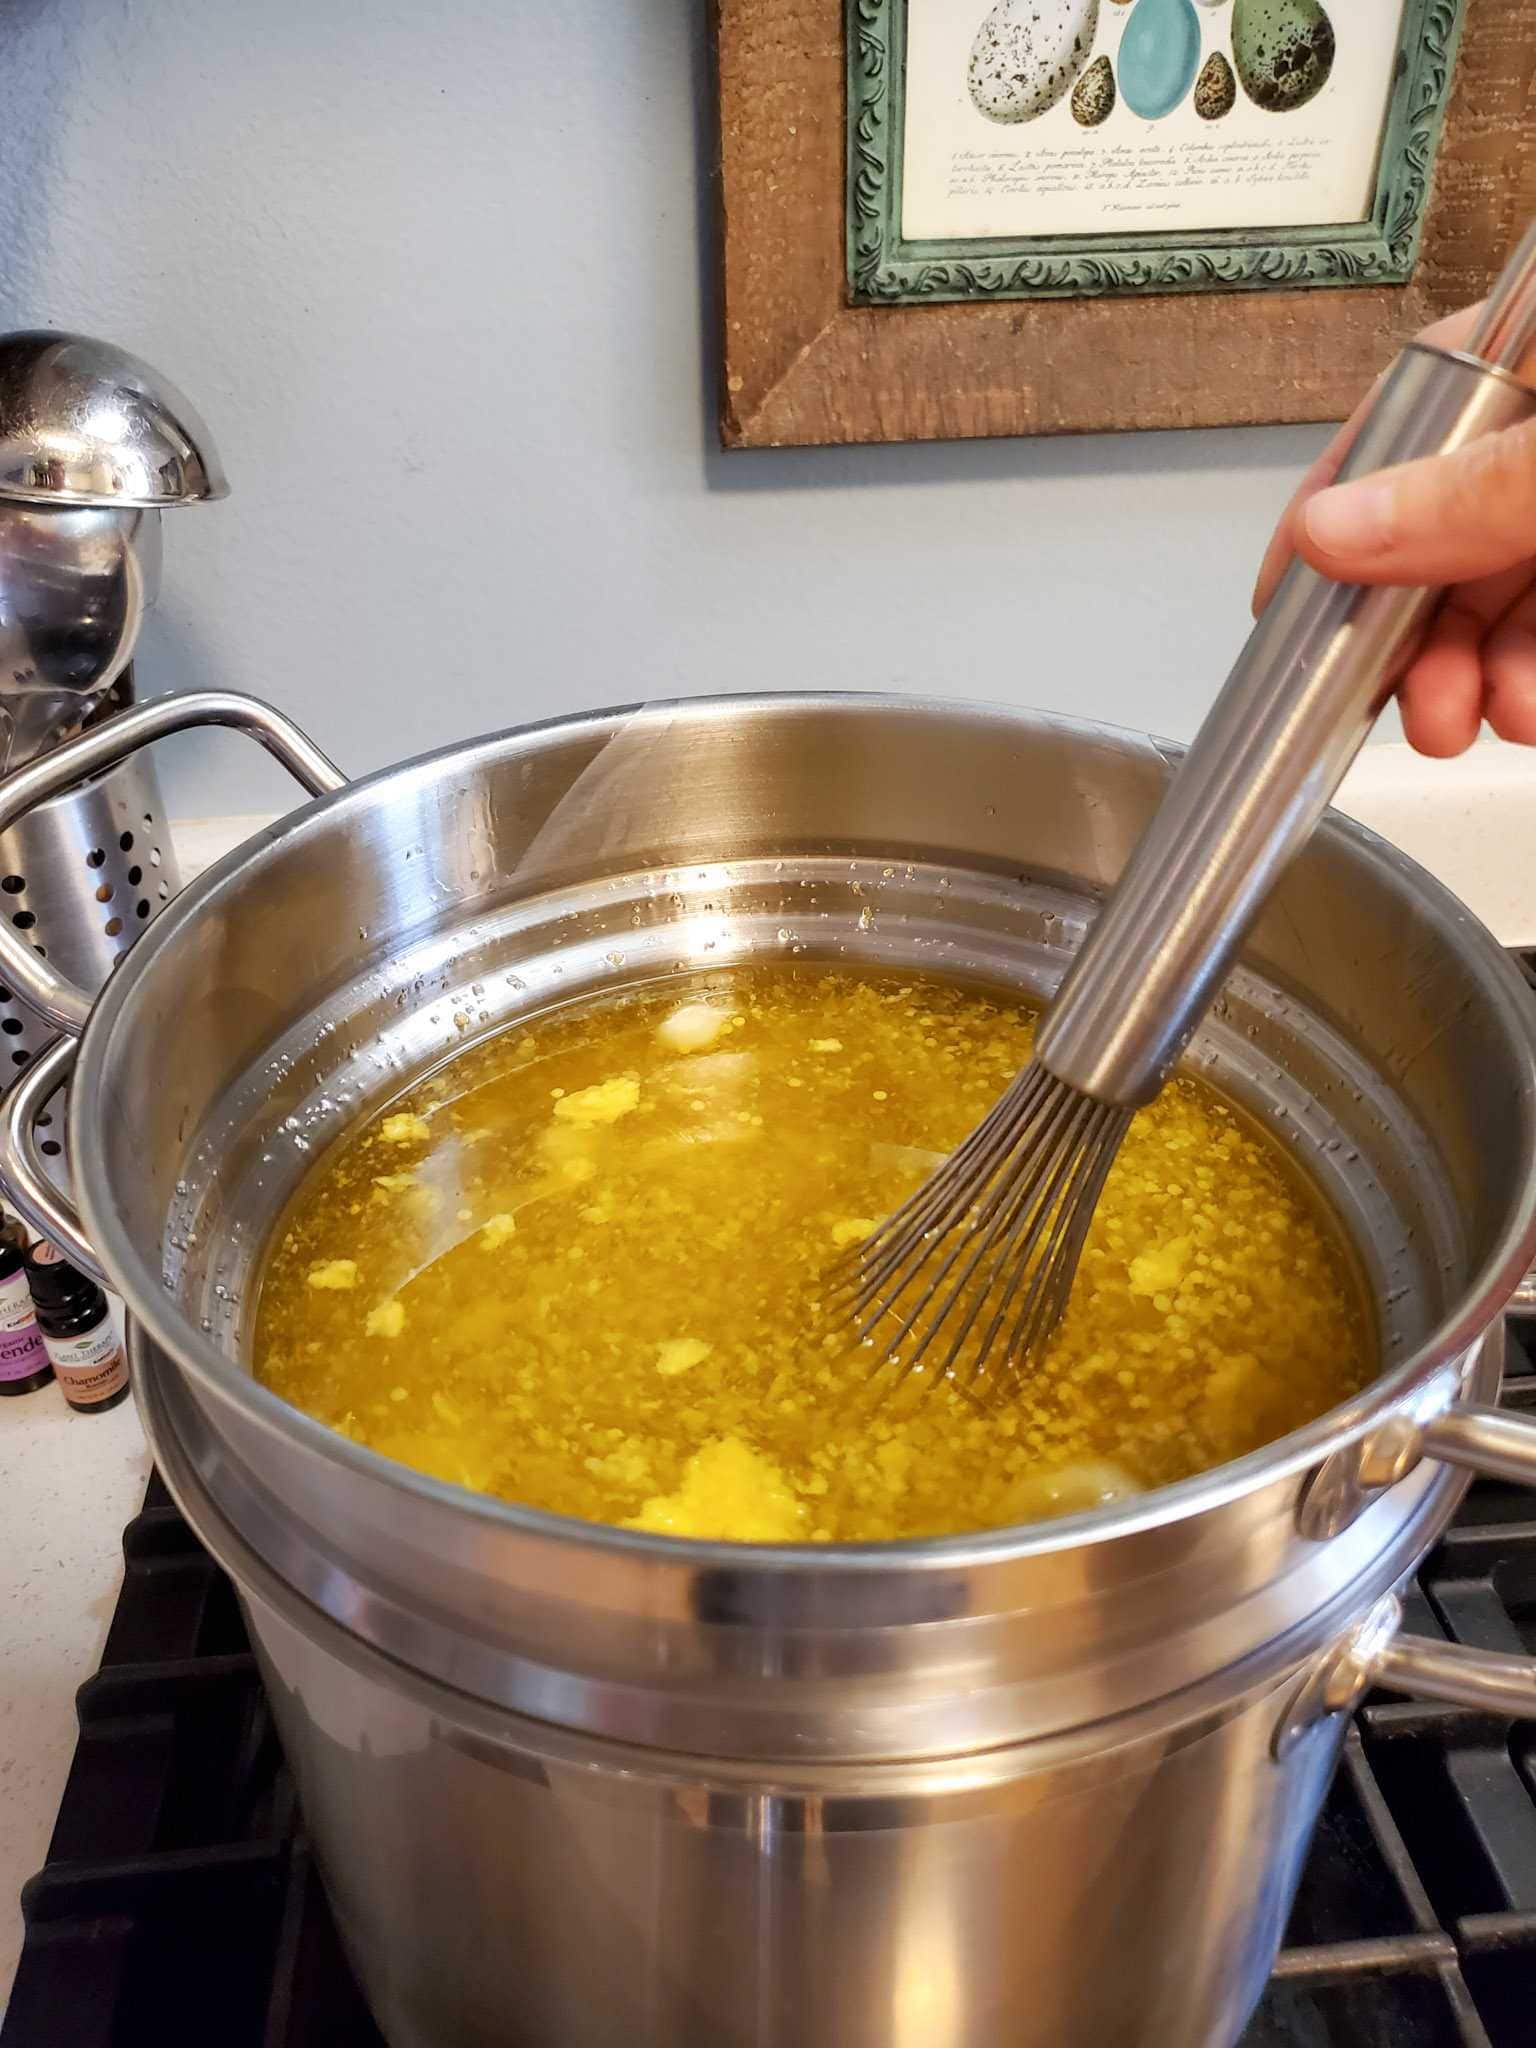
- Heat the double-boiler over a medium-low heat on the stovetop. Remember, we want to avoid excessively heating the lavender oil more than what is necessary to melt the beeswax!
- Monitor and routinely stir the mixture until the beeswax (and shea butter) completely melts. Stir to thoroughly combine, and then remove from the heat immediately thereafter.
- Add the essential oils after removing the liquid salve from the heat. They are very volatile and therefore will dissipate quickly when exposed to high heat. Whisk to combine.
- While it is still hot, carefully pour the now-liquid lavender salve into your chosen containers. If it starts to solidify while you’re still filling containers, simply put it back on medium-low heat until it liquifies again.
- Finally, set the full lavender salve containers aside (lids off) and allow them to fully cool and harden.
- Enjoy healthy, moisturized skin! Use either clean fingers or a salve spoon to collect a small amount of salve and apply as needed. A little goes a long way!


And that concludes this tutorial on how to make lavender salve.
With that, I hope you feel excited and empowered to make your own healing homemade lavender salve too. It is a favorite of ours to use personally, and also makes the perfect thoughtful gift for loved ones on special occasions – or just because!
Store your salve containers in a cool, dark place. I always keep one out and about for regular use, then stash the rest away in a cabinet. Homemade lavender salve can “stay good” for several years! However, it’s medicinal potency may decrease with extended time and age.
Please feel free to ask questions in the comment section below. Also, please come back for a review once you try it, and spread the love by sharing this post. Thanks for tuning in!
Don’t miss these related articles:
- How to Make Rosehip Infused Oil and 12 Ways to Use It
- Harvesting Fresh Lavender: How to Harvest, Prune, Dry & Use Lavender Flowers
- How to Make Homemade Lavender Oil
- Soothing Homemade Chickweed Salve Recipe for Itching, Burns or Rashes
- How to Make Homemade Calendula Salve for Healthy Skin
- 10 Best Vegetarian and Vegan Supplements for Improved Health

How to Make Homemade Lavender Salve
Equipment
- A double-boiler, or make-shift double boiler (such as a glass pyrex bowl or stainless steel bowl perched on top of a saucepan with water below)
- Glass storage jars or salve tins
Ingredients
- 1 cup Lavender-infused oil (OR plain oil such as sweet almond oil, olive oil, jojoba oil, sunflower oil, or other carrier oil of choice)
- 3-4* tbsp Beeswax pastilles, or approximately 1 once if you're using shaved, block, or other forms of beeswax. *If you opt to also add shea butter, use only 3 level tbsp of beeswax pastilles. However if you skip the shea butter, use 4 tbsp beeswax. (vegan option: replace with the same amount of organic soy wax or candelilla wax)
- 2 tbsp Shea butter (optional)
- 20-25 drops lavender essential oil, if using lavender-infused base oil. (Use up to 12 drops essential oil per ounce of base oil, or 96 drops per cup (maximum) if using plain carrier oil. I suggest starting at half that and scaling up based on personal preference/aroma)
- 4-5 drops Other essential oils of choice, such as chamomile, rose, ylang ylang, sweet orange, lemon, rosemary, or others (optional)
Instructions
- Have your chosen salve tins or small glass storage jars ready and waiting.
- Add water to the bottom pan of your double-boiler. Now add 1 cup lavender-infused oil (or plain oil), and 3-4 tbsp of beeswax (see sliding scale notes above).
- Heat the mixture on the stovetop over medium-love heat – only until the beeswax melts, and stirring frequently.
- As soon as everything melts and is thoroughly combined, remove from heat.
- Add essential oils once removed from heat. They're highly volatile and prone to dissipating.
- While it is still hot, carefully pour the liquid salve into your chosen containers. (If it starts to solidify while you’re still filling containers, simply put it back on medium-low heat until it liquifies again.)
- Set the full lavender salve containers aside (lids off) and allow them to fully cool.
- The lavender salve will harden as it cools, and then it is ready to use. Use either clean fingers or a salve spoon to collect a small amount of salve, and apply to your skin as needed. A little goes a long way!
- Store your salve containers in a cool, dark location. Homemade lavender salve can “stay good” for several years. However, it's medicinal potency may decrease with extended time and age.


49 Comments
Bonnie Geer
I made this but it did not harden. It is more of a cream like a moisturizer. Is this the way it is supposed to be or is it suppose to dry very hard?
Aaron (Mr. DeannaCat)
Hi Bonnie, I would say our salve products and recipes are in between very hard and cream like, you should still be able to easily dip into the product and it should apply easily to the skin. It’s not supposed to be as hard as a lip balm or a product like that. A salve is slightly softer than a balm, if you think your salve is too soft, maybe your beeswax to oil ratios were off slightly? Hope that helps and good luck!