


7 Useful Seed Starting Supplies for Success Indoors
Sun, soil, water, air. That’s all plants need to grow, right? Maybe outdoors, but starting seeds inside is a uniquely different job. And like any job, you need the right tools to succeed! Come learn about 7 useful indoor seed starting supplies that will help your seedlings not only survive – but thrive! From hobby novice to serious seed starter, we’ll cover options for every level of gardener.
Starting seeds indoors is rewarding and easy to do. It gives you a jump start on the growing season, and a few helpful tools make all the difference in the world. Without adequate bright light, seedlings will grow floppy and weak. Without the right soil medium, seeds may struggle to sprout or grow strong roots. Yet investing in quality indoor seed starting supplies will help you grow strong, happy, healthy seedlings (and loads of homegrown food) for many years to come!
This article is proudly sponsored by Gardener’s Supply Company, our favorite Certified B Corp for seed starting supplies and other garden goods. This post also contains affiliate links that help support the work we do here at Homestead and Chill. We’re so grateful for your support!

Setting up an Indoor Seed Starting Area
You can start seeds just about anywhere indoors. In a garage, basement, spare room… wherever you have a little free space! Some of our friends start seeds right on their dining room table, or even on a closet floor. Ideally, the area should be protected from extreme temperature swings and have a power outlet nearby. We’ve been growing from seed for nearly a decade, and have used everything from a greenhouse to an insulated shed to a single shelf in our guest room. Work with what you have!
7 INDOOR SEED STARTING SUPPLIES
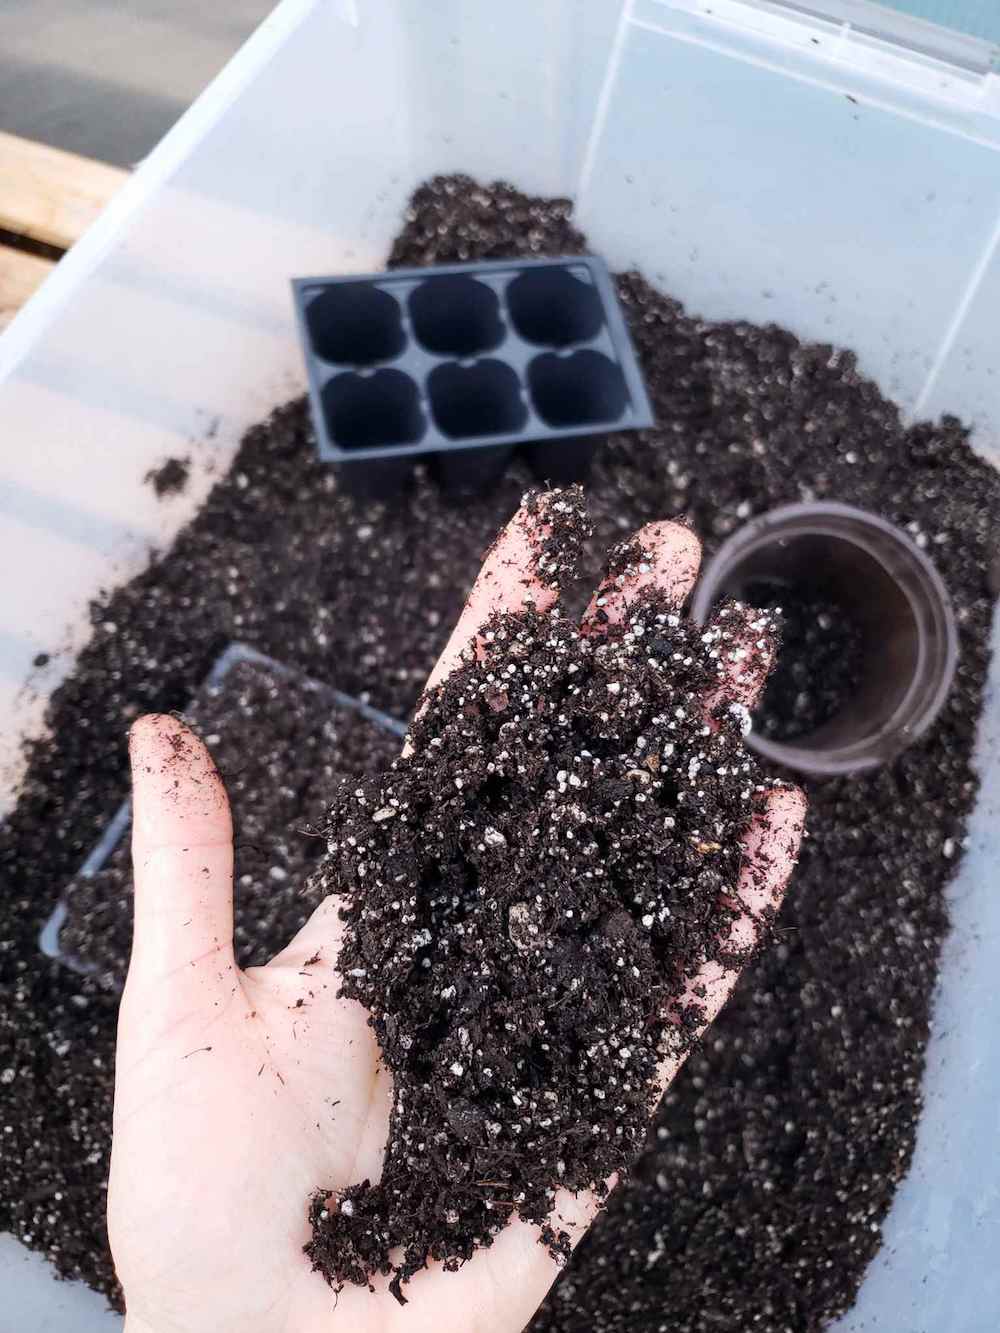
1) Seed Starting Medium
Seeds should be planted in a light, fluffy, sterile medium so they can easily sprout and grow their tiny tender roots. Potting soil, compost, and garden soil are often too heavy and rich for seeds to germinate, or will lead to uneven germination and slow growth. Plus, using soil from your garden could potentially introduce unwanted disease or pests to your seed starting supplies!
Instead, choose a mix that is specifically designed for sprouting seeds – like this organic seed starting mix. I recommend pre-moistening the mix prior to planting seeds. Make it damp, but not soggy!
2) Seedling Trays and Pots
One of the most essential seed starting supplies you’ll need is containers to sprout seeds in. Yet there are tons of different styles available: plastic pots, soil blockers, paper pots, and more. Each one has its pros and cons, and every gardener has their own preference on what to use!
Here are a few popular options:
- All-in-one seed starting kits make it exceptionally easy to get going. For example, this Growease kit includes a 12 or 24-cell seedling tray, a self-watering wicking reservoir to prevent overwatering, and a clear humidity dome to keep things nice and damp during germination. It’s also made of durable, BPA-free, post-consumer recycled plastic! This Growease combo pack also includes seed starting soil, and this kit offers extra large cells.
- If you like classic trays and cells but want to avoid plastic, consider this awesome galvanized steel self-watering seed starting tray. It also has a wicking reservoir, is quite snazzy-looking, and should last forever! Pair it with these compostable wooden plant markers to complete the set.
- One of the most sustainable options is to avoid pots entirely and create your own soil blocks using a nifty soil block maker tool. However, you’ll still need a bottom tray to nest the soil blocks in, like these reusable heavy-duty 1020 trays.
- If you’re feeling crafty, you can make your own newspaper pots with the assistance of a paper pot maker. Even though newspaper is biodegradable, I suggest to gently peel away the pot (compost it) or at least tear off the bottom before transplanting the seedlings outdoors. If planted, paper often degrades more slowly than plant roots grow, leaving them restricted and root-bound. The same applies to any pre-made “plantable” biodegradable pots.
QUICK TIP: No matter which pots or trays you choose, it’s helpful to keep them covered with a reusable humidity dome or clear plastic after planting seeds. This prevents the soil and seeds from drying out, and aids in rapid germination. However, it’s very important to remove the cover as soon as the seeds sprout!


3) Grow Lights
From the moment they sprout, seedlings need ample bright direct light to thrive. Without it, they grow undesirably tall, weak and floppy (also known as getting “leggy”) as they stretch out in search of better light. Unfortunately, ambient light from a sunny window is generally not strong enough to grow healthy, compact seedlings indoors, especially during the shorter days of winter. Yet that’s where grow lights come in to save the day!
For the best results, keep grow lights on over seedlings for about 14 to 16 hours per day. An outlet light timer really comes in handy here! It’s also best to keep the lights low over the seedlings, hung just a few inches above them and then raise the light as the plants grow. (Some LED lights require more clearance, so check the manufacturer’s recommendations.)

Grow light options
Like other seed starting supplies, grow lights come in a wide array of shapes and sizes to suit different gardeners’ needs – ranging from single light fixtures to specialized multi-tier shelving units with built-in grow lights. Here are several great options to consider:
- An LED Tabletop light is perfect for starting a modest amount of seedlings on a table in your garage, basement, or other spare space. The light is suspended from a durable, adjustable frame that allows you to easily raise the lights as the seedlings grow.
- A 2 or 3-Tier Sunlite Garden provides space to grow a generous amount of seedlings on a dedicated shelving unit, equipped with high-quality adjustable grow lights. They come with a choice of standard fluorescent lights, efficient LED lights, or high-intensity LED lights that offer 50% more light. This is what we use! See all Sunlite Garden sizes and styles here.
- Gardener’s Stack-n-Grow light system is a fantastic way to start small, and then add more grow lights as your indoor seed starting adventures expand in the future! The base has two 3-foot T9 fluorescent lights, and then you can simply stack more tiers on top as needed. It also comes in an LED version.
- Do you already have a shelf, or just need a light? Consider this classic four-tube T9 light fixture paired with an adjustable pulley to hang it. Or, these compact high-output LED magnetic lights that will easily stick to the underside of a metal shelf or similar.
Check out all of the awesome grow light options from Gardener’s Supply Company here.


4) A Heat Mat
For fast and even germination, most seeds prefer soil temperatures around 70-75°F to sprout. Warm soil also encourages speedy root growth! Seedling heat mats are specifically designed to keep soil in the ideal temperature range. They come in a variety of sizes, and are very helpful when starting seeds indoors, in a garage, or even in a greenhouse – especially during cooler times of year.

5) A Watering Can
Before seeds sprout, it’s great to use a spray bottle to keep the top of the soil moist. However, once they do sprout, it’s best to switch to bottom-watering. (That’s when you pour water into the tray below the seedlings, and the soil drinks it up from the bottom.) A watering can with a long narrow spout like this makes bottom-watering a breeze.
Bottom-watering seedlings offers many benefits. It encourages roots to grow deep into the soil, keeps the soil more evenly moist, and reduces the risk of damping off or disturbing seedlings. It also reduces the likelihood that you’ll overwater! Just be sure to only add so much water that the soil can completely soak up within a few hours.

6) A Fan for Airflow
Good airflow is key for growing healthy seedlings. It helps prevent damping off, a fungal disease that results in sudden seedling death. As they wiggle in the gentle breeze, air circulation also makes seedling stems grow stronger and therefore reduces the risk of damage or shock once transplanted outdoors (part of the important hardening off process).
So, plan to have a fan nearby! We have a large standing oscillating fan in our grow room, but this handy 6” clip-on fan is perfect for smaller spaces. Keep the airflow directed near the seedlings, but not so direct or strong that it causes them to bend over.

7) Gentle Fertilizer
The last item on this list of useful indoor seed starting supplies is fertilizer. However, seedlings don’t need fertilizer right after they sprout. In fact, it can actually harm or stunt them if used too early! But as they get larger, seedlings will greatly appreciate added nutritional support in the form of a mild fertilizer – especially if it will still be a number of weeks until they’re transplanted outside.
Dilute fish fertilizer or seaweed extract are excellent gentle choices for seedlings. I recommend mixing the fertilizer concentrate with water and then pouring it in the tray below the seedlings to soak up, just like bottom-watering. Wait to start fertilizing seedlings until they’ve grown a couple sets of true leaves, or at least 3 weeks after germination or older. Follow the manufacturer recommendations in regards to amount, or even err on the lighter side. We also like to make homemade aloe vera fertilizer for seedlings as a special treat.

And that concludes this list of must-have indoor seed starting supplies.
Growing your own food from seed is an incredibly rewarding and exciting thing to do. There are so many awesome varieties and options out there! I hope this guide helps you feel more prepared to grow along – with the right tools to succeed! Please let us know if you have any questions in the comments below. If you found this information to be useful, please consider sharing or pinning this post. Thank you for tuning in today, and happy seed starting!
You may also like:
- Seed Starting 101: How to Sow Seeds Indoors
- When to Start Seeds: Garden Planting Calendars for Every Zone
- 12 Places to Buy Organic, Heirloom and Non-GMO Garden Seeds
- Seed Storage: The Best Way to Store & Organize Garden Seeds
- Transplanting Seedlings Outside: Tips for Success
- See our full collection of helpful seed starting articles here


7 Comments
Maureen
What seedling starting mix do you use? Any tips on good seedling starting mixes that are peat moss free? All of the seedling mixes I can find have peat moss. I looked up a few recipes online to make a peat-free mix myself with disastorous results! I used coco coir, compost, and vermiculite in the ratios recommended but the seedlings are all purple, pale, and stunted despite trying to rescue by starting with seaweed extract earlier than usual. After several years of starting seedlings successfully this is the only thing I’ve changed and I’m ready to go back to the peat moss! You grow such beautiful seedlings – any advice?
Aaron (Mr. DeannaCat)
Hi Maureen, I am so sorry you are having a tough time with your seedlings, that can be really frustrating. As far as avoiding peat moss, that is a tough one as most, if not all pre made seedling mixes contain peat moss. We like to use Roots Organic Micro-Greens or the Soil King Baby Rootz as we have had the most consistent results when using either mix and we typically add about 20-25% regular potting soil to 70-75% seedling mix so our seedlings have a little extra nutrition should they need it. However, both of these soils are typically found in “grow shops” and not your typical nursery as they are more catered toward cannabis growers. However, you can use many other pre made mixes and likely get similar results, I think we have used a seedling mix from Black Gold when in a pinch and I don’t recall having an issue with it.
As far as making your own mix goes, it seems like you probably used the correct ratios and are still having issues, this may be due to the coco coir. There have been some studies with varying results when comparing coco coir to peat moss in seedlings, this article outlines a few of the studies which did side by side tests using both types and the results that they found. If your seedlings are large enough to pot up into another container, your seedlings health may improve if you pot them up using a regular potting soil, giving their roots an opportunity to grow into some new soil. Hope that helps and ask any other questions you may have, good luck to hopefully get some healthy seedlings into the garden before too long.
Patricia Moore
For ideas of how much you can plant in a square foot for example, google square foot gardening. What I have done in my 4×8 foot garden is look at the plants growing requirements, how far apart, how big do they get and what plant is compatible with what. Corn is best grown in a block as close together and in rows as close as is advised for pollination. I like to be able to stand outside a block and reach half way in from either side and from front and back, without stepping into the growth area. Next I know beans and peas are great companions to corn, building nitrogen in the soil and they can climb the cornstalks. Next squash is another companion and so the three sisters can be in the same area. If you have trellis you can grow squash, zucchinni up the trellis. You can also find what is a companion to tomatoes. You know how far apart the tomato plants should be spaced. Radishes, onions, marigolds, lettuce can grow around and between tomatos. You can companion grown a lot of plants with each others, My turnips and beets are in seperate areas, but nearby. I grown Kale, lettuce, parsley, and dill together. Potatoes seperate, but many plants can grown in between rows. My garden is set so that I do not have to go into the interior. I have one small path cutting the length in half. I also won’t make the mistake of growing sunflowers anywhere but in its own spot. Can also grow them over a particularily weedy nusiance as sunflowers kill other plants. Found that out the hard way last year, after planting everything and what I thought was millet up front, it was red sorghum, LOL, the sunflower seeds were tossed over the entire garden and I wound up with a 4×8 foot patch of Sunflowers, Red Sorghum and Marigolds. Hope this helps.
Theresa Wallinger
With this wild & wet weather we have been having here in CA, is a late start with seeds ok??? We are late to the game this year and I was hoping to start seeds rather than spend the money on starts. What you do you think? Thanks!!! Theresa
Aaron (Mr. DeannaCat)
Hi Theresa, absolutely you can still start from seed, we have still yet to start our cucumber, hard squash, and melon seeds. Yet, we did start our tomatoes, eggplant, basil, and peppers 2-3 weeks ago. Still should be plenty of time to grow healthy seedlings for the upcoming summer season, good luck and have fun growing!
John D
Hi Deanna! Love all the content you’ve assembled – it’s a huge help to a new gardener here. One question – I’ve looked everywhere – but do you have charts/plans on how much of one plant you can fit into a space? Been trying to figure out “how many radishes can I fit in a square foot” (example).
Thanks for all you do!!!!!
Aaron (Mr. DeannaCat)
Hi John, thank you so much for the kind words and we appreciate your support! We don’t have any charts for plant spacing specifically, however, small radishes we typically space about 2 inches and larger radishes we will space 4-6 inches apart. Hope that helps and have fun growing!