


7 Ways to Protect Plants From Frost Damage
Freezing, frosty weather can make gardening more challenging at times, but that doesn’t need to be a deal breaker – or mean certain death to your plants! There are a number of easy and inexpensive ways to protect plants from frost in your garden. All it takes is a little creativity and preparation. From row covers and cloches to careful selection of plant locations and varieties, follow these simple frost protection tips to help extend your growing season.
Frost is admittedly pretty rare in our climate, but it does occur on occasion. In fact, we just had our first light frost of the year a couple weeks ago! I covered some of the garden beds, but we still got a bit of damage on our uncovered lettuce. Thankfully, I have plenty of wonderful gardener friends that live in colder climates that were willing to share sage advice and photos for this article too.
Why Worry? How Frost Damages Plants
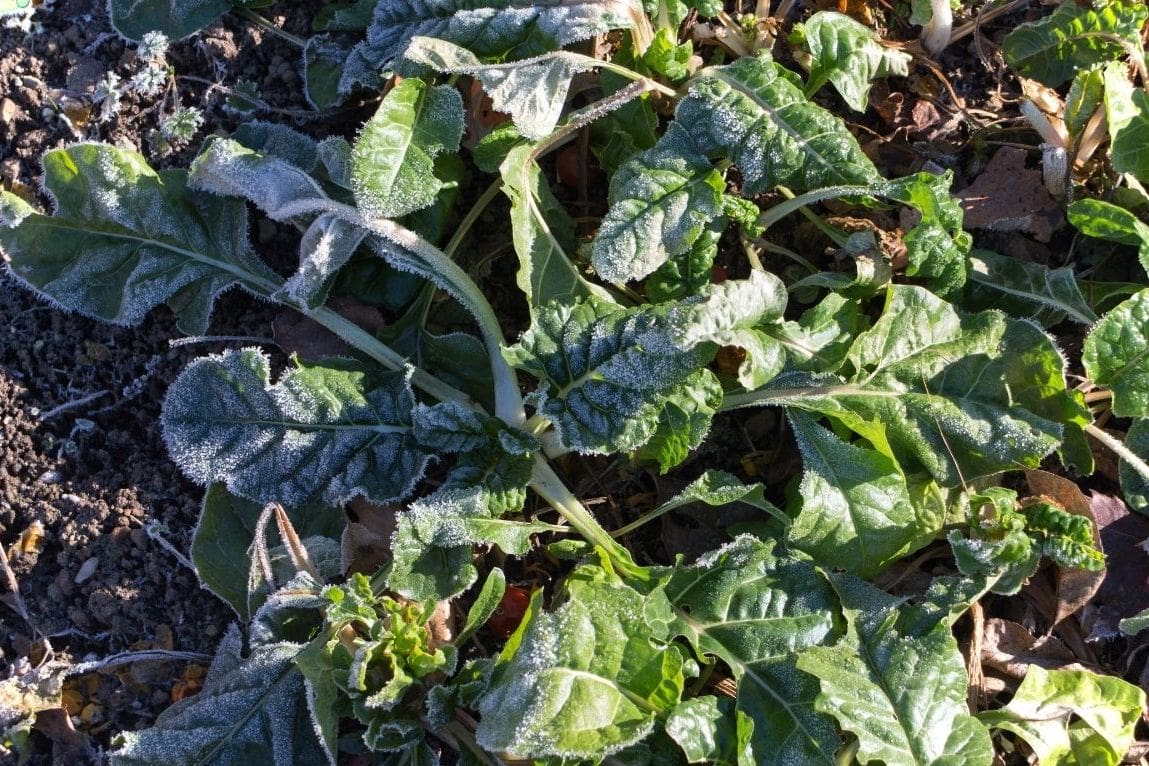
When plants are exposed to freezing temperatures and frost (which can occur at 32°F or below), ice crystals form in the plant cells – most commonly within their leaves. When this happens, it disrupts the plants ability to provide water or nutrients to those areas. In turn, frost-damaged leaves or plant tissues look soggy and water-soaked. They usually become darker in color, more thin, and limp. Some foliage may turn brown or appear scorched. Young and tender plants are the most susceptible to frost damage, so they will need more special attention during a cold snap.
Keep in mind that even if they look sad, many plants can bounce back from mild frost damage! Frost usually impacts fresh new growth and the outer perimeter leaves the most, but that doesn’t mean the plant is dead or won’t continue to grow. Also, many cold-tolerant perennial plants and trees go dormant during the winter time. They shed their leaves and hunker down for the winter, rebounding with fresh new growth come spring. Some even benefit from extended periods of cold, such as the “chill hours” required for many fruit trees to properly develop fruit. Kale and other members of the brassica family become increasingly sweet in flavor after a kiss of frost!
Disclosure: This post may contain affiliate links to products for your convenience, such as to items on Amazon. Homestead and Chill gains a small commission from purchases made through those links, at no additional cost to you!


Hardy versus Tender Plants
Frost doesn’t impact all plants equally. Plants are characterized by the degree of cold temperatures they can tolerate, classified as either “hardy” or “tender”.
Tender plants have soft, succulent tissues and are easily damaged or killed by freezing temperatures (unless protected). Examples of tender plants include summer crops like tomatoes, basil, cucumber, squash, peppers, eggplant, along with citrus, avocado, succulents, most annual flowers and common houseplants. Young sprouts and seedlings are also considered tender, even if they’ll grow up to be cold-tolerant plants (such as broccoli or cabbage seedlings).
On the other hand, hardy plants can withstand frost or short-term freezing conditions. Hardy annual vegetable plants include common cool season crops like cabbage, broccoli, kale, cauliflower, Swiss chard, carrots, radishes, turnips, and beets. Once established, these types of plants should readily survive a light frost or even temperatures in the 20s with little-to-no protection. Some cool season crops are more on the tender side, like lettuce and arugula. They do enjoy cold conditions but their thin leaves will become more easily damaged when exposed to frost (without protection) than tougher, thick-leaf hardy vegetables.
7 FROST PROTECTION MEASURES
1) Choose Season-Appropriate Plants for Your Zone
Choose plants that are well-suited for your growing zone. For instance, it is somewhat unrealistic to grow avocados or citrus in zone 5 – unless you grow them in a container and plan to do a significant amount of babying, that is! There are always ways to stretch the zone limits. Yet there are plenty of other wonderful fruit trees that will thrive in lower frosty zones with much less fuss, including apples, pears, and plums. Learn more about choosing the best fruit trees for your climate here.
In terms of annual vegetable crops, grow what fits with the coming season ahead. You know… tender warm season crops in the summertime, and hardy cool season crops for spring, fall, and winter gardens. Furthermore, consider specific varieties carefully. For instance, certain varieties of kale, spinach, or cabbage may be more frost-tolerant than others. If you have harsh winters, selecting the most hardy varieties will help extend your growing season! Different plant cultivars also have varying ‘days to maturity’, which is important to consider if you have an especially short growing season. Choosing faster-maturing options can help maximize your harvest before the deep freeze sets in.

Know your frost dates
Get familiar with your area’s first and last frost dates of the year, and plan around them accordingly. Most vegetable seeds or seedlings have instructions based around frost dates, such as “transplant 2 weeks after last spring frost” – and then be ready to cover them if frost comes later than expected! We use our Homestead and Chill planting calendar as a guide. Grab your own calendar here; I made one for every USDA hardiness zone! However, keep in mind that the average frost dates are just that: averages. The calendars are meant to be a general guide since there are always unique microclimates and other variables to consider.

2) Harden Off Seedlings
Imagine you’ve spent weeks or even months raising seedlings that you grew from seed indoors. The day has finally come to plant them outside, and you’re stoked! But hold on just a moment… Have you taken the time to properly harden them off? If not, all that hard work could be for naught. Young seedlings are more sensitive to temperature swings than established plants, and indoor-raised seedlings are even more so! Therefore, it is best practice to always harden seedlings off before transplanting them outside.
‘Hardening off’ is the process of gradually introducing seedlings to outdoor conditions over the period of a week or more. The process strengthens them, and reduces the risk of shock or injury that could otherwise be caused by wind, rain, direct sunlight, heat, or cold. By hardening off your seedlings, it also helps protect the plants from frost damage. See this article to learn more about how to harden off seedlings. (It usually isn’t necessary to harden off nursery-started seedling).

3) Check the Weather Forecast
As a gardener, I’m always keeping an eye on the weather forecast. Fluctuations in weather impacts when and how much to water, the best time for transplanting, and definitely the time to act and protect plants from frost! In spring, a late unexpected frost can be detrimental to heat loving-crops like peppers or basil. In fall, an early freeze could take out your just-planted seedlings, or the last of your tomato plants that are still loaded with fruit.
Check the weather regularly. Have an action plan and supplies readily available to protect plants from frost when it’s in the forecast! Many northern gardeners leave hoops on their garden beds year-round, making it easy to throw a cover over when needed.
4) Cover Plants
When you’re expecting frost, cover your plants! Well, the tender or less-hardy plants at least. Even mature cool-season vegetable crops will appreciate the added protection of a cover when temperatures dip below freezing, especially for an extended period of time. The use of covers is one of the most effective ways to protect plants from frost damage. Covering vulnerable plants provides them added insulation and a shield against the icy moist air. It also helps to warm the soil, which is especially helpful to get a jump start on your summer garden during a nippy spring.
Types of Frost Covers
- Something as simple as an old bed sheet, blanket, drop cloth, roll of burlap, or sleeping bag can help protect plants from frost damage.
- Specialized frost cover material is also available to buy, known as horticultural fleece or frost fabric. It comes in various sizes, shapes, and temperature ratings. (See the chart below). We buy large sheets/rolls and then cut it fit over individual garden beds. In our mild climate, we use a fairly lightweight frost cloth (0.55 oz). Colder climate gardeners would want to use thicker options like this 1.2 oz frost cloth, or this heavy-duty 1.5 oz frost cloth. Some specialized frost covers are designed and shaped to fit neatly over shrubs or small trees, like this one.
- Sheets of thick plastic (like greenhouse plastic, or even a tarp) can be used in a similar manner as fabric row covers to protect plants from frost and snow. When supported on hoops, they’re referred to as polytunnels.
- Cloches are solid domes that cover and protect individual plants, usually made of clear plastic. You can purchase cloches or turn average buckets, food storage containers, cut milk jugs, 2-gallon soda bottles, or other random materials into homemade ones!
- Cold frames are small structures that cover plants, designed to protect them from freezing conditions. Similar to a mini-greenhouse, cold frames made of transparent materials such as clear plastic or glass that allows sunlight in. They are constructed fairly low to the ground and close to the plants. Create a simple DIY cold frame by laying old windows or frames of plastic over a raised garden bed.
|


Tips on Using Frost Covers
- If possible, keep row covers (blankets, sheets, etc) slightly elevated above the plants by supporting them on hoops, stakes, or other clever means. This is especially important when plastic sheeting is used to protect plants from frost. If the covers are in direct contact with the plants and become wet and frozen themselves, that can be transferred to the plants below.
- Secure the covers to hoops with clothespins, binder clips, or other specialized clamps. Also be sure to tuck the covers in (or pin them down) around the sides and bottom as much as possible. We love these durable metal clamps, which clip right on to the side of our raised beds. These mini clips are ideal for attaching the row covers right to our wire hoops. (We usually use a combination of both types.)
- In a pinch or hurry, it’s usually okay to lay frost covers directly on plants. That is, as long as it’s lightweight and/or the plants are mature enough that it won’t smash them. It’s better to lay something right on top than not cover them at all!
- Put out your covers in the evening to protect plants from frost overnight. You can typically leave transparent cloches, sheet plastic supported on hoops, and specialized frost covers on during cold days as well. Yet if you’re using thick blankets, opaque sheets, or dark buckets, it is best to remove the covers during the day. Pull them back in late morning as temperatures warm so the plants can continue to get sun and photosynthesize. Plants can survive without sunlight for a few days, but will become increasingly unhappy the longer they’re covered.
See this article for a more in-depth look at using hoops and row covers for pest control, frost protection and shade (including DIY hoop options).


5) Protected Planting Site Location
Careful site selection for frost-sensitive plants will make both of your lives easier! Tender plants will be significantly more happy in a protected location. Plus, you’ll save time, energy and stress by not having to fuss over them so much. Therefore, it’s best to avoid planting tender perennial plants in open spaces where they’re fully exposed to cold air and wind.
You can find or create a microclimates within any yard space! For example, planting less hardy trees and shrubs near a west or south-facing wall will provide valuable radiant heat and create a space that is several degrees warmer than nearby open areas. It will also help to block chilly gusts of wind. Large shrubs, fences, boulders, and canopy cover from trees offer similar protection for nearby plants. The photo of our front yard above is a perfect example. Tucked between mature trees and along our west-facing fence (and the neighbor’s tall house) we have frost-sensitive bougainvillea, avocado, loquat, and fig trees.
Move tender potted plants indoors, against the house, under eaves, or even under the shelter of a tree to protect the plants from frost. Mobility is a definite perk when it comes to container-grown plants! On the other hand, pots don’t offer the same level of insulation to the soil and roots as in-ground plants receive. Thus, you may want to wrap the pots of especially sensitive plants (or, on freakishly cold nights) with a blanket, horticultural fleece, or even bubble wrap for added protection. Clustering many potted plants together also helps.

6) Mulch
Cover that bare soil! Applying a nice deep layer of organic mulch around the base of shrubs, young trees, evergreens, or tender perennials will help protect the plants from frost damage. Aim for about 2 to 4 inches deep. You could even cover low-lying plants completely with a layer of fluffy mulch (such as straw) for a short period of time.
Mulch adds a protective layer that insulates soil, holds in warmth, and can prevent the ground (and roots) from freezing. This goes for potted plants too! A few excellent mulch options include compost, small bark, wood chips, straw, and chopped leaves or leaf mold. Read more about the pros and cons of 8 popular types of garden mulch here.

7) Water before a frost
It may sound a little counter-intuitive, but watering your garden before an exceptionally chilly evening can help protect plants from frost damage. Stressed, thirsty plants are more susceptible to frost damage. Also, damp soil provides superior insulation, holds in heat, and freezes less deeply than dry soil. When frost is looming, water earlier during the day. This gives the plants ample time to absorb water and get perky for the cool evening ahead. Keep in mind that damp soil is good, but overly soggy soil could actually make the problem worse. That goes for any time in the garden!
Take care to water the soil only and not intentionally wet the plant’s leaves. One frost prevention trick used in the agricultural industry is to directly spray plant foliage with water. However, that method is most effective when the water is continually sprayed throughout the period of freezing (such as overnight via overhead sprinklers in an orchard or vineyard) – not as a single application of water before a frost. When the spraying ceases, the water droplets left on the plant leaves will freeze.

With a little helping hand, your plants will be just fine!
All in all, many plants are more resilient than we think. Even tender veggie plants may recover from leaf scorch, wilt and browning caused by frost. Just give them some time. I hope this article gave you a few new ideas to extend your growing season! Did I miss any clever ways you protect your plants from frost? Let me know in the comments below, and feel free to ask questions as well.
To dive even deeper into the world of winter gardening, I highly suggest the book “The Year Round Vegetable Gardener” by Niki Jabbour. If you found value in this article, please spread the love by sharing it. As always, thank you for tuning in!
Don’t miss these related articles:
- Using Hoops and Row Covers: Pest Control, Frost Protection & Shade
- Garden Mulch 101: When, Why and How to Mulch Your Garden
- Pros and Cons of 8 Garden Mulch Types: Straw, Bark, Compost & More
- The Benefits of No Till (No Dig) Gardening
- How to Design and Build a Raised Garden Bed
- Raised Garden Beds Vs. In-Ground Gardens: Pros and Cons


5 Comments
Eden
Great article for garden frost protection. Thank you for giving ideas on how to maintain the beauty of the garden. Hope to read more from you.
Debbie
One year we got an unexpected frost and I had read somewhere that if you watered the plants before the sun hits them (the sun breaks down the cells apparently) the plants can usually be saved. It worked but I wouldn’t want to chance it every time.
Edward Cantarella
Great article. A tarp can help tremendously. I’m in Michigan, one eyar I planted(before 10 day forecasts) and freaked out – snow in late MAY!!! Threw every tomato cage I had out there for support, threw on a 30X60 tarp and prayed. 3 days later I looked. Better than just good – they actually thrived. I left the tarp on for a week after that. Didn’t want that hassle again.
Anne T.
Hi Deanna,
I live in Santa Barbara and subscribe to your website, Homestead and Chill.
My lantana I planted in late August has splotchy leaves, a dusty type of mold underneath it, and stems with no flowers? Is this a bug? Or winter blight?
Could you recommend a product to treat the disease?
Thank you,
Anne
Aaron (Mr. DeannaCat)
Hello Anne, thank you for being a member of the community! It sounds like your lantana has powdery mildew, they should not be grown in the shade and may be more susceptible to mildew if done so. The ways to control powdery mildew are to spray with fungicides such as Green Cure or MilStop Broad Spectrum Foliar Fungicide which are mostly made of potassium bicarbonate. It is best to apply the foliar spray as a preventative to plants that are more susceptible to mildews. I have found that using a routine foliar spray with neem oil also helps to prevent mildew, here is the article if you are interested in looking into it further; How to Properly Emulsify Neem Oil & Make a Safe Garden Pest Spray. Hope that helps and good luck!