


17 Ways to Save Water in the Garden and Landscape
Water is necessary for all living things to survive and thrive. It’s what makes life on Earth possible! Yet fresh water is a finite resource and becoming increasingly scarce. 30 to 50% of all residential water is used for landscape irrigation, but the EPA estimates that half of the water used outdoors goes to waste due to inefficient watering practices! Not good.
That’s not to say we shouldn’t be using water outdoors though. Trees, shrubs, flowers and edible gardens are all very worthy of water! Plants help to feed us, absorb heat and carbon dioxide from the atmosphere, provide shade, stabilize soil, and offer habitat for wildlife. We just need to do better with how we maintain them.
Read along to learn 17 different ways to save water in the garden and increase drought resilience. Whether your goal is to cut your water bill or be more eco-friendly, many of these water-saving tips are actually best for plant health too! A water-wise garden doesn’t necessarily mean xeriscaping with rock and cacti either. It’s possible to grow lush, vibrant, beautiful gardens while still being conscious of water use.
Ways to save water in the garden, a glance:
- Stop overwatering
- Reduce or eliminate grass lawn
- Mulch, mulch, mulch!
- Use drip irrigation
- Water deeply but less frequently
- Adjust with seasons and weather
- Choose drought tolerant and native plants
- Repair leaks
- Amend soil with organic matter
- Use ollas
- Water at night
- Plant densely
- Automate, timers, and valves
- Collect rainwater
- Swales, berms and land contouring
- Prioritize and compromise
- Greywater systems
Now let’s briefly discuss each of these water-saving techniques, one-by-one!

1) Stop overwatering
Overwatering is one of the most common mistakes in the garden. Even the most well-intended plant parents sometimes give their plants more water than they actually need to get by – houseplants and seedlings included! Plants breathe through their root systems, and most of them do not like to be constantly soggy. Rather, most plants prefer only modestly damp soil and will tolerate when the soil dries out just slightly between watering. So, err on the conservative side rather than being heavy-handed with water!
Unfortunately, I can’t tell you exactly how much and how often to water. That varies greatly depending on your climate, soil type, plants, and more. Finding the perfect watering schedule for your landscape will take a little research and experimentation on your part. But get in there and feel how damp or dry your soil (check several inches below the surface) is before watering again!
If you’re trying to cut back and save water in your garden, gradually reduce the water and see how the plants respond. Watch for wilting, yellowing, dry or crisping leaves – all signs that a plant may need more water again.

2) Reduce or eliminate lawn areas
Lush green lawns are a thing of the past. Once a sign of prestige, grass lawns scream “wasteful” nowadays – especially in dry climates like California. Maintaining a green lawn requires an exorbitant amount of water, and isn’t doing the environment many favors in return! Lawns don’t offer food or habitat for native wildlife and pollinators, and instead, usually rely on chemical fertilizers and herbicides to keep up their neat appearance.
With over 40 million acres of lawn in the US alone, watering grass accounts for literal trillions of gallons of water used per year. Plus, lawn sprinklers are notoriously the most wasteful type of irrigation you can use due to overspray, runoff, and evaporation. On the other hand, woody plants, shrubs, and other non-turf plants can thrive with 55% less water than that needed to maintain typical fescue lawn.
If you would like a small patch of green space for kids or dogs, consider using native low or no-mow grasses, or even clover. Otherwise, eliminating lawn areas will help you save a ton of water in the garden! Please see this guide to learn how to kill, smother, or otherwise remove your lawn – so you can use valuable water to grow more beneficial things like food, flowers, and shrubs instead.

3) Mulch
Mulch, mulch, and more mulch! Okay, more isn’t *always* better, but providing 2 to 4 inches of mulch over bare soil is absolutely essential to save water in the garden. Naked soil is just begging to dry out! Mulch protects and insulates soil, reduces evaporation and runoff while simultaneously buffering the soil (and plant roots) from temperature extremes. The top few inches of soil especially will stay damp far longer when mulched than when exposed to air and sunlight.
Popular organic mulch options for the garden include wood chips, bark, compost, straw, and leaves. Gravel acts as mulch too, but is usually used in pathways and open spaces rather than directly around plants. Learn more about mulching best practices here, and explore the pros and cons of 8 different mulch types in this article.

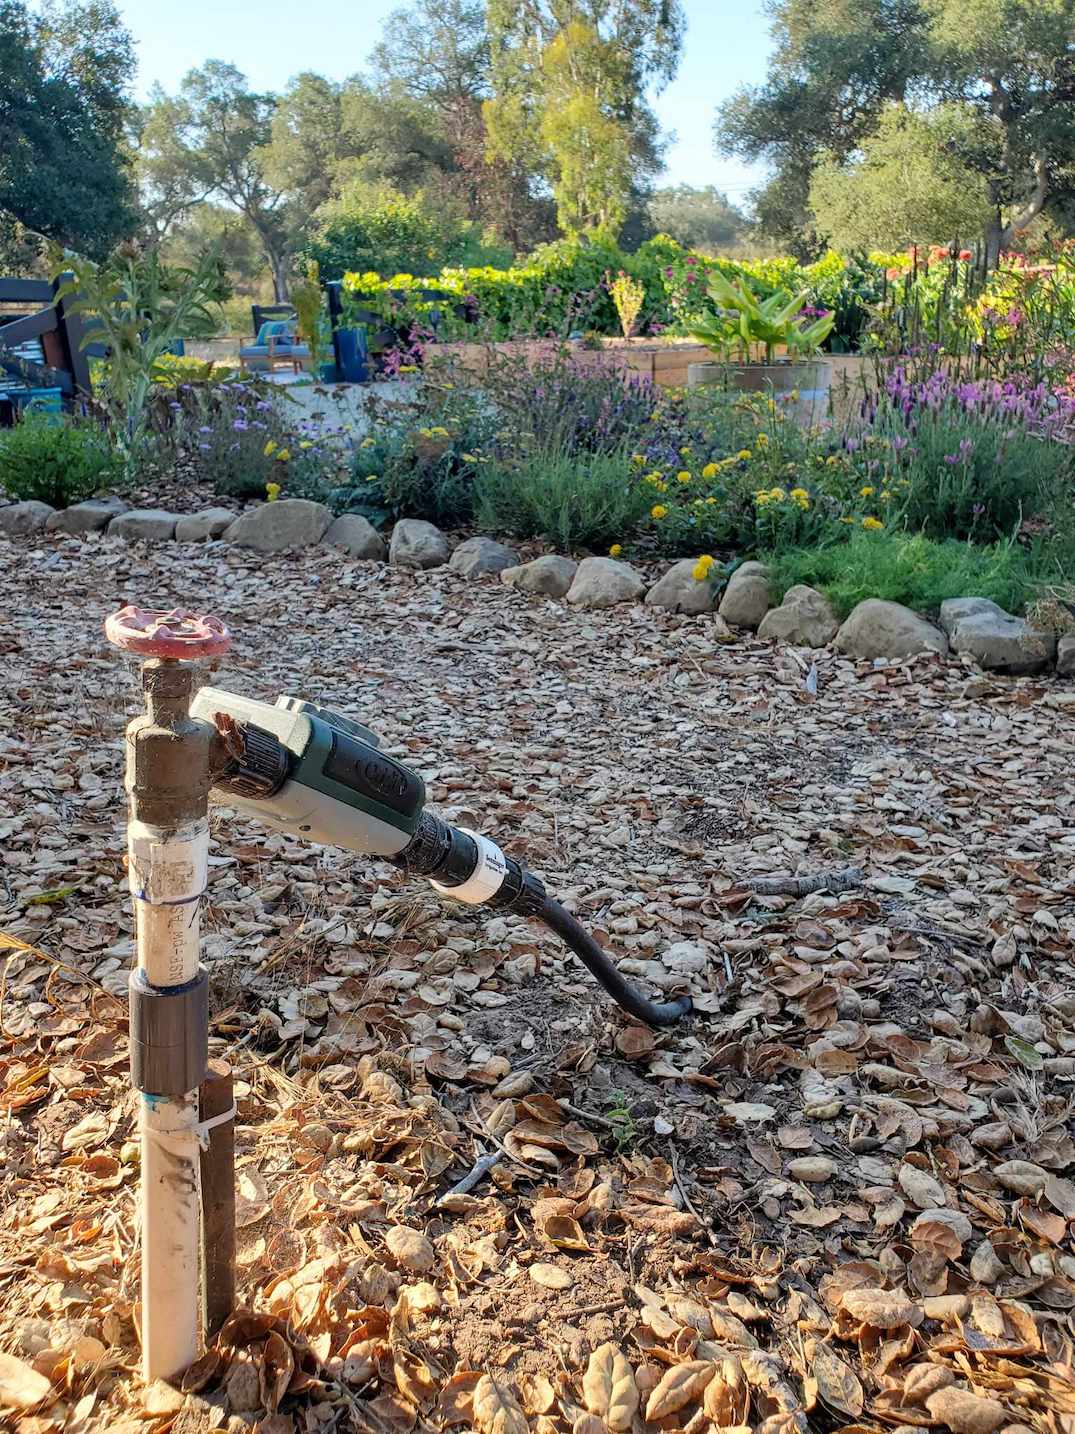
4) Switch to drip irrigation
Compared to overhead sprinklers, drip irrigation can save significant water in the garden! According to the UC Master Gardener Program, drip irrigation is up to 90% efficient while sprinklers OR hand-watering are only 50 to 70 percent efficient. Drip emitters disperse water only where needed at the base of each plant. Specialized emitters, bubblers, and other attachments enable you to tailor your drip system to a wide variety of plants, applications, and flow rates.
Drip irrigation systems eliminate wasted water that goes hand-in-hand with traditional sprinklers, avoiding overspray, runoff, watering walkways, or space between plants. Not watering unnecessary areas also helps reduce unwanted weed growth! When water is sprayed up into the air, it also evaporates much faster – sometimes before it even hits the ground.
Drip irrigation also saves water in the garden by delivering smaller volumes and more slowly. Slow drip irrigation gives the water more time to soak into the soil, which reduces runoff and nutrient leaching – ideal for sloped or flat gardens alike. It also means the water penetrates the soil more deeply, which results in deeper root systems, healthier plants, and moist soil for a longer period of time.


5) Water deeply and less frequently
If they had to choose, plants will always prefer deep, slow, and less frequent watering sessions over frequent bouts of shallow water or flooding. For instance, we run the drip irrigation in our raised beds, orchard and general landscape for about an hour twice per week, which is far better than turning it on for 20 or 30 minutes every day or two.
By offering slow deep water, the soil stays damp longer – reducing overall water demand. Even better, plant roots will grow nice and deep, following where the water goes. Deep-rooted plants are more drought tolerant, resilient to temperature swings, and grow larger. In contrast, offering shallow water more frequently encourages plants with shallow root systems that are generally less healthy.

6) Adjust with seasons and weather
Adjusting your irrigation schedule with the seasons is another important way to save water in the garden. For instance, we change our irrigation timers to reduce both the duration and frequency of water during the cooler months of late autumn, winter and early spring – even if it’s not raining much here! Most plants go dormant or semi-dormant during the darker days of winter, so they need less water overall compared to when they’re actively growing, flowering or bearing fruit. The same applies to houseplants!
Also keep an eye on the weather forecast. When rain is on the horizon, be sure to turn off all your automated irrigation systems until things dry up again. Many modern irrigation controllers have a rain sensor setting or other seasonal control options too.

7) Choose drought tolerant and native plants
Choosing drought-tolerant plants or those native to your area will help save water in the garden. Yet again, that doesn’t mean you need to fill your garden with ONLY natives and extra drought-resistant plants like cacti and succulents. Woody shrubs, herbs, and flowers are already a more water-wise choice than grass lawn. Some of our favorite low-water plants include lavender, rosemary, various salvia and sages, yarrow, echinacea, agastache, catmint, verbena and lantana. We love to grow agave, cacti and succulents too! Avoid water-loving tropical plants in dry, arid climates.
Related: Top 23 Plants for Pollinators to Attract Bees, Butterflies, and Hummingbirds

8) Watch for and repair leaks
Stay vigilant and watch for unusual wet spots, runoff, dripping fixtures, or suspicious extra-green patches that may be getting “free” water from somewhere. We’ve discovered and repaired many holes and tears in our drip tubing (usually thanks to gophers chewing on them) after observing an odd bloom of weeds in an otherwise dry area.
The EPA explains that a single leaky faucet that drips one time per second can waste up to 3,000 gallons of water per year! So tighten or replace leaky faucets, and use plumbers tape to help stop dripping threaded connections. If needed, call in a plumber or irrigation specialist for help. Finally, don’t just let your hose run free when it’s on! Use a trusty hose nozzle on the end that shuts off the flow for you.

9) Add compost and organic matter to soil
Soil composition plays a significant role in how well it retains water. Sandy soil drains very quickly and therefore dries out fast. The same goes for extra fluffy potting soils, especially those “made for containers” with a lot of perlite. On the other hand, clay soil has the potential to hold a lot of water, but is often so dense and compact the water runs right off instead of being absorbed.
Amending your soil with organic matter like well-aged compost and worm castings will greatly benefit sandy and clay soil alike. Water is naturally attracted to organic matter, which is perfectly suited to absorb and retain it like a sponge. Organic matter also breaks up hard clay soil, providing more air pockets and space for roots to grow and breathe. We also like to add small ⅜” volcanic rock to our raised garden bed soil. The lava rock is both absorbent and porous, which helps with overall moisture balance – promoting good moisture retention AND drainage.
Even better, did you know that compost and other amendments can make plants more resilient to drought? The nutrients and beneficial microbes found in compost enhance overall soil and plant health, especially when paired with deep watering practices. Robust, healthy, deep-rooted plants are more resilient to environmental stress, including drought, disease, and pests. Meaning, they’ll be able to hang with a little less water.
Related:
- How to Amend and Fertilize Garden Soil
- Composting 101: 6 Ways to Compost at Home
- How to Fill Raised Beds with the Perfect Organic Soil
- How to Make Actively Aerated Compost Tea to Feed Your Garden

10) Use Ollas
Ollas (pronounced oy-ya or oh-ya) are amazing little tools that save water in the garden! Traditionally made of porous clay, an olla is a container or vessel that’s buried in the soil and filled with water. Via osmosis, water then slowly seeps out through the walls of the vessel to irrigate the surrounding soil.
Much like drip irrigation, ollas have the benefit of delivering water slow and deep. They usually aren’t used as the sole form of irrigation (with the exception of in containers), but can help offset the frequency and amount that you need to provide other water – and also prevent soil from yo-yoing between extreme wet and dry!
The really neat thing is, water will only seep from the olla if the soil needs it. So, ollas are also a great gauge of how dry your soil is, or how well you’re watering in general. If they empty very slowly over several days, your soil is probably nicely moist. In contrast, if the olla empties rapidly after filling it, the soil must be very dry and thirsty.
Before we had automated drip irrigation, we used ollas in combination with BPA-free soaker hoses to water our raised garden beds. Now, we still use ollas in large grow bags, wine barrels, and other big containers! Save 5% off GrowOyas (our favorite ollas) with code “deannacat”.


11) Water at night
It’s best to set automated irrigation timers to go off sometime between 6 pm and 6 am. Watering plants overnight (including in the evening or early morning hours) helps save water in the garden by reducing evaporation. As opposed to during the heat of the day, providing water when it is cool and dark gives plant roots ample time to absorb water before the sun hits and starts to dry soil out.
12) Plant densely
Densely planted spaces use less water per plant than sparsely planted landscapes. Meaning, 20 shrubs planted in clusters or fairly close to one another will require less water to maintain than those same 20 shrubs if they were more spread out. Similarly, full garden beds retain moisture better than partially empty ones. Dense plant cover shades the soil which reduces evaporation, while smothering weeds and increasing both biodiversity and yields.
Yet don’t confuse dense planting with overcrowding! Try to still respect the recommended spacing for each plant species, as crowding plants can lead to issues with disease, pests, airflow, nutrient competition or stunted growth.

13) Get in control with timers, zones and valves
Using automated timers and controllers is a great way to save water in the garden, and can save loads of time and effort too! Irrigation control systems are set to deliver only the amount of water the plants need, and at ideal times (such as overnight). With timers, you don’t have to worry about turning on the water and accidentally forgetting to turn it off.
We use a variety of controllers and timers in our garden, including a larger Hunter controller for our main 6-station landscape irrigation hub, along with several of these easy garden hose/faucet timers in other areas. Even if you don’t want a timer that turns the water ON for you, these simple hose timers will turn it off after a set amount of time. They operate much like an old school count-down oven timer.
Since different plants have varying water requirements, breaking your landscape irrigation up into different zones is also key. For instance, our orchard is on a separate irrigation zone from our raised garden beds, plus other zones for the perennials and ornamental trees. Then we can run the zones for different days, times, or turn some off completely as needed. We also installed individual shut-off valves at every raised garden bed so we can turn off individual beds to save water when they don’t have crops in them.


14) Set up a rainwater collection system
Did you know that you can collect over 600 gallons of water from a 1000 square foot roof in a single 1-inch rainstorm?! Harvesting rainwater is a fantastic way to get “free” water for your garden and offset your water bill. Plus, plants absolutely thrive with fresh natural rain water compared to chlorinated city tap water.
Rainwater collection systems can be as simple as a 50 gallon barrel at the end of a gutter downspout, or as elaborate as multi-thousand gallon tanks and pump systems. Check out this guide to learn all about setting up and using a basic rainwater collection system, along with frequently asked questions about size, regulations, roof types, contaminants, mosquitoes and more.

We had a pretty sweet little rainwater collection system in our old garden, and it’s definitely on our “to-do” list for the new homestead too! Collecting and using rainwater can be a bit tricky in arid climates like ours though. Since we get all of our annual rainfall over a short span of time (it only rains in winter here), it’s best to have large tanks with ample storage capacity – to be able to capture as much rainwater as possible at once, and have enough stored to hopefully last until it rains once again the following year. Folks with more frequent rainfall throughout the year can get by with much smaller systems since its constantly refilling.
15) Swales, berms, and water-wise landscape design
There are a number of ways to work with the contours of the land to passively increase water efficiency. Swales are a technique used in permaculture that relies on trenches or depressions in the ground (either man-made or natural) to direct and channel water runoff to key areas. For example, swales around fruit trees can concentrate and increase the water each tree receives, rather than the water absorbing in the empty spaces between the trees. Similarly, terracing and/or raised berms help to reduce runoff and increase water absorption on sloped terrain.
I highly suggest the book Gaia’s Garden if you’re interested to learn more about home-scale permaculture.

16) Prioritize and compromise
When push comes to shove (say, if you’re facing mandatory water reductions or penalties) you may need to simply evaluate and choose what plants in your garden get first priority. For instance, we are fully prepared to let the existing ornamental shrubs in our front yard die if needed, while funneling our water use to our more valuable edibles and pollinator gardens instead. In fact, we already cut all the landscape irrigation in half from what the previous owners provided. I told the plants: “Sorry, but if you can’t hang with this, you aren’t meant for this California garden.” Some have died, and that’s okay.
On that note, don’t feel stuck keeping up a landscape that you inherited and doesn’t jive water-wise! We’ve removed plenty of established plants after moving to a new home.
The existing garden space at our new homestead had a lush catmint border along the center brick pathway. While it was beautiful at first, it became really infested with leafhoppers that were impossible to treat organically. Plus, even though catmint is native and drought tolerant, there were over 60 plants total – with a 1 gallon per hour drip emitter each! Under the previous owners watering schedule, just those catmint plants alone were using 420 gallons of water every week! Again, we’d already cut that schedule in half, but that’s still 200+ gallons of water that could be used for better things.

17) Reuse greywater
Last but not least, consider using recycled water in your garden! Sustainable greywater systems capture used water from household fixtures including sinks, showers, tubs and washing machines (but not toilets, dishwashers, or the kitchen sink – that’s blackwater). Instead of sending water down the drain to the sewer, it’s redirected to reuse in landscape irrigation.
Greywater systems are fantastic, but can be costly and complicated to install (especially if you don’t have a raised foundation). Since it requires retrofitting your home’s plumbing, engineering, permits, and skilled professionals are typically involved. So, the first step is to contact your local building department to see what the requirements are! Laundry-to-landscape greywater systems are usually the most straightforward and inexpensive to install, and often do not require elaborate permitting or engineering.

And that concludes this lesson on ways to save water in the garden.
Well folks, if you made it to the end – good for you! Thank you so much for reading, and for caring about water conservation. If you found this information to be useful, please consider pinning or sharing this post! Also, don’t forget to consider all the ways you can save water indoors, and therefore offset some of your landscape water use too! Check out this great guide on indoor water conservation for some ideas.
Otherwise, you may also enjoy these related articles:
- Installing Drip Irrigation (Drip Tape) for Raised Garden Beds (video included)
- How to Install Drip Irrigation to a Hose Bib or Faucet (video included)
- How to Build a Raised Garden Bed (video included)
- Rainwater Harvesting 101: How to Set up a Rainwater Collection System
- How to Set Up Drip Irrigation for Containers, Wine Barrels, Grow Bags and More
- How to Remove or Kill Grass (and Grow Food, Not Lawns!)
- Garden Irrigation Solutions: DIY, Efficient, & Toxin-Free Watering Options
- Composting 101: 6 Ways to Compost at Home

,


You May Also Like

Easy Low Sugar Peach Jam Without Pectin (Canning or Freeze)

Roasted Two-Bite Garlic & Herb Smashed Potatoes
