


How to Grow Garlic: Seeds, Varieties, Harvest, Curing, Storage & More!
Do you dream of having your own fresh, spunky, health-promoting garlic, straight from your garden to your kitchen? Well, you’re in luck. Because this ancient bulbous, herbaceous vegetable is easy to grow, and can be successfully cultivated in pretty much every climate. All you need to know is what kind of garlic is suited best for your location, along with few tips to help you along the way.
So, let’s talk garlic! What is the difference between hardneck and softneck garlic? Which should I choose? When do I plant garlic, and how do I know when it is ready to harvest? What’s up with the whole drying, curing, and storing process? This article will answer all of these questions, and more. I’ll provide you some tips about planting, fertilizing, using, and preserving garlic too. I hope this will help make all of your homegrown garlic dreams come true!
**If you’ve already planted your garlic and are mostly interested in harvesting tips – jump to the harvest, curing, and storage section here.
Choosing What Kind of Garlic to Plant: Softneck or Hardneck?
There are dozens of varieties of garlic to choose from: Inchelium Red, Music, German White, Creole, Spanish Roja, California Early White… the list goes on! Some are more spicy or mild, larger or smaller, or earlier-maturing. However, out of all of the many types, garlic will fall into one of two categories – hardneck or softneck.
Choosing the right type of garlic can make or break your success in growing it. For instance, planting a variety not well-suited for your climate can lead to underdeveloped, smaller heads. Just as you do when making other veggie selections, read each unique variety description!
I recently wrote an entire article dedicated to this topic, so feel free to check it out here for a more in-depth look at the difference between hardneck and softneck garlic. That article also highlights the top 12 most popular varieties of garlic, 6 of each type.
In a nutshell, the key differences between hardneck and softneck garlic are as follows:
Climate
Hardneck varieties tend to thrive in regions with more severe winters. They require a greater period of vernalization, which means a prolonged exposure to cold weather. Therefore, those long freezing winters that you may dread are actually ideal for hardneck garlic to grow!
On the other hand, softneck varieties tend to do best in regions with significantly milder winters, like here on the Central Coast of California. We have very rare frosts, and no freezing weather to speak of. That said, softnecks can still survive and grow with some freezing temperatures! This is particularly true if they’re provided a good deep layer of mulch like straw or leaves for added protection.
Both types of garlic should be deeply mulched over winter in places with freezing conditions. Instead of snow, we get rain in winter. Since we don’t want the soil to stay overly wet and risk rotting the garlic bulbs, we skip the deep mulch to help the garden beds dry out a bit between rain.
Bulb Development & Storage Potential
Softneck garlic varieties usually produce a larger bulb, with more individually-wrapped cloves inside. On the other hand, hardnecks typically have fewer individual cloves – but each clove can be larger, with thinner skin and easier to peel. Because softneck garlic cloves are so tightly individually wrapped, they have a longer storage life after harvest. Softneck garlic has the potential to stay firm and fresh for up to 9 months when stored properly!
On the more tender side, hardneck garlic has a shorter shelf life. Even after being properly cured, hardneck garlic bulbs may start to go soft and spoil after about 3 to 4 months, though they may hold up longer. Therefore, you’ll want to use it fresh, re-plant some as seed, or preserve it within that time frame. We’ll talk more about all of that below!

Scapes
Hardneck garlic will grow an edible flowering stem, called a garlic scape. In contrast, softneck garlic does not produce scapes. The scapes grow up and out from the center of the hardneck greenery close to harvest time. Garlic scapes are highly sought-after! They’re similar to delicious, garlic-flavored, long tender green beans – an awesome addition to pesto, or any meal!
When scapes develop, harvest them! Most gardeners wait until they form one nice curl, and then cut them down at the leaf line. However, if you allow the scapes to grow for too long, they’ll draw energy away from the developing bulb.

Flavor
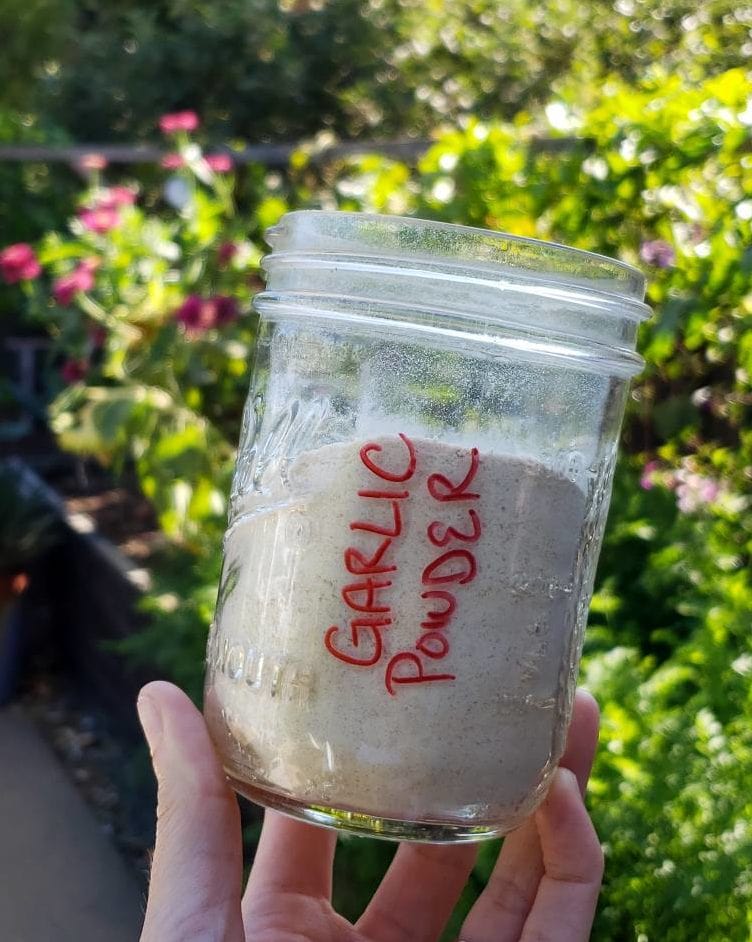
In terms of flavor, hardneck garlic varieties are said to have a more complex flavor profile than softneck garlic, described as being richer, spicier, and generally more “garlicky”. This, combined with its shorter shelf life, make hardneck garlic especially perfect and pungent for dehydrating into garlic powder. Both types have stellar flavor though! Like I said, we grow a lot of softneck garlic here, and it is plenty pungent and garlicky for our liking. You really can’t go wrong either way, because as with most things: homegrown garlic is SO much better than anything you’ll find in the stores.
Now that you have a good idea of what type of garlic may best suit your needs, have fun shopping!
Where to Get Garlic Seed
When it comes to garlic, “seed” means cloves! One planted clove will develop into one bulb of garlic. If you search around online, there are tons of sources for garlic seed! Check out Seeds Now, High Mowing Seeds, Botanical Interests, Peaceful Valley, or Adaptive Seeds, just to name a few. We have purchased garlic seed from all of them throughout the years. In addition to ordering online, seed garlic is sometimes available for sale at our local Farm Supply or Ace Hardware nursery, but the varieties are limited.
Even though garlic isn’t planted until the fall, try your best to plan in advance and order your garlic seed early! Most online retailers will open up pre-orders for garlic during the summer, and will ship it out in late summer to early fall. We just ordered ours – it is currently late July. Here is the kicker: many places sell out fast and early! If you wait until planting time, you’ll have very slim pickings.
Check your farmer’s market too! The garlic they sell locally should grow well in your region. In a pinch, you can plant organic garlic cloves from the grocery store, but success is slightly less guaranteed. Also, you’ll have less control over the selection available (stores usually sell softneck). If you do go this route, I emphasize: get organic! Inorganic produce is often irradiated or treated with sprouting inhibitors. Ew.

HOW TO GROW GARLIC
When to Plant Garlic
Garlic has a crazy long growing season! It is traditionally planted in the fall, usually sometime between late September to late November, depending on your climate. Mid-October is a safe bet for most locations. We generally plant our garlic in the last week of September or first week of October.
After planting, the cloves should begin to sprout in the fall, and also start to establish their root systems. They’ll go dormant over the winter, resume growth in the spring, and be ready to harvest early to midsummer. If you miss the window for fall planting, cloves can also be planted in late winter to early spring, as soon as your soil thaws enough to work. However, fall planted garlic will produce bigger, superior bulbs.
Preparing Garlic Seed to Plant
Once you have your seed, carefully break apart the whole bulbs into individual cloves. Leave the papery cover on each clove though! It is recommended to do this a day or two before planting. Every clove will form a new bulb or “head” of garlic that contains 5 to 12 new cloves. If you have your choice, select the largest cloves to plant! Larger cloves are said to produce the largest bulbs.
Pre-planting soak (optional):
Years ago, we read a tip about pre-soaking garlic cloves in various solutions to prepare them for planting, and have stuck to it ever since! It isn’t a mandatory step by any means though. The purpose is to provide them with a combination of nutrients and anti-fungal ingredients, to give the garlic seed a jump start to sprout, and also to fight infections and disease!
To create a garlic clove soak, combine 1 Tbsp of baking soda and 2 Tbsp of liquid seaweed per gallon of water, scaling up or down as needed. Given the modest amount of garlic we plant – about two pounds of cloves – we only make a quarter of the recipe. We soak each variety in its own designated mason jar to keep track of which is which. One year we didn’t have liquid seaweed on hand, so we substituted the seaweed with kelp meal instead.
For one quart of water, combine 3/4 teaspoon of baking soda and either ½ a tablespoon of seaweed extract OR 1 teaspoon of kelp meal. Mix well, distribute into your soaking vessels of choice, and add the garlic cloves. Soak the garlic seed in this solution for several hours or even overnight, but no more than 18 hours. When the time is up, remove them from the liquid.
An additional optional step is to give them one quick dunk (a minute or two) in rubbing alcohol. It sounds odd, but it will help further kill any bacteria or fungal spores that may be present. This would be particularly useful if you’re re-planting garlic that was harvested from your own garden, where the likelihood of disease may be higher than fresh seed garlic.
Then they’re ready to go into the soil!

Where to Plant Garlic
Garlic will grow best in a location with full sun. If you’re not using raised garden beds, choose a spot in the ground that doesn’t easily collect and pool water, which can lead to rotting. Avoid planting garlic in the same place year after year, or in the same location that other alliums (like onions) were recently grown. Good crop rotation practices are important to help prevent disease, pests, and nutrient deficiencies.
Growing Garlic in Containers
Even if you don’t have a large garden, or if your garden space is already full of other lovely things, you can totally grow garlic in containers! We planted about a dozen leftover cloves in a grow bag and also a wine barrel one year, and they did just as well as the ones in the raised beds! To grow garlic in a container, follow all the same tips and steps outlined in this article.
I suggest using a wide container with a lot of surface area (rather than deep and narrow), so you can maximize the amount of garlic you can fit inside without crowding them too much. We used this 15 gallon smart pot. Fabric pots like this are ideal since they have excellent drainage. No risk of rotting here! They can also withstand freezing and thawing. However, fabric pots may dry out a little more quickly. Therefore, more mulch and frequent water may be required compared to those in beds or in-ground.
Soil Preparation to Grow Garlic
Garlic thrives in rich, loose, well-draining soil. If your soil is compact and dense, loosen it to about a foot deep.* Work in several inches of organic compost to your chosen planting location, along with a dusting of a mild fertilizer. We usually add a combination of alfalfa meal, kelp meal, and neem seed meals to our garden beds, along with compost of course. You’ll want to go fairly light on the fertilizer at this stage, and plan to add more in the spring.
*Note: If your soil is dense and compact, consider working in a little aeration additive like small 3/8” volcanic rock, pumice, or perlite to help keep it loose and promote drainage. We mix small volcanic rock into all of our raised garden beds, and not just for garlic! Then you won’t have to worry about breaking and loosening it up next time, which is ideal if you like to follow no-till or no-dig practices. To read more about how we create our garden soil, see this article.
How to Plant Garlic Cloves
Plant each garlic clove 2 inches deep, and about 4 to 6 inches apart. I usually pre-poke all the planting holes in the designated bed, and then pop in each clove one by one. Place the garlic clove in the hole with the flat root end down and the pointy end facing up.
For larger varieties, like “Elephant garlic” (which is actually a member of the leek family), provide more spacing between the cloves – up to 12 inches apart, and 4 to 6 inches deep. If you order seed from a company to grow garlic, they will usually include planting instructions with spacing guidelines for you to follow.

Mulching Garlic
To properly overwinter garlic in cold northern climates, heavily mulch the top soil with several inches of loose mulch, like straw, leaves, or even additional layers of compost. Because we are growing garlic in a location with mild and sometimes rainy winters, we skip the deep mulch to help prevent rotten bulbs. Our compost serves as a nice modest mulch layer, which is what we primarily use in all of our raised beds.
Ongoing Care
Garlic is a heavy feeder! A couple times throughout the growing season (while they’re actively growing – which may not be during winter for you!) we add another layer of rich aged compost on top, plus a sprinkle of well balanced slow-release fertilizer. Add fertilizer between the rows of garlic – referred to as “side dressing” – and then water in. We also try to water with either dilute seaweed extract or actively aerated compost tea (AACT) made with worm castings from our worm bin every other month or so, in lieu of its routine watering.
Speaking of watering, it is best to water garlic deeply but infrequently. Allow the soil surface and top inch to dry out between waterings. If it is raining, snowing, or otherwise damp during the winter, do not apply additional water. Again, we’re trying to prevent the bulbs from rotting, particularly during the time the garlic is not actively growing. Once the spring comes and your temperatures rise, maintain an evenly slightly moist soil – which also keeps the soil cool, the way garlic prefers it.
Potential Garlic Disease
While garlic can be very low maintenance and easy-to-grow, it is also prone to several diseases.
“These include, but are not limited to: Basal Rot, White Rot, Downy Mildew, Botrytis Rot and Penicillium Decay. Most of the major garlic diseases are soil-born, so proper site assessment and yearly rotations are crucial in maintaining a healthy garden of garlic.”
Cornell University
We have never experienced any of those issues while growing garlic, so I don’t have much to say about them… If you want to learn more, check out this more detailed article from Cornell University.
The only disease we have ever struggled with is Garlic rust. Garlic rust is a fungal disease that only affects the allium family (garlic, onions, leeks, and shallots). It is virtually impossible to treat organically once it appears, and is common in humid, damp conditions like we often have in the winter. Minor cases are mostly a cosmetic nuisance, but severe infections can lead to decreased bulb size and lessened life in storage. Despite our best crop rotation efforts, we usually end up having some rust appear. Depending on how bad it is that particular year, we have decided to harvest our garlic early to prevent the spreading of rust spores. In that case, we end up with green garlic.
Green garlic can’t be dried and stored long-term like mature garlic can, but we’re still happy when we have it – because green garlic is awesome too! If you end up a similar situation, check out this article to learn more about how to use and preserve green garlic.

When and How to Harvest Garlic
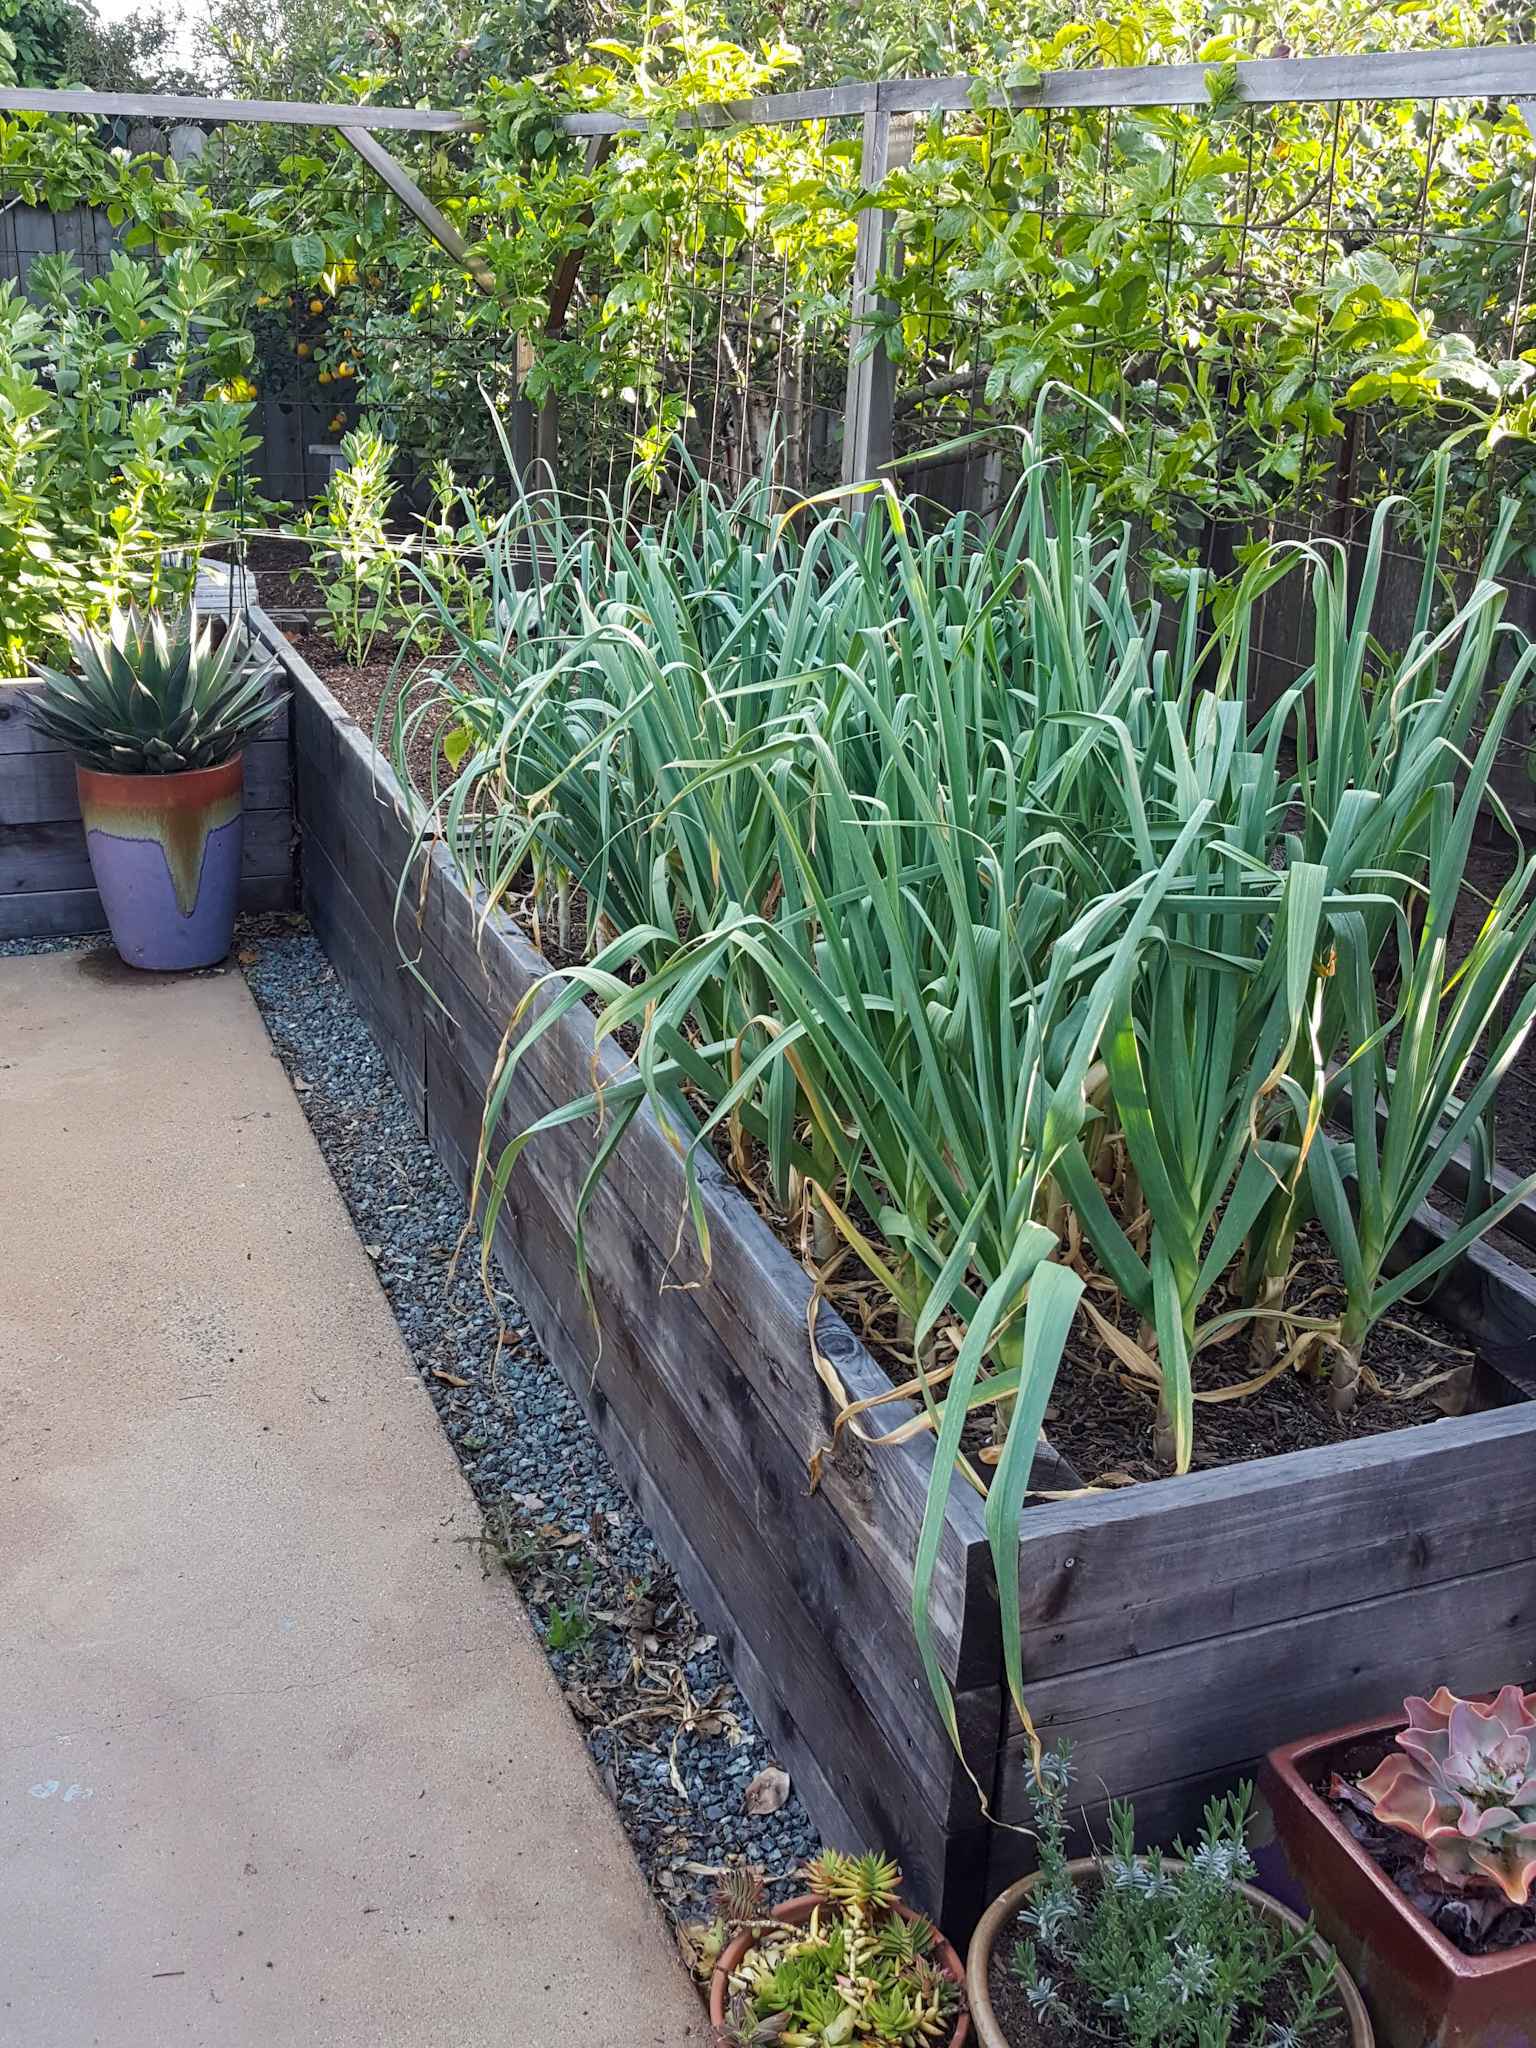
Garlic is typically harvested in early to midsummer. You’ll know when it is getting close to harvest time when a lot of the garlic leaves start to turn yellow or brown, shrivel, and dry up. Garlic is ready to harvest when about one third to half of the tops are yellowing and falling over. If you gently prod and explore under the soil line, you should feel large developed bulbs of garlic! If they’re left in the ground too long, the bulbs may start to separate and not store as well.
When the leaves begin to yellow and you think it is close to harvest time, stop watering. It is recommended to discontinue watering garlic a couple weeks before harvest. This will make the harvest and cleaning easier, and aid in proper drying. To remove the garlic from the soil, gently loosen and dig around the bulbs to unearth them – with the help of a trowel if needed. Try not to pull too hard on the greens if they’re not coming up easily! Also, avoid puncturing, bruising, or otherwise damaging the bulbs as you dig them up.

How to Dry and Cure Garlic
Garlic must be properly cured in order to hold up well in long-term storage, which is your goal, right? Right. So don’t remove those greens! To dry and cure the fresh garlic, store it in a well-ventilated area away from direct sunlight for 2 to 3 weeks after harvesting. Do not wash the garlic. Let it dry out and brush the soil off as needed. Keep both the leaves and roots intact (attached to the bulb) during this process. The garlic bulbs are still drawing important energy and nutrients from them!
If you are feeling fancy, you can braid and hang your garlic. Otherwise, you can just lay them out flat on a wire rack, a screen, slotted shelving, or other breathable surface in a desirable curing location. Our braids usually hang in our dark spare bathroom shower, with an open window and fan. Hey, we’re working with the space we have!
After the 2 to 3 weeks of curing, you can remove the leaves and roots and get them all cleaned up, cutting them off at the top and bottom of the now-dry bulb. On the other hand, you could keep the dry leaves attached to braid and hang if you wish.


How to Store Garlic
Once your garlic is cured and dried, store the bulbs long-term in a dry, dark, cool place. We don’t have a fancy root cellar, so we keep ours in a partially closed cardboard box in our spare “hobby room” which stays fairly temperate and dark. As we already discussed, some varieties will last longer than others, so check on your stored bulbs routinely and give them a squeeze. Make quick use of any that are going soft or starting to sprout!

Preserving and Using Garlic
Get ready for the treat of your life! Homegrown garlic is pretty much the best thing ever. We love adding it to nearly every dinner, or in recipes like our homemade Fire Cider, or in fermented foods like sauerkraut or dilly carrot pickles! Another delectable use is to roast it, then either add it into the dough or spread it on top of homemade sourdough bread. Oh my yum.
There are a several delicious ways to preserve garlic. You can pickle, ferment, or freeze it. Or, our personal favorite: dehydrate and turn it into homegrown garlic powder! Check out this tutorial on how to do just that. For more details about the other garlic preservation methods, see the end of this green garlic article, where I discussed the many ways to do so!
It’s time to go grow your own!
So, what do you think? Are you going to grow hardneck garlic, softneck, or maybe a little of both? I hope you found this article to be interesting and informative! May you be blessed with delicious homegrown garlic, and definitely free of vampires. Please feel free to ask questions, and share this post!


50 Comments
Larry Pokes
Thank you Deanna for this garlic article. I live in Michigan and have grown garlic in my raised beds for a number of years. Yet. As I read your article I still pick up great tips on successful garlic growing. it hits all the key topics any would be grower needs to be successful. My friends and neighbors are amazed at how easy it is to grow garlic and I have passed this article on to them. And now, I’m sure, they will become converts to garlic growing in their own gardens. Thanks for your spot on advice
Aaron (Mr. DeannaCat)
Hi Larry, thank you so much for sharing and we are glad you still found some useful information even though you are a seasoned garlic grower. Thanks for reading and have fun growing!
MARC A .MOORE
Mrs. Deanna.
I’m a some what new to home gardening but I have been gardening for about 4yrs and it’s amazing how much I keep learning about gardening. But for reading your column I learn so much from you about the Veggies to grow and when to plant them (planting in the fall ) and what to plant . A lot of things I didn’t know were fall planting plants but you’ve really taught me alot thank you . And your planting Veggies are awesome to plant I’ve always had success with your seeds 👏🏾👏🏾👏🏾
Aaron (Mr. DeannaCat)
Hi Marc, it’s so great to hear you just keep on learning more and that is really what gardening and life is all about, have fun growing!