


How to Grow Artichokes: A Complete Guide with Photos
Let’s talk about how to grow artichokes! With their delicious edible heads, beautiful silvery foliage, and stunning unique flower blooms, artichoke plants are definitely worthy of a spot in the garden! Artichokes can be grown as an annual, or as perennials in many zones.
This guide will explore everything you need to know to grow artichokes, including ideal growing conditions, popular artichoke varieties, how to start from seed, when and how to harvest artichokes, organic pest control, how to prune and divide artichoke plants, how to prepare and eat them, and more!
We grow artichokes to eat as well as an attractive ornamental in our landscape: tucked in raised beds, wine barrels, and in perennial beds with other pollinator plants. Artichokes will always hold a special place in my heart. Growing up, they were one of my favorite special meals that my Dad made for me. I always think of him when we harvest our own now. I wish he could try one… because homegrown chokes are the best!
What is an artichoke?
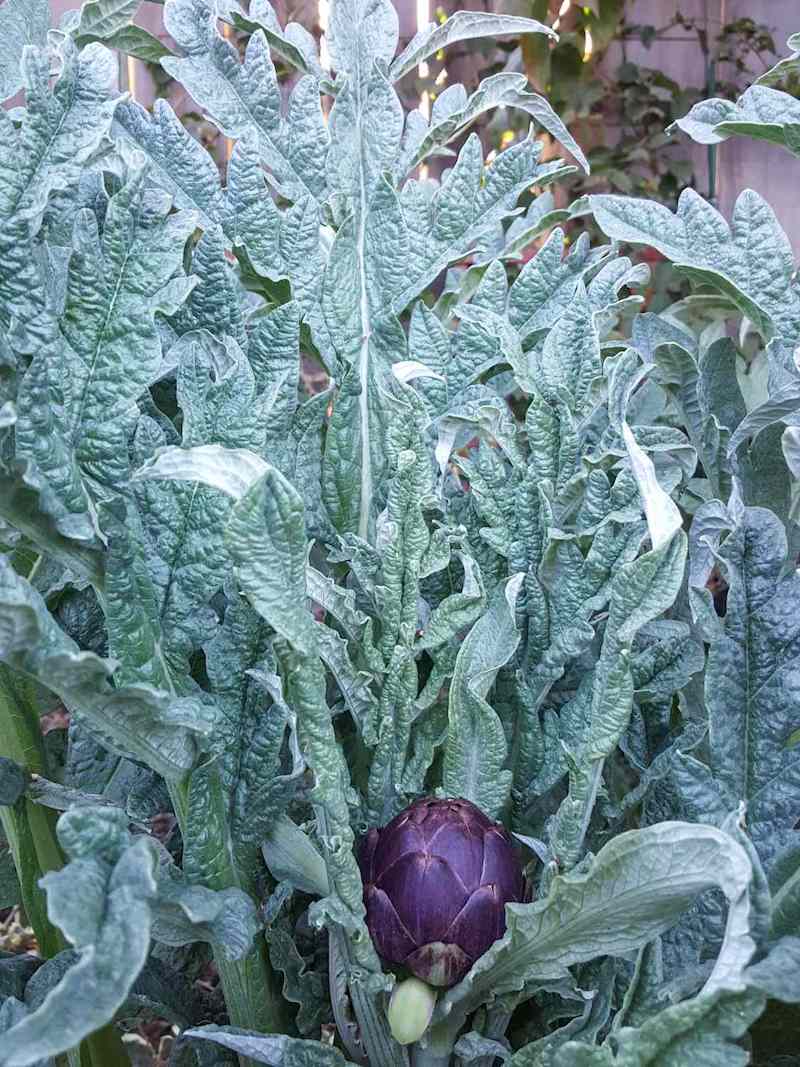
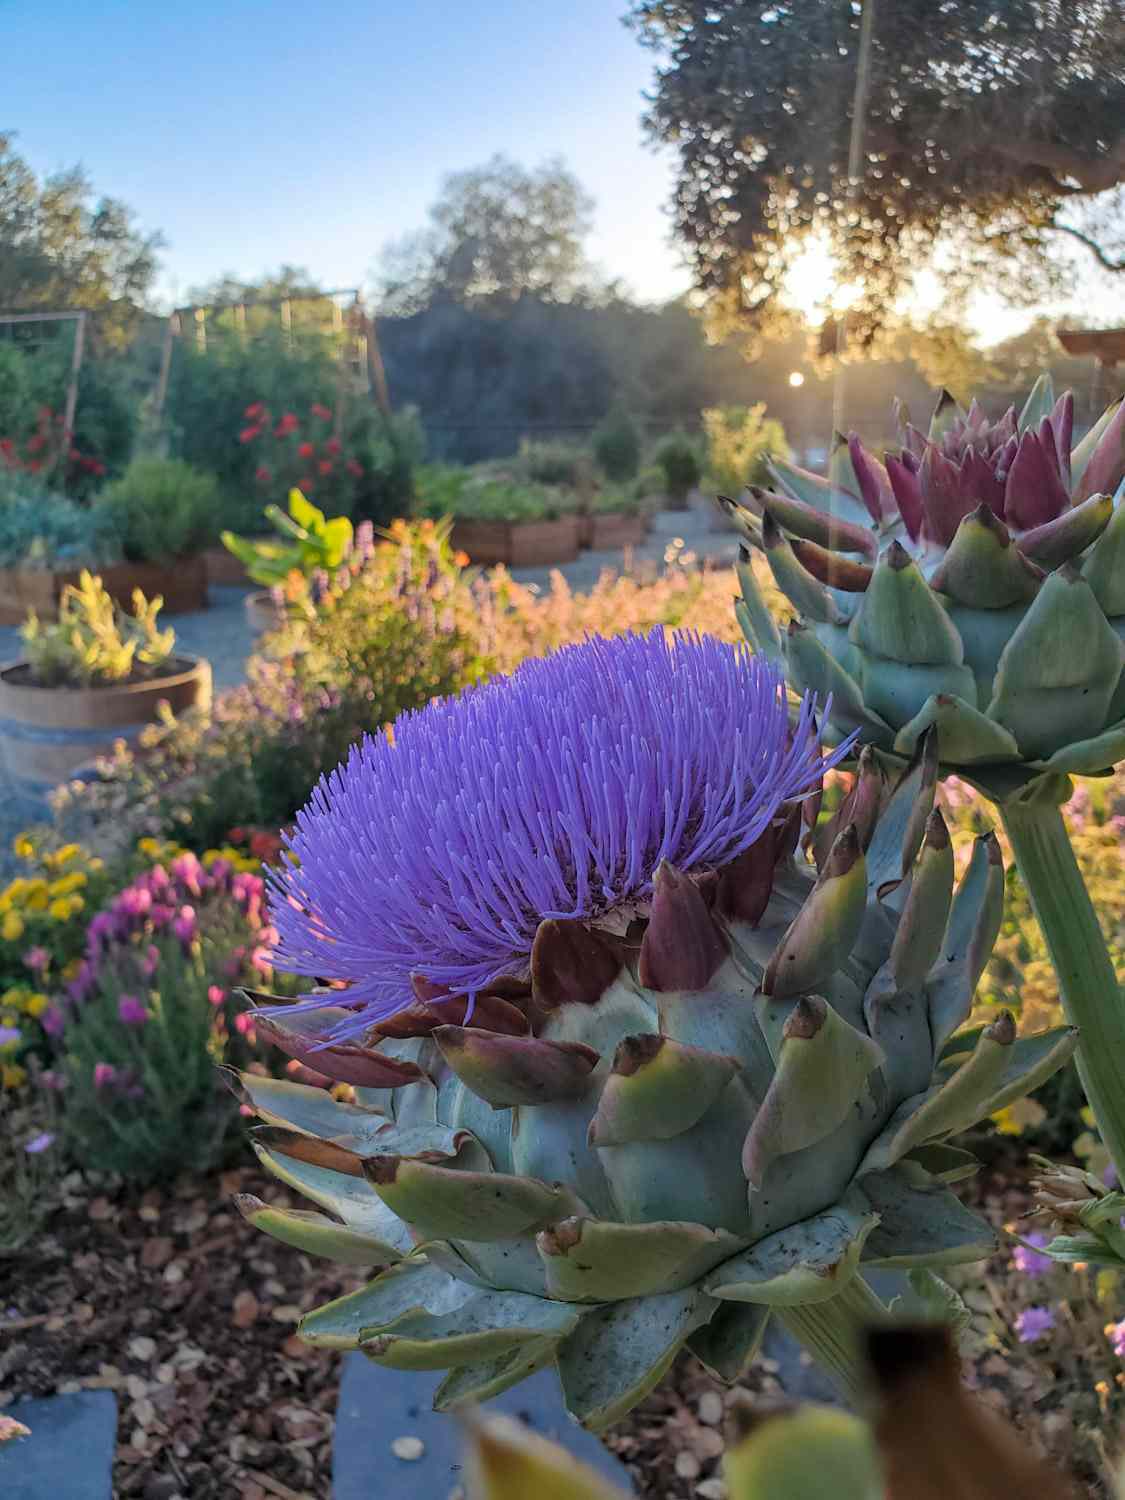
Did you know that artichokes are part of the thistle plant family? More specifically, they’re a domesticated variety of the wild cardoon (Cynara cardunculus), which is native to the Mediterranean region. The edible portion that we’ve all come to love and enjoy is actually an immature thistle flower bud that hasn’t yet bloomed. And once they do bloom, artichoke flowers are absolutely stunning – and a favorite for pollinators!
Artichokes are now grown far and wide, though they thrive in mild coastal climates. Fittingly, the temperate Central Coast of California is known as the artichoke capital of the world – especially Castroville and Watsonville. With its mild winters and cool foggy summers, the region produces nearly all of the artichokes commercially grown and sold in the country.
Nutritionally, artichokes are rockstars! They’re rich in antioxidants, fiber, folate and vitamin C. They also offer a respectable amount of plant-based protein: 5 grams per cup! Artichokes contain natural probiotics, prebiotics, and inulin, meaning they’re excellent for gut health too.


Artichoke Varieties
- Green Globe is a classic artichoke variety; what you’re very likely to see in the grocery store or garden center. The plants produce 3 to 5 large, round artichoke buds that are 3 to 5 inches in diameter. Many Green Globe varieties have been improved to have less spines on their leaves. 120-180 days to mature from seed, depending on exact cultivar.
- Imperial Star is another very common and popular artichoke variety. This includes Imperial hybrids like ‘Tavor‘: a highly-productive, virtually spineless artichoke variety. Imperial artichoke varieties produce 6 to 8 large, round green artichokes similar to green globe, and are often kissed with purple streaks. Imperial Star varieties are adapted to a broader range of climates (including more heat tolerance) than Green Globe. 85 to 90 days to maturity.
- Violetto (aka Violetto di Romagna) is a purple artichoke variety. It produces abundant smaller, oval or elongated flower buds – about 3 inches wide and 5 inches long. They contain very little inedible fuzzy choke if harvested young and tight, though the leaf tips usually have spines. Hardy in zones 6 and above. 85 to 100 days to maturity.
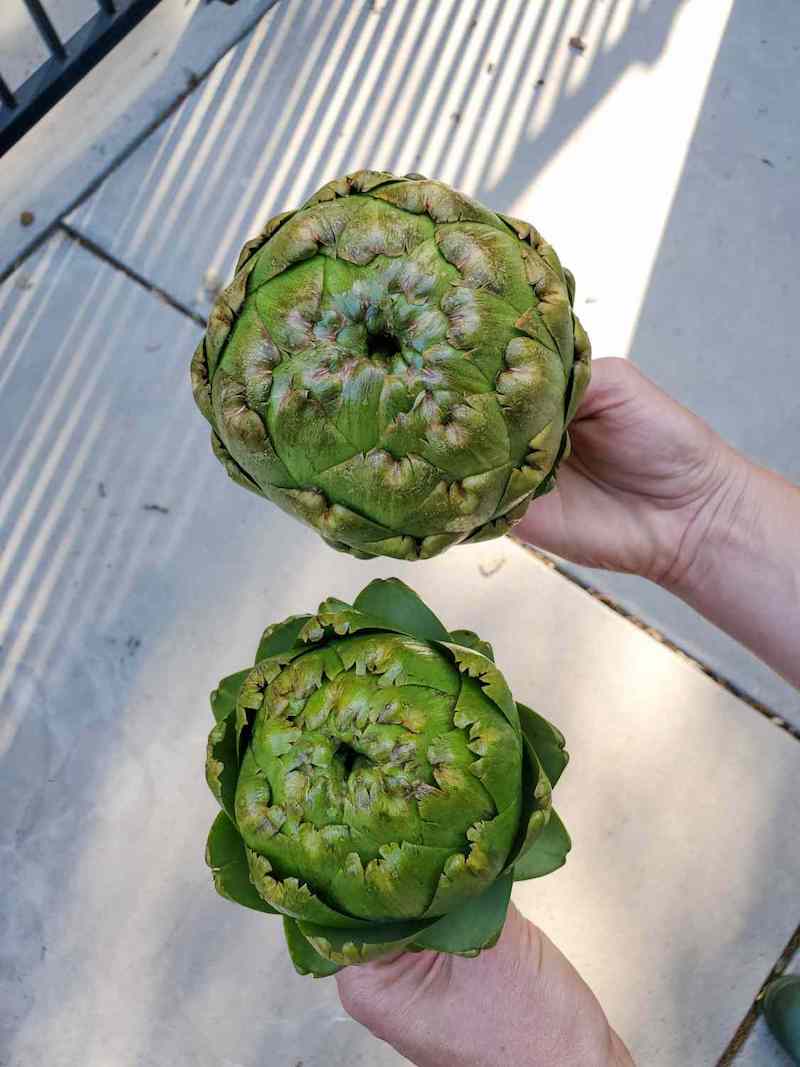
Beyond these few popular cultivars, there are dozens of other unique and less common artichoke varieties! We grow several different types, but one of our favorites is Wonder: a high-yielding, spineless, artichoke variety with large meaty hearts. (That’s what is shown in most of the photos in this post). Some gardeners report that purple artichoke varieties are more challenging to grow than green varieties; something to keep in mind for beginner’s.


Are artichokes annuals or perennials?
Artichokes grow as perennials with ease in zones 7 through 11, where the plants can live for up to 8 years. In temperate climates with little-to-no frost (zones 9-10), artichoke plants will grow right through the winter! Otherwise, the above-ground portion of the plant is usually cut down for winter, but the roots survive under the soil and will re-grow fresh artichoke plants in spring.
It’s also possible to grow artichokes as perennials in zones 5 and 6 if they’re offered additional protection during winter. For example, by planting artichokes in a sheltered location, moving a pot indoors, and providing ample deep mulch on top to insulate the roots during freezing conditions.
Otherwise, artichokes are grown as annuals in lower zones. Folks with short growing seasons or those growing artichokes as annuals should look for fast-maturing varieties and ones known to produce well in their first year of growth, such as Imperial or Colorado Star.

When to plant artichokes in the garden
Spring is the best time to plant artichokes in most places, and they’ll be ready for harvest by fall. Folks growing artichokes as perennials in zones 9 and 10 have a more flexible planting schedule, and can add artichokes to their garden essentially any time of year. In fact, fall planting is often recommended for zones 10 and 11.
To grow artichokes from seed, the slow-growing seeds need to be started indoors in mid to late winter – 10 to 12 weeks before the last frost date in your area. On the other hand, buying seedlings will give you a great head start.
When grown as annuals, artichoke seedlings require a period of vernalization (a couple of weeks where temperatures are below 45°F, but above freezing) in order to produce edible flower buds that same year. So, plant artichoke seedlings outside in early spring when it’s still cool out, but protect them from frost! Alternatively, you can take artichoke seedlings outside (or to a cold place like your garage) to expose them to cool temperatures before planting. Perennial artichokes will be naturally vernalized each winter, so no further steps are needed.
How much space do artichoke plants need?
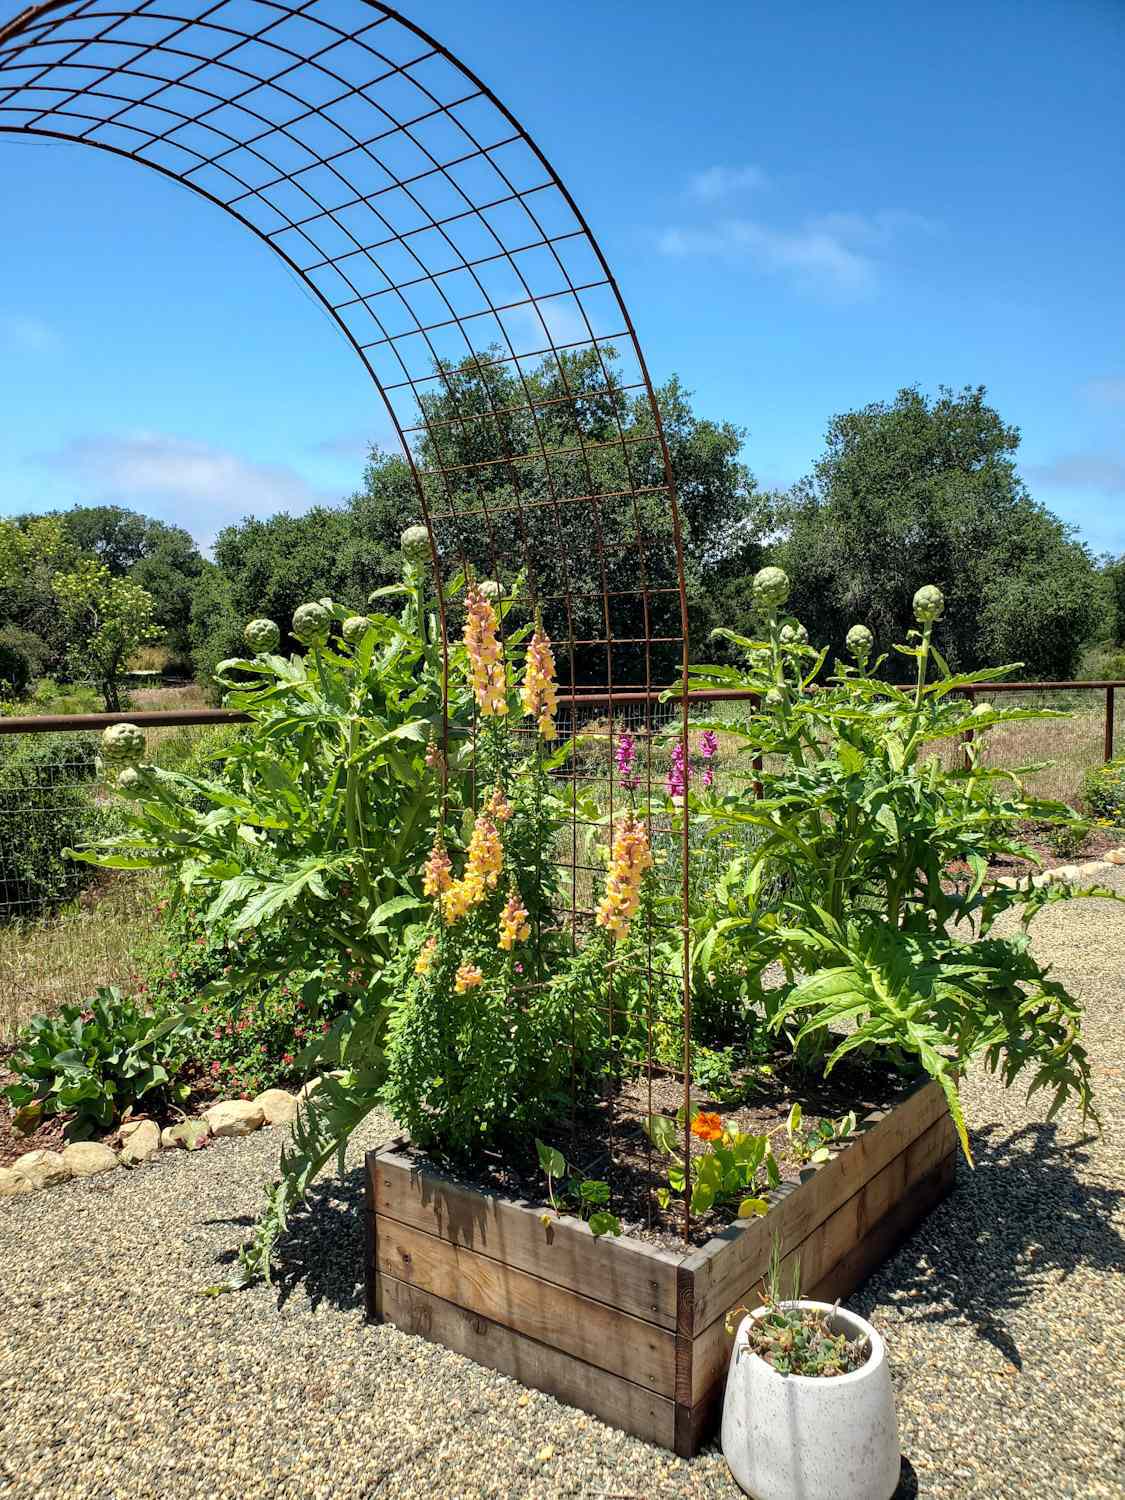
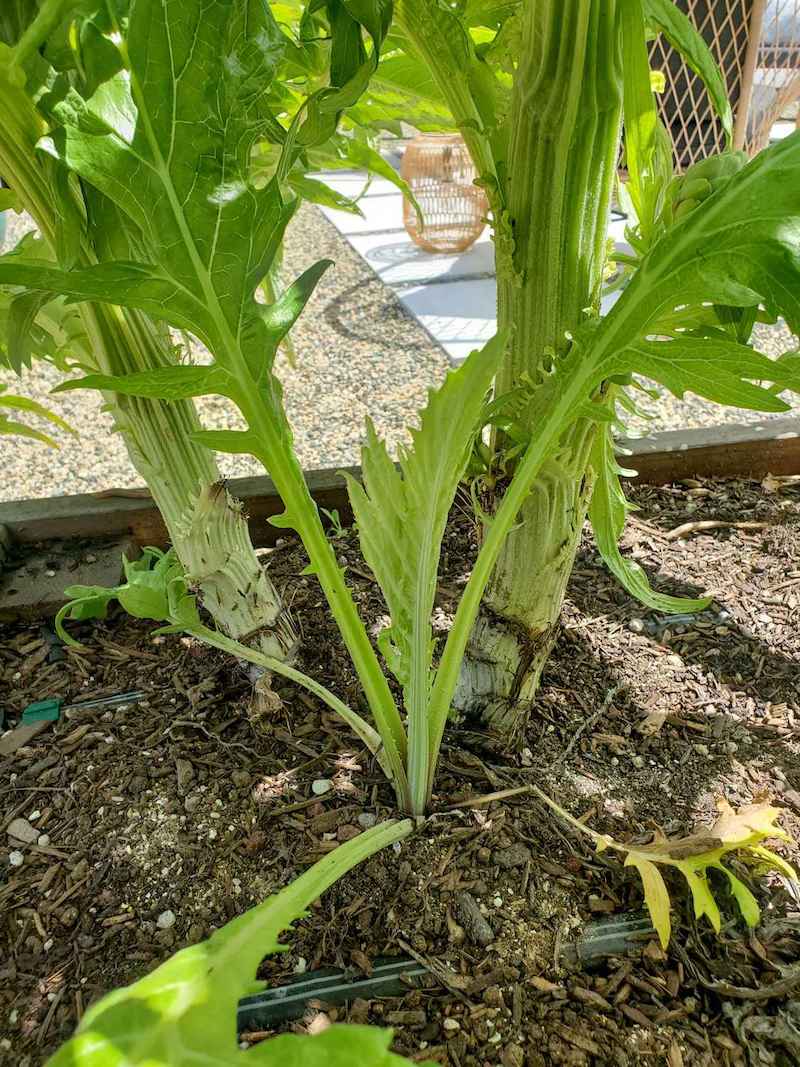
Artichoke plants grow quite large – reaching 4 feet wide and 6 feet tall, or larger! Therefore, it’s best to space artichoke plants at least 3 to 4 feet apart. Since artichokes can be grown as perennials, make sure to plant them somewhere they can stay awhile. Artichokes grown as annuals will likely not get quite as large as perennials plants, so you may be able to get away with tighter spacing.
As the years go by, artichoke plants divide below the soil to produce more plants, forming clusters. They’ll eventually grow into very dense bushes, when you’ll want to carefully thin and divide them – and get free artichoke plants! Read more on pruning and dividing artichokes below.


Can you grow artichokes in pots?
Yes, within reason. Because artichokes grow so large (and enjoy ample water), they perform best in raised beds or planted right in the ground. However, you can also grow artichokes in large containers such as half wine barrels, whiskey barrels, or other pots that are at least 18 inches deep and wide at minimum. The more room they have, the more healthy and prolific they will grow! Ensure the pot or container has drainage holes.

Artichoke Growing Requirements: Sun, Soil, Water, Fertilizer
- Sun: Artichokes thrive in full sun to partial shade, with at least 4 to 5 hours of direct sun per day.
- Temperature: Artichokes do not like excessive heat, which can cause tough bitter chokes or premature flowering. Artichokes’ ideal growing temperature is between 60 and 80 degrees F. Gardeners in hot climates should plant artichokes in a location that receives afternoon shade, or offer protection via shade cloth if needed.
- Soil: Artichokes grow best in fertile, well-draining soil. Amend soil with well-aged compost before planting, and add potting soil or horticultural sand to clay soil to increase drainage.
- Water: Don’t be shy with water! Artichokes grow best with regular deep water, where the soil is maintained consistently moist. Without enough water, the plants will droop (especially in hot conditions) and the edible leaves will grow thin, tough, and papery… not nearly as tasty to eat! Large, established plants require more water than immature plants. Mulch around the base of plants to reduce evaporation, and insulate the roots from temperature swings.
- Fertilizer: Artichoke plants are fairly heavy feeders. Add aged compost and organic matter to the soil, along with routine feedings via gentle organic fertilizer. We top-dress around the plants with a balanced slow-release organic fertilizer in spring and fall, plus water with compost tea a few times per year.

Growing Artichokes from Seed
You can grow artichokes either from seed or buy seedlings (small plants) from the nursery. We’ve done a bit of both! One benefit of growing from seed is having more options to select the exact varieties you want to grow. However, artichoke seeds are very slow to germinate and grow, so starting from seed does take some planning and patience!
To grow artichokes from seed, sow seeds indoors during winter – about 10 to 12 weeks before your last spring frost date. Artichoke seeds take anywhere from 10 to 21 days to germinate or sprout. Because artichoke seeds have such slow and finicky germination, and need to be started so early, I don’t recommend direct sowing seeds outside.
Plant seeds 1/4″ deep in a light fluffy seedling soil mix. Sow two to three seeds per pot or cell to make up for poor germination. Put the seed trays in a warm location (70-80 F) under ample bright light. The use of a seedling heat mat and grow light is ideal for success! Keep the soil damp (not soggy) at all times during germination, and use a humidity dome to prevent the soil from drying out. After they sprout, thin the seedlings to one per cell or pot. Avoid overwatering. Be sure to harden off indoor-grown seedlings before transplanting them outside! Learn more seed starting best practices here.

How many artichokes does each plant produce?
Most artichoke varieties produce about 5 to 8 artichokes per plant. Some can produce up to a dozen or more! Each plant will produce a few large artichokes on a central branching stalk, along with several smaller secondary artichokes that grow from side shoots.
Artichokes grown as perennials will often produce more (and higher quality) artichokes in their second, third, and following years compared to the first year they were planted. We’ve already harvested over 40 artichokes from 4 established plants this spring! After a spring harvest, you can encourage the production of a second fall harvest by pruning the plants down to the ground.

Organic Pest Control for Artichokes
Unfortunately, many pest insects seem to love artichokes just as much as we do! Therefore, growing artichokes may require a little TLC at times. But it’s not difficult to do – and well worth the effort! Thankfully, we’ve found that the more full and established the plants become, the less pest pressure there is per artichoke. Cutting back the plants each year also helps remove lingering pests or disease.
The most common artichoke pests include aphids, pincher bugs or earwigs, and ants (who are attracted to the aphids). Gophers are also highly attracted to artichoke plants, so plan to use gopher baskets if needed. Finally, artichokes are susceptible to fungal diseases like powdery mildew, crown rot, botrytis rot or gray mold.

How to get rid of aphids and earwigs on artichokes
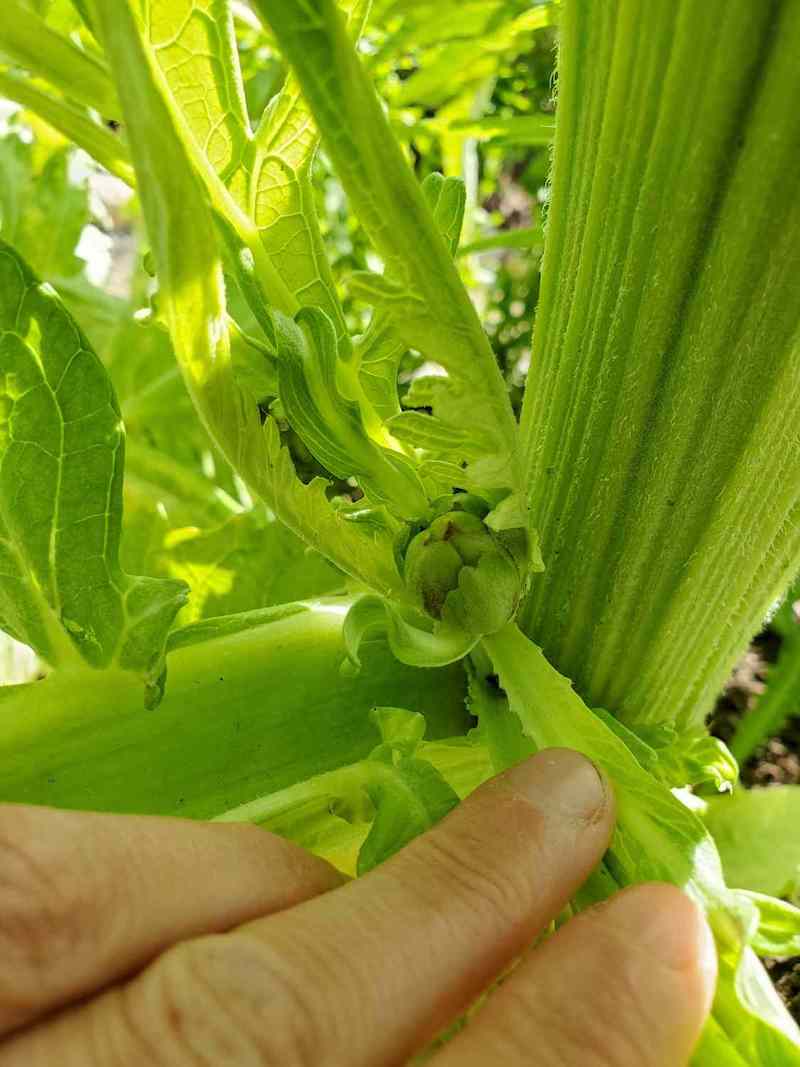
It’s easiest to control pest infestations when caught early, so routinely check your plants! Aphids especially like to hide around the lower outer leaves around the artichoke buds (shown above) and on tender new leaf growth, including in the very center of the plant.
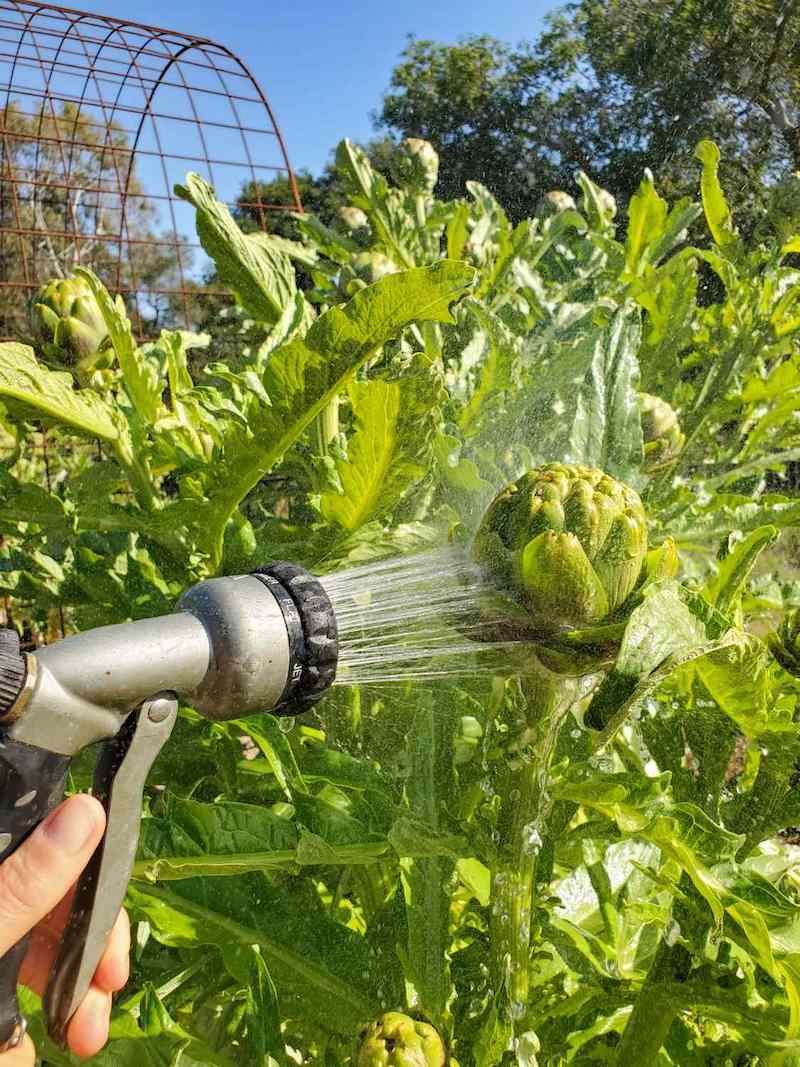
Fend off aphids and ants by blasting them away with water. Simply set your hose to a strong stream and spray away, including between and under leaves. Proceed to using a dilute aphid soap spray if that doesn’t work, which should be sprayed directly on the aphids and then rinsed off later. During peak aphid season, I spray my artichoke heads with water weekly. Learn more about organic aphid control here, including our DIY soap spray recipe.
Companion planting can also help prevent or reduce the presence of pests. For example, earwigs supposedly hate dill, fennel, garlic, calendula, sweet alyssum and cilantro – so plant some near or below the artichoke plants! Sprinkling diatomaceous earth (DE) around the base of artichokes can also help deter earwigs.
If your artichokes still end up a little buggy despite your best efforts, it’s not the end of the world! After harvest, soak and swirl artichokes in a bowl of cold water with a healthy dose of vinegar or lemon juice added. This will help dislodge many pests, and the acid also helps reduce bitterness. When I notice an artichoke bud is extra buggy (beyond saving) I simply let it bloom so we can all enjoy it – myself and bees included!

When and How to Harvest Artichokes
The best time to harvest artichokes is when they’ve grown to a respectable size and feel firm, full, and tight, but before the heads/leaf bracts start to open and separate. It’s not the end of the world if you miss the prime harvest moment thought! We’ve eaten plenty that were just starting to loosen up a bit. Yet if left too long, the artichoke leaves and center will become increasingly tough, bitter, of full of inedible fuzzy choke. Eventually, the artichoke head will open and flower.
To harvest artichokes, simply cut the stalk a couple inches below the flower bud using a sharp pair of garden shears. Remember that the first few artichokes will usually grow larger than the side shoots to follow. Yet both small and large artichokes are wonderful to eat. In fact, the smaller ones are often more tender, sweet, and “meaty” inside!
Here on the Central Coast of California, we can get a couple good flushes of artichokes per year. For instance, if we cut back the plants in late fall, they regrow over winter and bear fresh artichokes to harvest in spring. After that, we cut them down again to get another harvest in fall.

How to store artichokes after harvest
For maximum freshness, store artichokes in the refrigerator inside a plastic bag or other sealed container. They should stay firm, fresh, and good to eat for several weeks that way. Utilize the crisper drawer if they’ll fit! It’s best to not wash artichokes before storage, only at time of use.
Are artichokes frost tolerant?
Artichokes are tolerant of light frosts once established. When protected, the roots and crown can survive freezing conditions. The above-ground portion of the plant may be damaged in a hard freeze. Though artichoke seedlings need vernalization (chill hours) they are not nearly as hardy as mature plants and should be protected from frost – such as with frost cloth or cloches.
Pruning and Overwintering Artichoke Plants
Prepare your artichoke plants for winter by cutting them back all the way to the ground after fall harvest. Or, leave just a couple inches of stalk above the soil. In climates expecting freezing conditions, cover the top of the roots and crown area with several inches of aged compost, followed by 6 inches of straw mulch for insulation. Well-mulched artichokes should be able to survive down to 14°F. If temperatures dip below 15°F, consider adding an upside down cardboard box, cooler, or frost cloth over the root area for added protection.
Gardeners with mild, frost-free winters don’t necessarily have to cut their artichoke plants completely to the ground. However, we’ve found the plants respond very well to it! It removes dead leaves and stems, pests and fungal spores, and gives them a vigorous fresh start.
I also like to routinely prune and remove some of the plant’s lower leaves as they naturally turn yellow and fade during the growing season. This also helps re-direct energy to the flower buds, increase airflow, and reduce the risk of disease.


When and How to Divide Artichoke Plants
Artichokes should be divided every 3 to 5 years. As artichokes grow, the root systems divide to form numerous crowns. Each crown grows a new plant, which can be allowed to grow in a cluster for the first few years. However, I thin them out if needed by cutting back all but two or three plants per cluster as they regrow after pruning.
As time goes on, mature artichoke plants become overly crowded, reducing the quality and size of the heads. Dividing artichoke plants invigorates new fresh growth, and also creates free artichokes to plant elsewhere! Divide artichokes during the early spring or late fall, as summer dividing may cause excessive stress to the plants. You can do it when the plants are fully cut back or just starting to re-grow.
To divide artichokes, start by brushing back the soil around the base of the plant so you can identify each offshoot (pup) in the root crown. Then use a shovel to firmly dig straight down between the offshoots to sever the roots between them. Next, carefully dig wide and deep around each pup, trying to keep a substantial root ball intact for each section. Finally, transplant the newly divided artichoke pup to a new location (preferably already amended and prepared in advance). Water well after transplanting.
Preparing Artichokes to Eat
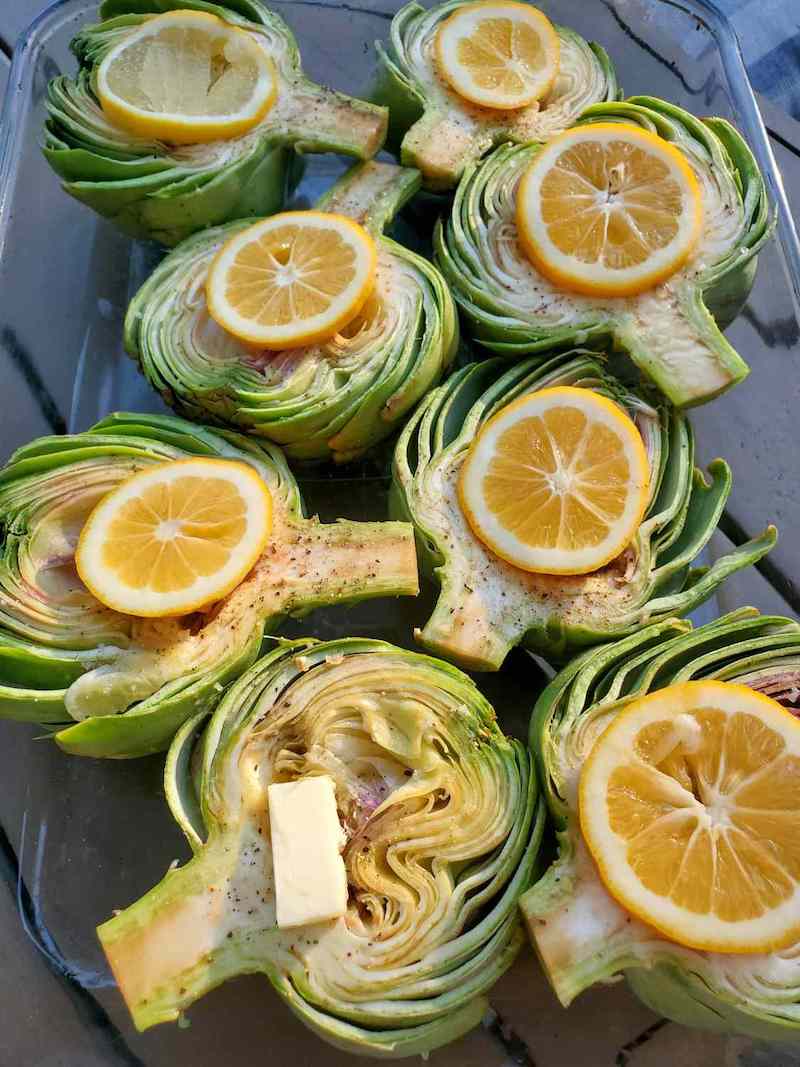
There are a number of ways to cook and eat artichokes: steamed, boiled, roasted, grilled, stuffed and more! The prime edible portion is the thick fleshy part at the base of the leathery leaves (scraped off with your teeth), along with the tender inner leaves and heart. Steaming or boiling artichokes is the most simple and straightforward way to enjoy them. See a full tutorial on how to easily cook and eat artichokes here! We’ve been roasting/steaming our artichokes in the oven lately, explained in the photo caption below.
No matter the method, you’ll want to avoid eating the fuzzy, fibrous, pokey “choke” part in the center – located just above the heart. You can either halve the artichokes to cut it out or remove the choke part before cooking them, or leave artichokes whole and simply eat around it later. If they’re extra spiny, you may also want to trim off the tops of the leaves. But definitely enjoy eating the heart; that’s arguably the best part!
You’ll often see lemon served alongside artichokes. One, because the bright acid helps to reduce any bitterness in the chokes. Two, because cooking with or rubbing lemon on artichokes helps reduce the oxidation that quickly occurs when artichokes are cut and otherwise turn brown.


Can you preserve artichokes?
It is difficult to preserve the edible outer leaf portion of artichoke buds, but you can preserve the tender inner leaves and hearts. Artichoke hearts can be frozen, preserved in oil, pickled, or pressure-canned. It’s best to preserve cooked artichokes, not raw.
To be honest, we typically don’t bother with preserving our chokes. We eat as many as possible fresh, and always allow several to flower for the pollinators too! Even the author of this well-rated marinated pickled artichoke recipe admits “processing all these baby artichokes will take some time, and, well, generate a lot of waste.” But I won’t knock it until I try it! It does seem like a good use of all the small side shoots – especially when you have a large bounty on your hands.
And that’s how to grow, harvest, and use artichokes!
Oof, that was a hefty one, eh? As you can see, there are a quite a few unique nuances to growing artichokes. But now that you know all the tricks, I hope you feel empowered and excited to grow artichokes of your own too! Let me know if you have questions in the comments below. If you learned something new today, please consider pinning or sharing this post! Thank you so much for tuning in today. Happy artichoke growing… and eating!
You may also enjoy:
- How to Grow Pineapple Guava: A Cold-Hardy “Tropical” Fruit
- Easy Raised Bed Drip Irrigation Tutorial
- Organic Aphid Control: 9 Ways to Get Rid of Aphids
- Top 23 Plants for Pollinators
- Companion Planting 101 with Printable Chart


You May Also Like

How to Make the Perfect Zoodles (Zucchini Noodles) with Pesto

How to Install Drip Irrigation in Raised Garden Beds (Drip Tape)
