


How to Test Seed Germination: Easy Paper Towel Method
Do you have a bunch of old seeds and are wondering if they’ll still grow? Or perhaps you’d like to check the success of your personal seed-saving efforts? Come along and learn how to do an easy seed germination test using the paper towel method! This post will show you the simple step-by-step process of testing seeds to see how many will sprout, before you invest in planting them elsewhere.
What is a seed germination test?
A seed germination test is used to measure seed viability. It’s a great way to use a small sample of seeds to check how likely the rest are to sprout and grow. For example, if you have 50 seeds left in a packet, you can perform a seed germination test with just 10 of them, and then have the rest left to plant if they’re still viable. Yet if the test shows poor germination results, the grower likely won’t bother planting them.
The results of the test also determines the seed germination rate as a percentage. Use this calculation to determine seed germination rate:
(Number of seeds sprouted X 100) / Total number of seeds tested = Germination rate %

Example: (17 seeds sprouted X 100) / 20 seeds tested = 85% germination rate
Why perform a seed germination test?
There are a few reasons you may want to perform a seed germination test:
- Seed companies test every batch of new seeds they sell to ensure they’re providing good viable seeds to their consumers. Many companies also include the expected seed germination rate listed on the package.
- If you saved seeds from your own garden, you may want to test the new seeds to see how well they’ll sprout – especially before planting them outside, or sharing them with friends!
- As old seeds age, they become less viable (less able to sprout). Some seeds have a shelf life of just a year or two, while others stay good for 5 years or longer. Performing a simple seed germination test is a great way to see if your old seeds are still worth planting, or if it’s time to buy some new seeds.

Different methods of testing seed germination
The two most common types of seed germination tests are done either by 1) planting several seeds in a small pot of soil (similar to how you’d start veggie seedlings indoors) or 2) placing seeds between a damp paper towel or specialized germination paper, then tucked inside a ziplock bag.
The paper towel seed germination test is usually considered more accurate since you can easily see each seed and spot the sprouting activity sooner. When planted in soil, there is more room for error. Seeds will sprout below the surface before you can see them, take longer to emerge, and some may never come up at all. Other factors like seed depth or using an overly dense, wet or dry soil medium can lead to spotty germination – ultimately swaying the test results.

Moisture matters most
No matter which method you use, the key to a successful seed germination test is to keep the seeds consistently and lightly damp. Not too wet, and not too dry. Seeds also need air to survive and thrive. Dry seeds won’t sprout, but overly wet, soggy seeds without air will rot and die. They literally suffocate and drown! That said, it’s important to keep the ziplock bag unsealed or open at the end to allow some airflow.
I’ve had unsuccessful seed germination tests when I placed the paper towel inside a tupperware-type container (in an effort to not use a plastic bag). With the lid cracked open, the paper towel dried out often and quickly. But with the lid on, it stayed too wet and the seeds didn’t get enough air.
How many seeds to test?
The more seeds you include in your seed germination test, the more accurate the test results will be. Professional growers and seed companies test hundreds of seeds (if not thousands) to get the most accurate results possible. Yet that isn’t feasible or necessary for us hobby gardeners! Use as many seeds as you can spare – still leaving plenty to plant if the test shows the seeds are viable. 10 to 20 seeds is plenty for the average at-home seed germination test.

How to Conduct a Seed Germination Test
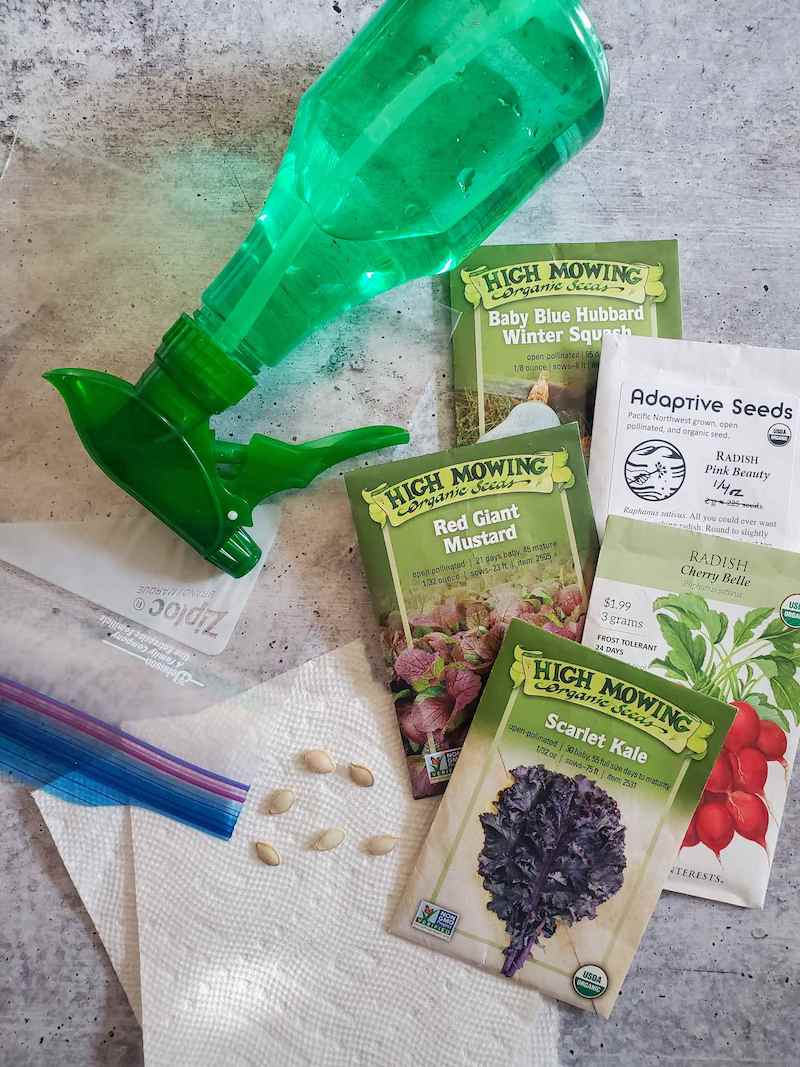
Supplies Needed
- Paper towels
- Seeds
- Ziplock bag or similar
- Water (spray bottle recommended)
Instructions
- If you’re testing more than one seed variety, plan to label each test as needed. In an effort to reduce plastic use, I put several paper towels stacked together inside one ziplock bag, so I labeled each towel with a sharpie.
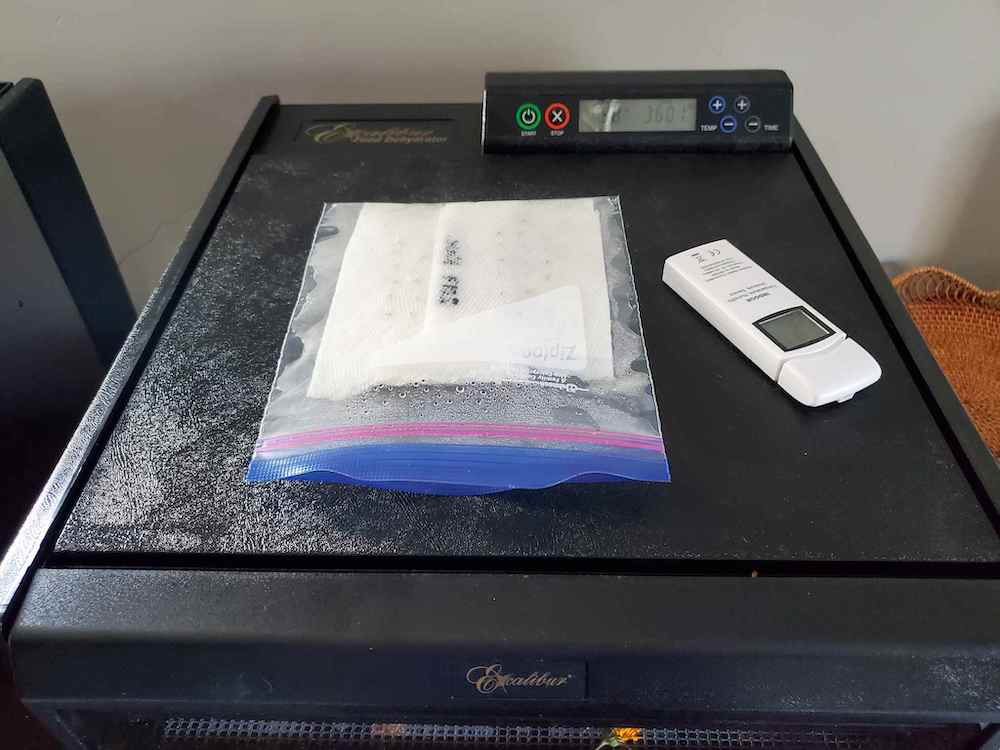
- Pre-moisten the paper towel. I use a spray bottle to evenly and lightly dampen the towel. If you run it under water instead, squeeze out excess water so it’s not dripping or sopping wet. (If you’re using a spray bottle, you can put seeds on the towel first and then spray it after – either way is fine.)
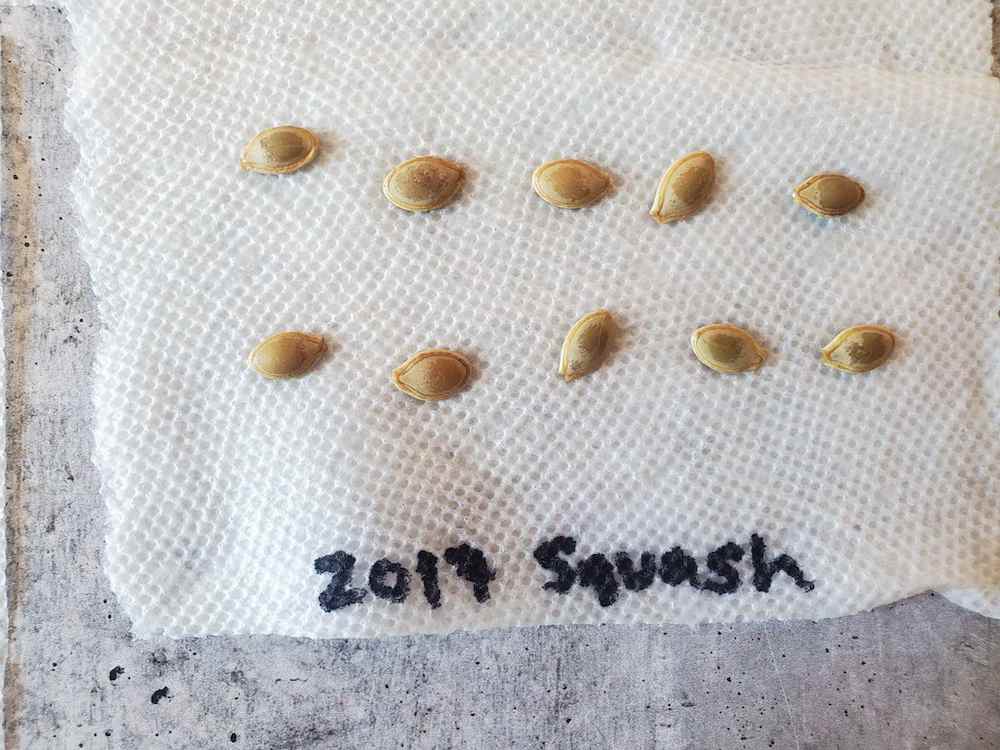
- Place at least 10 seeds on one half of the towel. Try to keep them spaced enough to observe their sprouting activity.
- Fold the paper towel in half over the seeds. Lightly press down so the damp paper towel is in contact with all of the seeds. Spritz again if needed.
- Place the damp paper towel and seeds inside a ziplock bag, but leave the bag unsealed.
- Keep the seeds in a moderately warm location (not hot). 65 to 75°F is ideal for rapid and even germination for most seeds. Some cool-season crops will not sprout in temperatures 80°F or greater, including lettuce and spinach. Lettuce also requires light to sprout; keeping the ziplock bag out in ambient light is sufficient.
- Over the next few days, monitor the moisture level inside the bag. Use a spray bottle to mist the towel with more water only if it starts to dry out.
- Under ideal conditions, most types of seeds should germinate within about a week (if not sooner) though some may take longer. For instance, eggplant seeds can take up two weeks and artichokes up to three weeks to germinate.
- Once the majority of your seeds have germinated (and you’ve waited a few extra days for any late bloomers to sprout too), it’s time to take a count! Use the calculation I provided above, but the math is pretty simple. If 7 out of 10 seeds sprouted, your germination rate is 70%. I’d feel confident in planting those!

No sprouts?
If you’ve waited an appropriate length of time (e.g. two weeks or longer) and no seeds have sprouted, either seeds are not viable or something may have gone wrong with your seed germination test. Perhaps it was too wet, too cold, or the seeds were just too old. That is one reason I usually like to test a few different types and ages of seeds at the same time. As long as some sprout, that tells me my test was done correctly and gives me a “control” to compare against.
Can I plant the sprouts from a seed germination test?
Yes, you can plant the seeds that have sprouted after your seed germination test. In fact, some people use the paper towel method exactly for that purpose: to pre-sprout seeds for planting, not to test them! However, I recommend doing so when the sprouts are still very short and small. Long seedlings are more tricky to transplant successfully because they’re already undesirably leggy, but will be more prone to damping off (dying) if planted too deeply. Gently place the seed on the soil surface and gently cover it (including the base of the sprout) leaving the top leaves exposed above the soil.
And that is how to do a simple seed germination test!
Easy peasy, right? If you found this guide to be useful, please consider pinning or sharing this post. Also feel free to ask any questions in the comments below. Thank you so much for tuning in today. Happy sprouting!
Don’t miss these related articles:
- 12 Places to Buy Organic, Heirloom and Non-GMO Garden Seeds
- Seed Viability Chart: How Long Do Old Seeds Last?
- Seed Starting 101: How to Sow Seeds Indoors
- 9 Common Seed Starting Mistakes to Avoid
- When to Start Seeds: Planting Calendars for Every Growing Zone
- Using Grow Lights for Seed Starting or Indoor Plants

Seed Germination Test: Easy Paper Towel Method
Equipment
- paper towels
- plastic ziplock bag
- spray bottle (recommended)
Ingredients
- seeds
- water
Instructions
- If you’re testing more than one seed variety, plan to label each test as needed.
- Pre-moisten the paper towel. I use a spray bottle to evenly and lightly dampen the towel. If you run it under water instead, squeeze out excess water so it’s not dripping or sopping wet.
- Place at least 10 seeds on one half of the towel. Try to keep them spaced enough to observe their sprouting activity.
- Fold the paper towel in half over the seeds. Lightly press down so the damp paper towel is in contact with all of the seeds. Spritz again if needed.
- Place the damp paper towel and seeds inside a ziplock bag, but leave the bag unsealed.
- Keep the seeds in a moderately warm location (not hot). 65 to 75°F is ideal for rapid and even germination for most seeds.
- Over the next few days, monitor the moisture level inside the bag. Use a spray bottle to mist the towel with more water only if it starts to dry out.
- Under ideal conditions, most types of seeds should germinate within about a week (if not sooner) though some may take longer.
- Once the majority of your seeds have germinated (and you’ve waited a few extra days for any late bloomers to sprout too), it’s time to take a count!
- Germination rate % = (number of seeds sprouted x 100) / total seeds tested


3 Comments
Patrice
Soaked my pumpkin seeds in salted water overnight before roasting them,as you suggested. They were awesome. Thanks for sharing the tip.
Aaron (Mr. DeannaCat)
Glad to hear you enjoyed them so much Patrice!
Sarah Post
Thanks again for a great gardening article! I needed this reminder, and I’m excited to go through all of my seeds again this year. I’ll get started on testing their germination asap!