


Homestead Update: Our New Grow Room Makeover
Of all the spaces on our new property, the room we lovingly (and temporarily) dubbed “the trip shed” was the most unexpected – yet a hilarious and pleasant surprise! When we first stepped across the threshold into the room and looked around, we made eye contact, smiled, and both knew we were thinking the same thing: “the perfect grow room!” Let’s be real: it also gave me instant flashbacks to my junior high school bedroom, with the blacklight and glow-in-the-dark stars on the ceiling and all.
With the psychedelic artwork and the term “grow room” being tossed around, I know what you’re probably thinking… cannabis, right? Well sure, maybe we’ll grow some of that magical plant in here eventually, but for now, this space will be the absolutely perfect seed-starting room for our vegetable, flower, and herb seedlings. Especially once we’re done giving it a little makeover!
Follow along to see the transformation of how we spiffed up an existing outbuilding and converted it to a functional space to raise seedlings for our garden. I’ll share a few tips and thoughts about indoor seed-starting along the way too! Check out our “Seed Starting 101” guide for more in-depth information.

The Backstory
The small barn that houses the new grow room has a couple sections to it. First, you enter an open workshop/storage area with a few old tables and shelves. We plan to clean up that space soon as well – it’ll be the perfect spot to keep a table saw or things like that! Then to the left is the enclosed grow room area, which offers more protection from critters and the elements. Between the two areas is a hallway equipped with wall racks to hang shovels, pitchforks, tree trimming poles and other large tools.
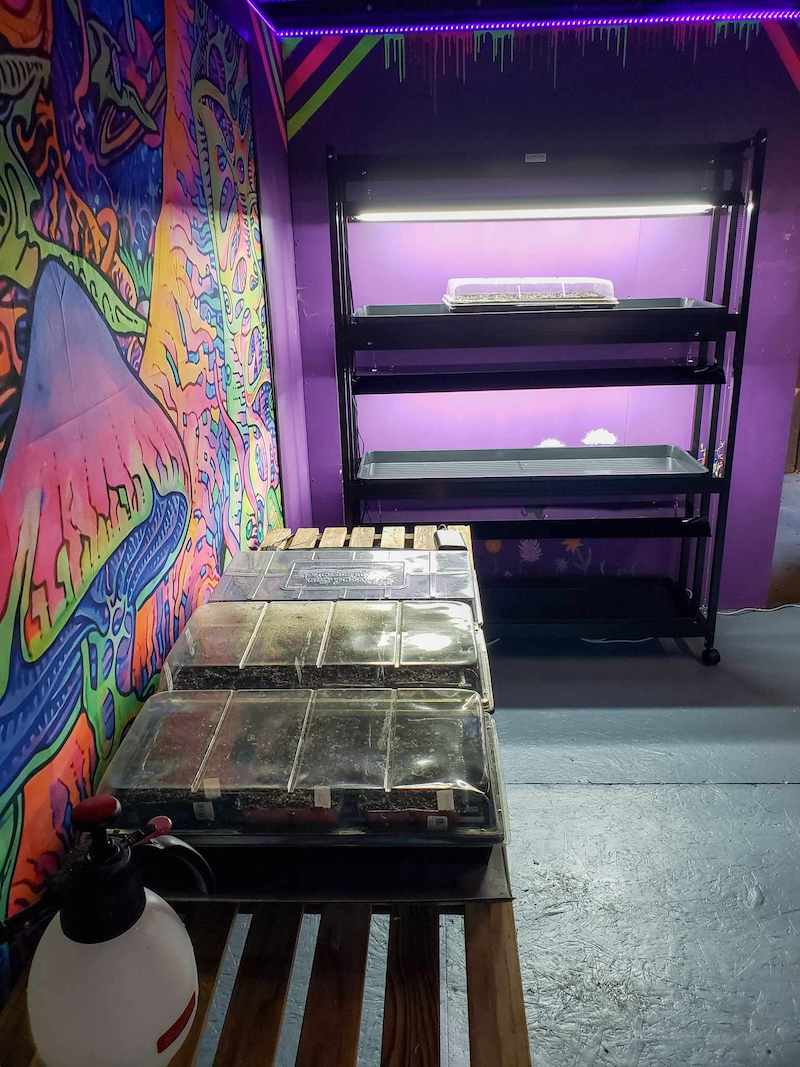
So, what’s up with all the groovy art? From what we can gather, our new grow room was formerly used as a teenager hangout. The previous homeowner’s daughter played electric guitar and also liked to paint. (At first we thought she’d done all the art in the room herself, but later realized the largest shroom mural is actually a screen print.) Along with the colorful walls, the room was decked out with a TV, an old tattered sofa, workbench, and quite the funky aroma… Lol. I guess we’ll just have to let our imaginations fill in the rest!

Our Previous Seed Starting Set-Up
At our last urban homestead, we started seeds inside a 6×8’ hobby greenhouse. We left the greenhouse behind when we moved, but brought along our homemade redwood benches. A new larger greenhouse is likely in the future for this homestead, but not for at least a couple years down the road! You can learn more about using a hobby greenhouse in this guide, (including details about our old greenhouse in particular) and follow our step-by-step tutorial to build your own greenhouse potting benches or tables here too.
Now is a great time to remind you that you do NOT need a dedicated greenhouse, trip shed, or other separate space to grow food from seed! Before we had a greenhouse, we simply started seeds in our guest room – on a wire shelving rack with grow lights hung from the shelf above. Any free space where you can tuck a few seedling trays and a grow light will do, including a garage or basement.
In fact, there are a number of advantages to starting seeds indoors rather than in an outdoor structure! a) It’s less subject to temperature swings, and b) it’s easier to keep your eye on the seedlings. Our new grow room is a hop, skip and a jump from the house (maybe 100 feet?) so it’s still easily accessible for us to go check on our seedlings, but not nearly as “in your face” as having seedlings right in the house for easy tending – like hey you, remember to water me!

Cleaning Up the Space
The first thing we tackled was clearing out all the old leftover stuff from the room. Then everything got a good sweeping and wipe-down. Next, we primed the raw plywood floor with 2 layers of Kilz, hoping to eliminate some of the bad odor. Once that dried, we applied a coat of quality exterior paint. We chose a dark, dusky grey-blue called “Charcoal Blue” by Behr in a satin finish. We figured that would hide dirt well and also be fairly easy to clean. For now, we decided to leave the walls mostly as-is. Maybe one day we’ll want to refine the space a bit more!
Later we also got a custom screen made up for the window by a local screen company, complete with durable 30-year pet mesh – so that we could safely keep the window open without letting pests or critters in. Good airflow is essential for seedlings, and this will hopefully help with the smell too!


Adding Seed-Starting Equipment
To turn this space into a proper grow room, the most essential thing we needed to add was good bright light! Whether you’re starting seeds in a garage, shed, or guest room – grow lights are pretty much a “must have” for indoor seed-starting. Unfortunately, ambient sunlight from a nearby window is not usually strong enough, and will result in leggy weak seedlings. Even our old greenhouse needed grow lights during certain times of year since it didn’t receive full sun.
To give our seedlings plenty of light (and space!), we added this awesome 3-Tier LED Sunlite shelf from Gardener’s Supply. We love it already, and so do the seedlings! It took about an hour to assemble, but went together very smoothly and has loads of useful features. The lights are operated independently so you can use just one shelf, two, or all three as needed. They’re suspended in a way that can be easily raised or lowered – which is great since it’s important to keep lights low, just a few inches above seedlings. Each shelf itself is a rimmed tray that catches water drainage, and you can set seedling containers right inside (without needing an additional tray) and still bottom-water too.

In the market for grow lights? Pop over to this article! It covers information and frequently asked questions about choosing AND using grow lights, including some of our top light recommendations. In addition to the Sunlite shelf shown in this article, Gardener’s Supply offers many other grow light units too.
Last but not least, we also brought in one of our old greenhouse benches and other various seed-starting supplies: 1020 trays and pots, seedling heat mats, an oscillating fan, a light timer, and our favorite handheld pump sprayer.

Starting Fall 2021 Seeds
Since our new homestead only has 3 raised garden beds at the moment, we scaled way back from our normal fall seed starting routine. (Our old homestead had 15 raised beds!) We’d usually be starting all sorts of brassicas like cabbage, broccoli, romanesco, and cauliflower and also direct-sow seeds for carrots, radishes, and beets. Check out tips on starting a fall garden here, including a full list of our favorite cool-season veggies to grow! If you’re pressed for time with a short growing season, be sure to try these 13 fast-growing fall crops.
Our current space limitations forced us to pick favorites, so we’re focusing on growing our go-to cut-and come-again leafy greens this fall: Joi Choi bok choy, a few varieties of mustard greens and kale, lettuce, and arugula. Rather than a one-and-done crop like cabbage, leafy greens are ideal for perpetual harvesting. Each plant will feed us virtually non-stop for many months to come! Here, they’re keep producing right through the winter and into the spring.

After sowing seeds in our new grow room, we kept the seedling trays on a bench on top of a heat mat. The vast majority of seeds* do not need light to sprout; steady warmth is what helps them germinate. Then once they did sprout (in just a couple days!), we immediately relocated them to the new Sunlite LED light shelf. Note that seedlings will get leggy FAST in the absence of light. So, if you think you may miss the moment they sprout, it’s best to keep them under a light from the start.
*One caveat is lettuce. Lettuce seeds DO need light to germinate, and also prefer cooler soil. So, we put the tray of lettuce seeds on the grow light shelf immediately after sowing – skipping the heat mat.


And that’s the story of our new grow room.
I’m happy to see and say that only days after its makeover, our new grow room is already home to dozens of new happy baby seedlings! Growing your own food from seed is incredibly rewarding, and therapeutic; it felt wonderful to start that process for the first time at our new place. I am already excited for next spring, when this room will hopefully be filled with quadruple the seedlings. We plan to break ground on our new expanded garden space this fall to have it up and running by spring. Stay tuned for that huge undertaking! Thanks so much for stopping by and following this project with us. I hope you picked up a few new helpful tips along the way!
Want to grow along? Check out these articles:
- Seed Starting 101: How to Sow Seeds Indoors
- Beginner’s Guide to Using a Hobby Greenhouse
- 9 Common Seed Starting Mistakes to Avoid
- How to Design & Build a Raised Garden Bed
- Using Grow Lights for Seedlings and Indoor Plants
- When to Start Seeds: Garden Planting Calendars for Every Zone


7 Comments
Shreya @ The Creatives Hour
This is super helpful! I definitelt got great ideas for my balcony. Thanks for sharing;)
Jenni
Love what you’ve done! I can’t wait to see how the trip room does over the winter.
Thomas Hesselgrave
Dear Deanna Cat,
I enjoy your newsletter. My daughter referred me to you when I had a question about fermenting veggies. I am an amateur gardener and read all your articles. I used to be one of those retired old men who bought five tomato plants every spring and harvested three tomatoes every summer. I am doing much better now. I hope that you are enjoying your new “digs”.
Keep up the good work,
Thomas Hesselgrave
Petal, MS
Aaron (Mr. DeannaCat)
Hi Thomas, we are glad that you found us and that you are having more success as a gardener! Thank you for the kind words and we appreciate your support.
Oluwaseyi
Nice seeing your great works, keep it up .
Aaron (Mr. DeannaCat)
Thank you so much!
Hannah W
I was wondering if you guys would keep the artwork. I love seeing that you didn’t get rid of it, at least for now! It’s so fun! 🌱🍄