


Super Green Sauerkraut Recipe w/ Garlic, Turmeric & Ginger
Bok choy, kale, tat soi, mustard greens, cabbage, collard greens… you name it! We dubbed this our “super greens” sauerkraut recipe because you can use any combination of super-nutritious hardy leafy greens that you desire. It is incredibly flexible. We also often invite fresh garden daikon radish or carrots to the party. Speaking of garden… this is one of our favorite ways to preserve a glut of homegrown greens! We’ve been making this green kraut for years.
Follow these step-by-step instructions and learn how to make a super green sauerkraut of your own. With the addition of turmeric, garlic, and ginger, the finished flavor is incredibly fresh, zesty and delicious. If you’re new to fermentation, don’t worry! The process is simple (and damn near foolproof), especially if you have the right tools on hand.
Not only is homemade sauerkraut easy to make ~ it is ridiculously healthy for you and your gut. Like all fermented foods, green sauerkraut is rich in probiotics, beneficial enzymes, antioxidants, vitamins, and minerals. To learn more about the health benefits of fermented foods, check out this post all about it.
Now, are you ready to get choppin’ and massagin’?
Disclosure: This post may contain affiliate links to products for your convenience, such as to items on Amazon. Homestead and Chill gains a small commission from purchases made through those links, at no additional cost to you.
GREEN KRAUT INGREDIENTS
Please note that using organic produce for fermentation and sauerkraut recipes is essential! Inorganic foods may have been treated with chemicals that kill bacteria, thus inhibit it from going through a safe and tasty fermentation process. In ferments, good bacteria are our friends.
The amount of ingredients needed will vary on the size of the fermenting vessel you want to use. You’ll need to know the total weight of prepared veggies to accurately salt them.
Below is the recipe that will fill a half-gallon mason jar, which takes about 4 pounds of chopped or shredded vegetables to pack full (including both greens and optional daikon radish and/or carrot). Yet keep in mind that is a pretty hefty amount of greens, so feel free to scale down as needed. For example, use around 2 pounds of greens/veggies and half of the seasonings for a quart jar portion.
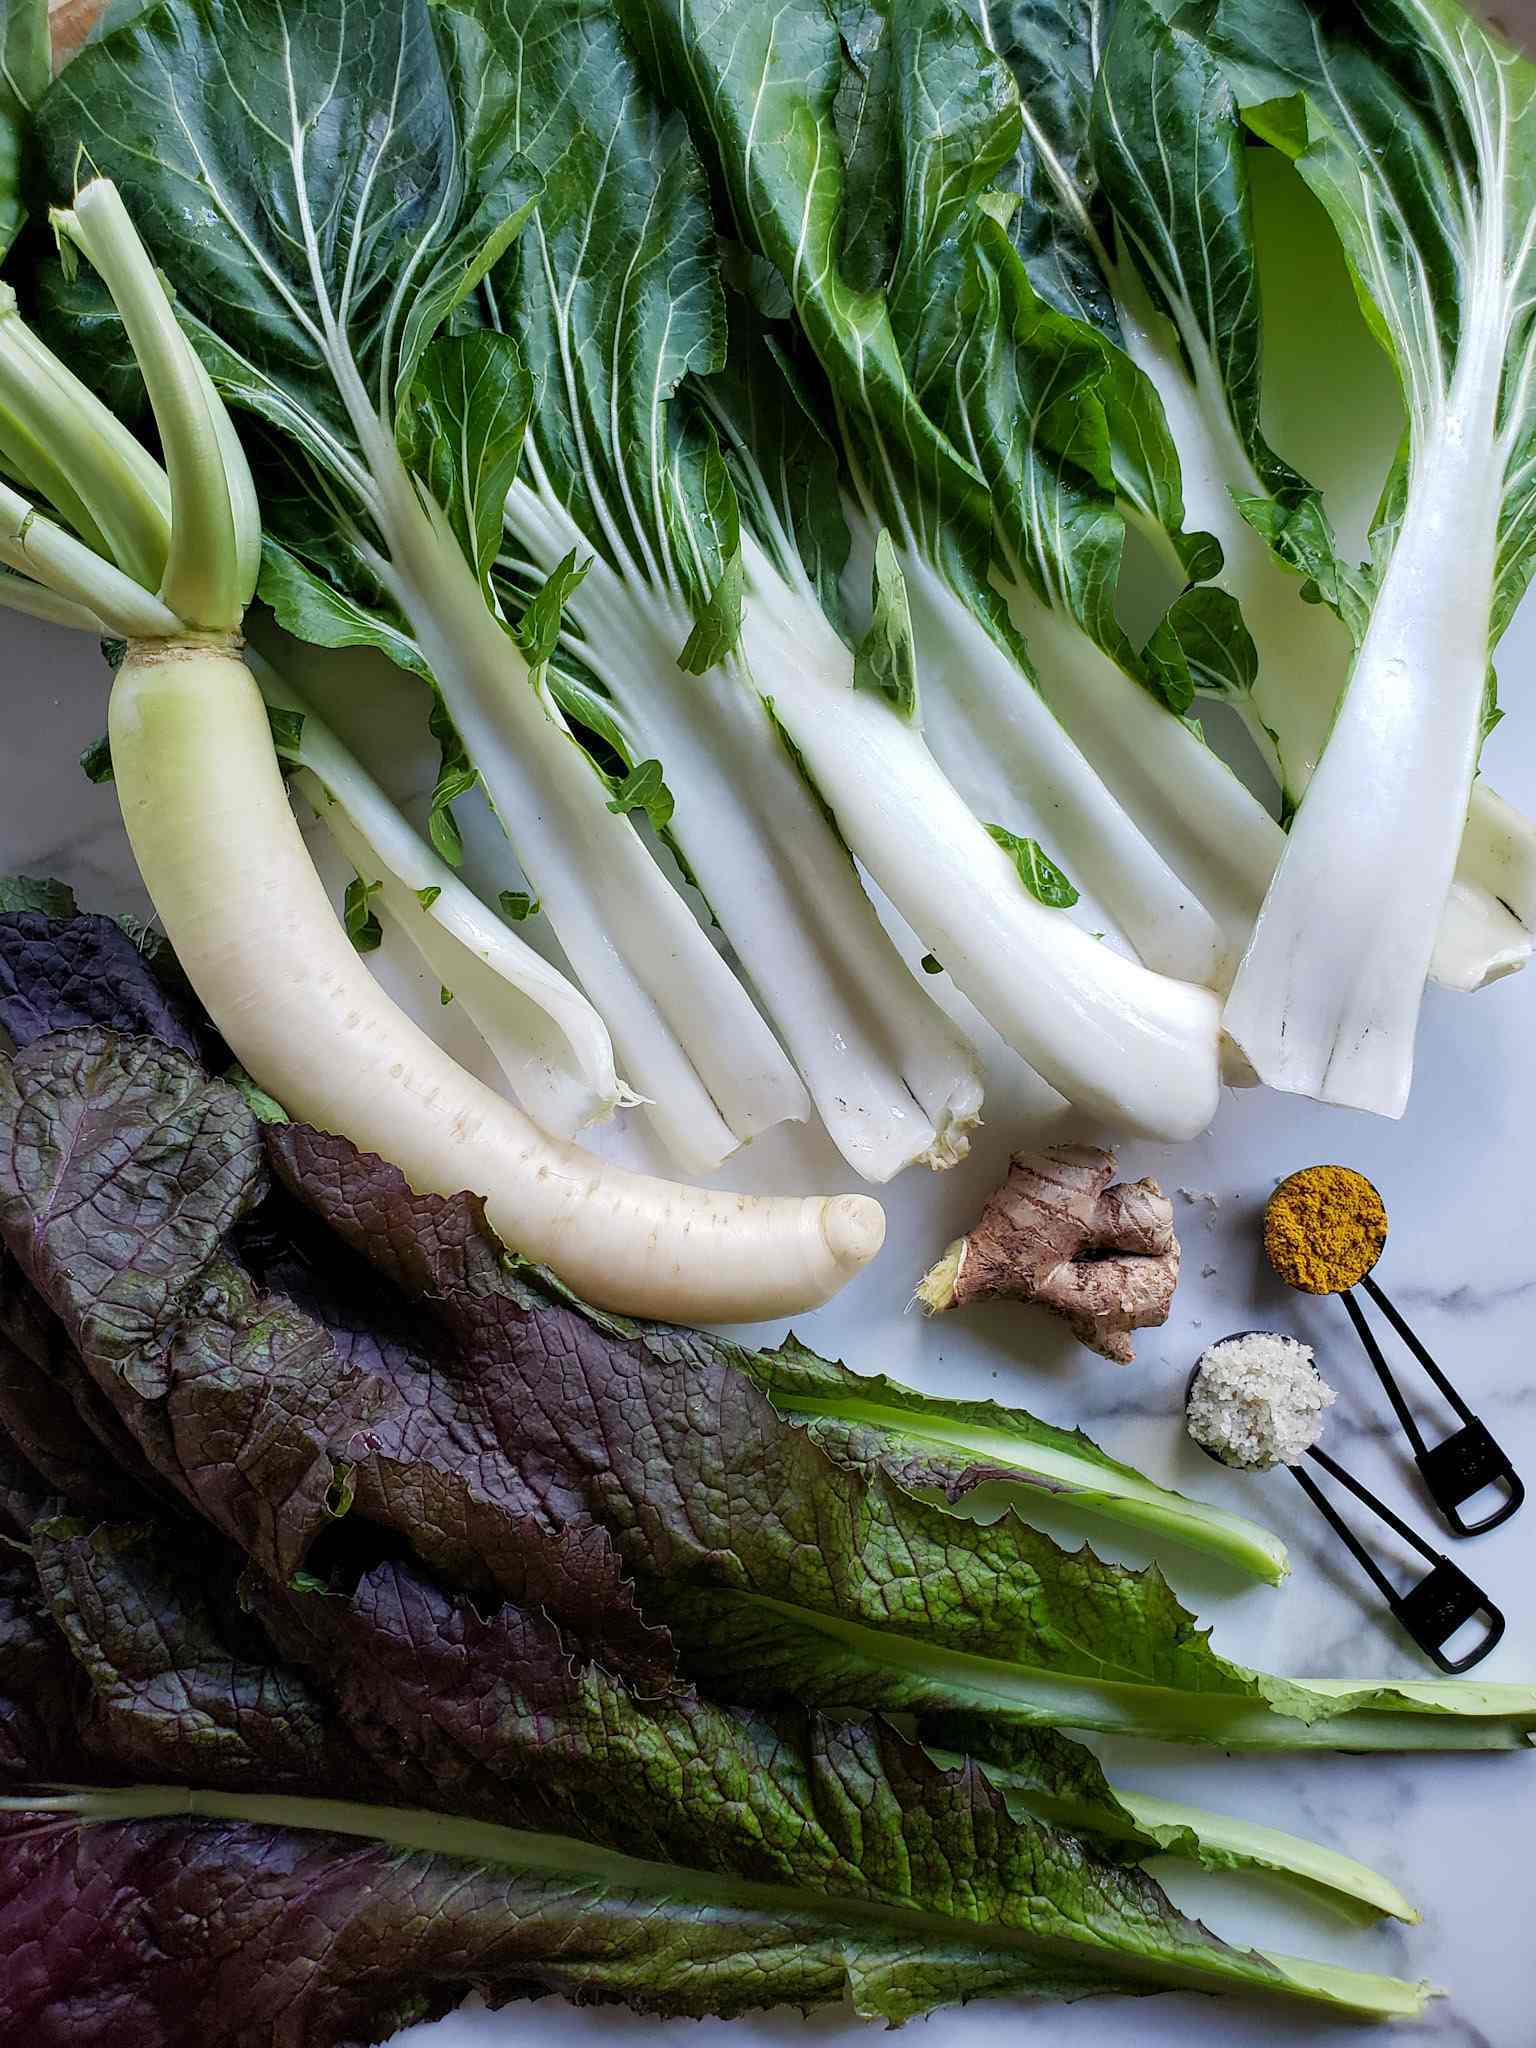
- Organic Super Greens – When selecting greens for this recipe, avoid using particularly tender greens like spinach or lettuces. They would create a gross, mushy green sauerkraut. Instead, choose greens that have a bit more texture, such as: Napa cabbage, kale, bok choy, mustard greens, tat soi, collard greens, daikon radish greens, and/or green cabbage. I highly suggest combining two or three different types of greens (including at least one with thicker crunchy parts) for a nice variety of texture. Bok choy stems and napa cabbage are a favorite here!
- Optional: Grated daikon radish or carrot. Just one or two per batch is usually good.
- Kosher, Pickling or Sea Salt – 2 tablespoons
- Fresh ginger – 2 tbsp – grated
- Fresh turmeric – 2 tbsp grated (sub with 1/2 tbsp turmeric powder)
- Garlic – approximately 2-3 cloves or 1 tablespoon – minced
- Black pepper – A few dashes, as you would normally season your vegetables or slightly heavier. Even if you aren’t usually a huge black pepper fan, I suggest using at least some. Black pepper increases the potency of the super-healing active ingredient in turmeric (curcumin) by making it more bio-available in our bodies.
- Optional: a hot chili pepper (such as a jalapeno, or hotter if you prefer!), red chili flakes, or fresh dill. We’ve made our green kraut with some of all of the above before, but chose to keep it more simple this round.
A Note About Salt
The type of salt you use does matter. Iodized table salt is not recommended for fermenting, as the chemicals in it can actually inhibit the fermentation process, and produce an overly salty and off flavor. We like to use this celtic sea salt.
Salt is what is helping preserve your greens! It is like what vinegar is to the pickling process. By salting vegetables, it inhibits the ability for harmful bacteria to grow and encourages the good guys – lactobacillus bacteria – to flourish. They change the pH of the food, creating lactic acid and an overall acidic environment that gives your green kraut that nice tangy flavor – but also safely preserves it. Too little salt can result in mold development.
SUPPLIES NEEDED
- A fermenting vessel – such as a glass mason jar. For smaller batches, you could use a pint or quart jar. We usually use these half-gallon mason jars – sometimes even two for one massive batch!
- Fermenting lid or air lock device – The use of a lid made for the fermentation process is ideal, which makes the job much easier and pretty foolproof, though a regular jar lid can be used with a few tweaks. Examples of fermenting lids include an all-in-one device like a Kraut Source lid (which is what we love and use), or the use of a combination of items like a glass or ceramic weight along with another type of air lock lid. A further discussion of their reasoning and use will follow in the directions section below.
- A large bowl for mixing
- Kitchen scale – For this type of massaged ferment method, you’ll need to weigh your greens (and daikon/carrot) once they’re prepped. We use this trusty little digital scale for ferments and sourdough.
- Filtered water
- Optional: Sauerkraut pounder
INSTRUCTIONS
1) Clean your supplies
You want to make sure all of your supplies are clean. No, they don’t need to be insanely clean or “sterile” – you actually never want to use bleach, or even soap on your fermenting tools! The residual soap could stick around and really make things “off”. We spray our supplies with plain white vinegar, and then rinse well with hot water. That’s it.
2) Weigh and/or tare a large mixing bowl
As you chop up your greens, you’ll want to toss them into a big bowl as you go. But we don’t want to include the weight of the bowl in our final veggie weight! So before adding the greens to it, either weigh the mixing bowl so you can subtract its weight at the end, or tare the empty bowl on the scale so it is already zeroed.
Tip: Even if you tare the scale, I suggest jotting down the weight of the empty bowl somewhere, just in case your scale turns off mid-process.
The wood bowl we use for making kraut is pretty damn large, wide and shallow. It works rather well since you need some wiggle room for mixing and massaging your green kraut. If you’re making a large batch (half-gallon or more) you may find the need to divvy up your greens between two bowls instead.
3) Prep the veggies
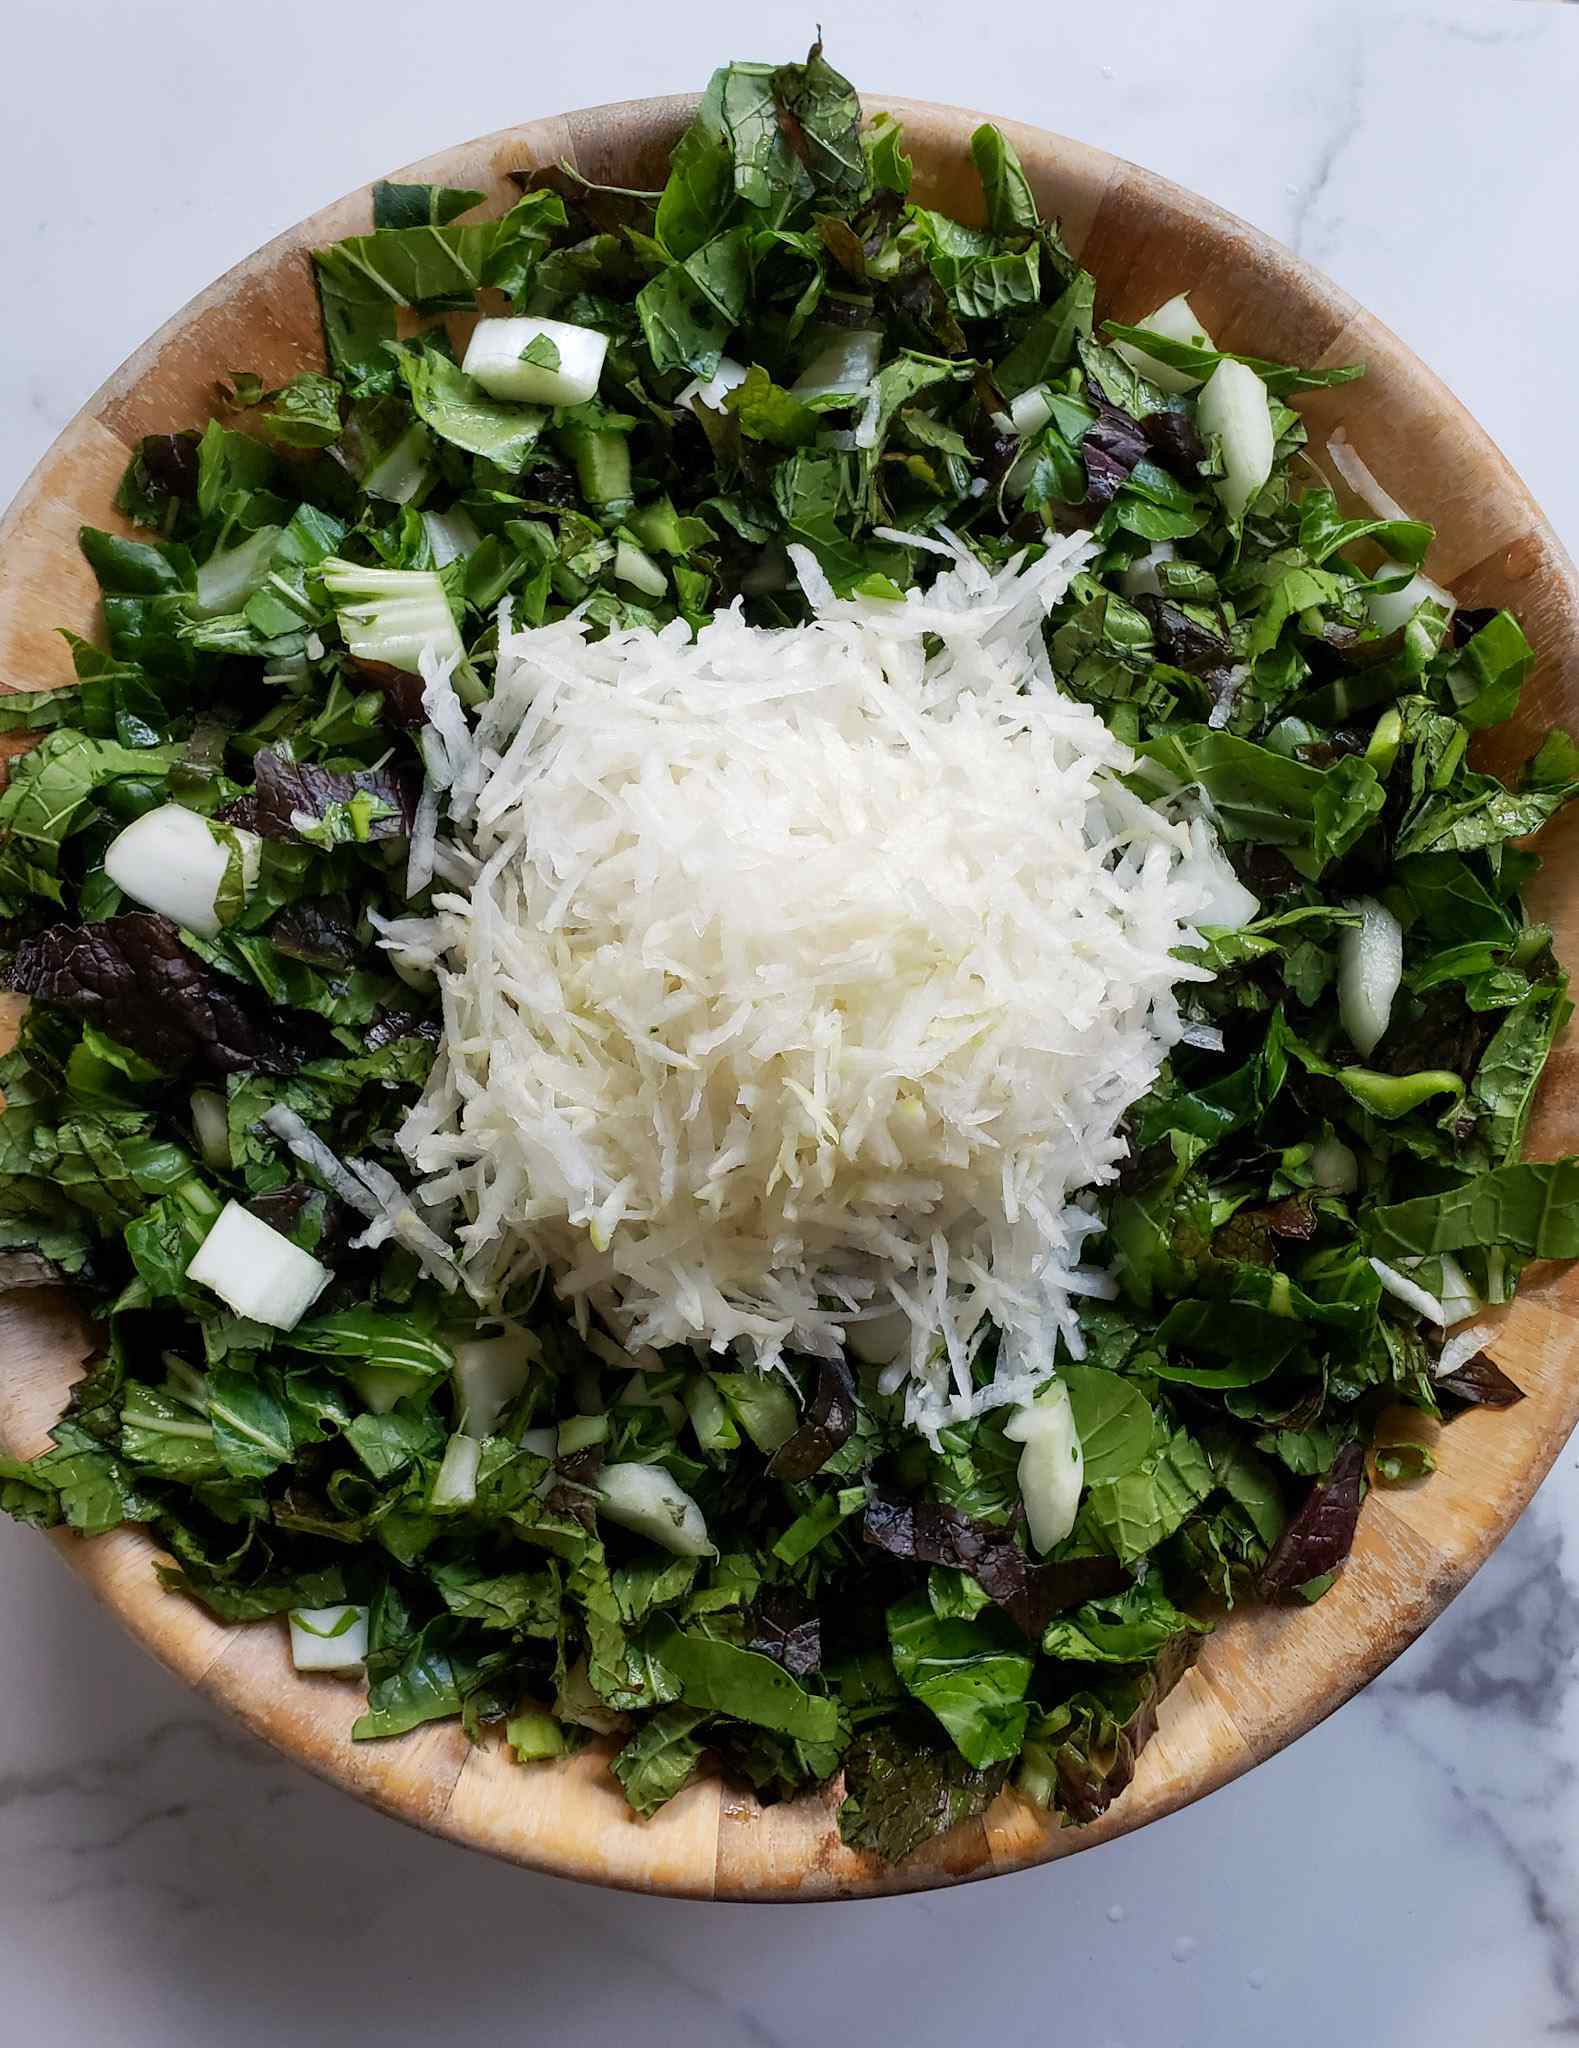
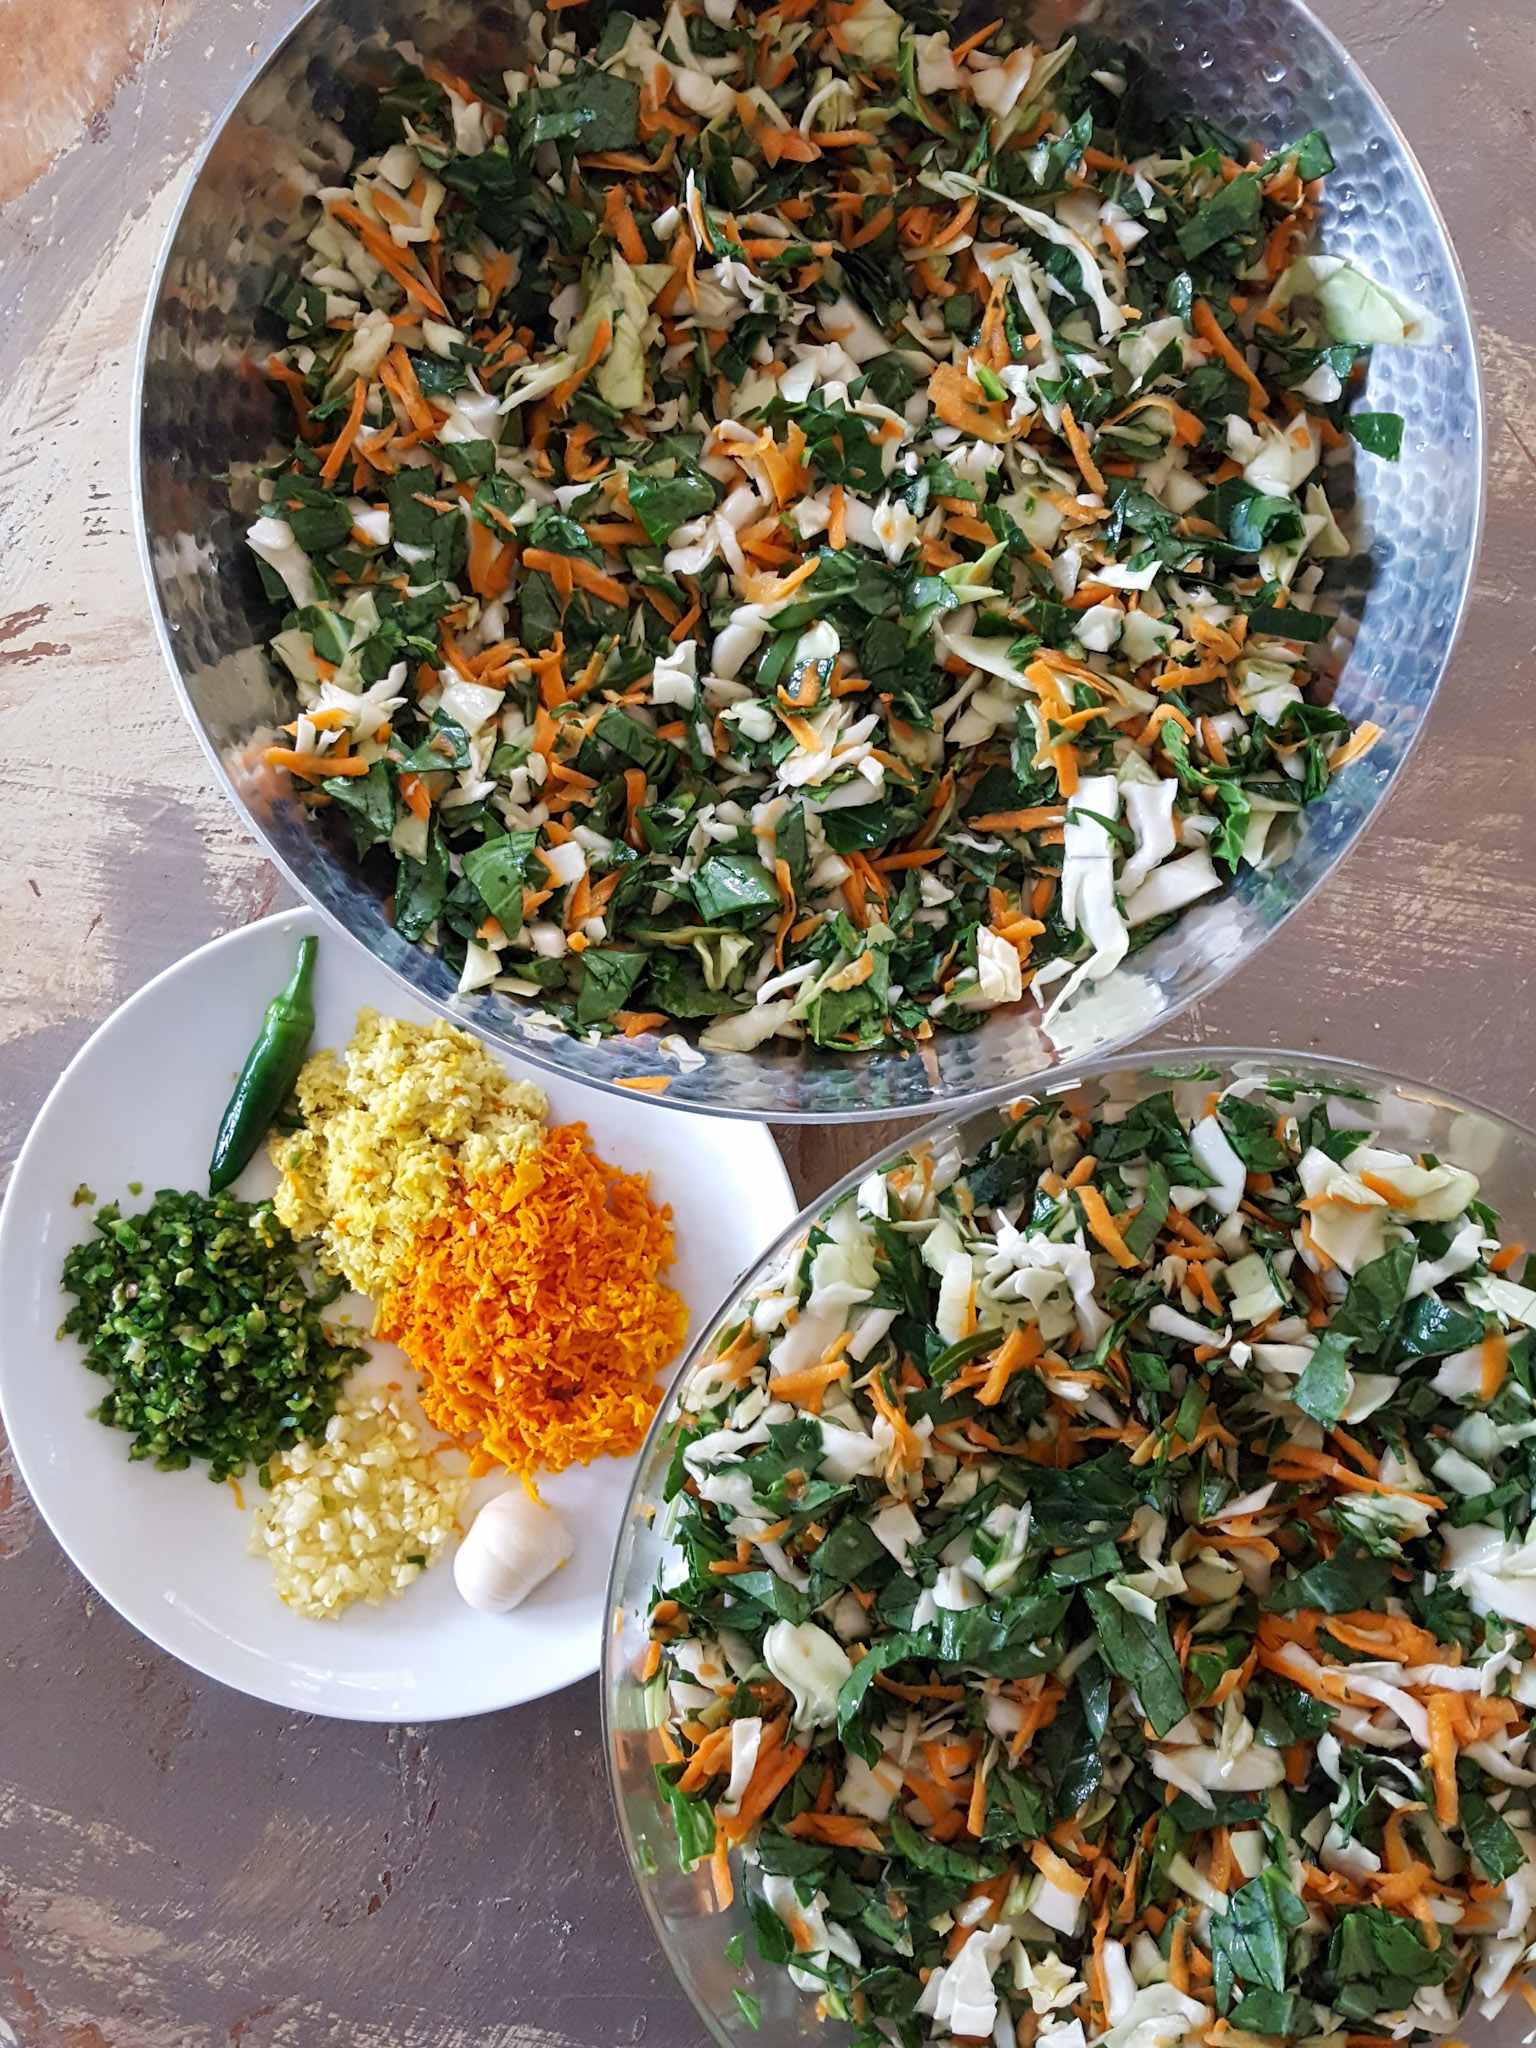
Wash your greens, shake away excess water, and chop them into into small pieces. The exact size is up to you. You may want to remove any tough (stringy or woody) stems first, such as mature kale leaf stems. If you’re adding daikon radish or carrots, either cut them into julienne strips or use a cheese grater to easily shred them.
Add the chopped/shredded veggies to your mixing bowl. Check the weight as you go. Keep adding greens (and/or radish and carrot) until you reach the desired total weight for your given container (e.g. approximately 2 pounds for quart or 4 pounds for a half-gallon).

4) Salt the Veggies
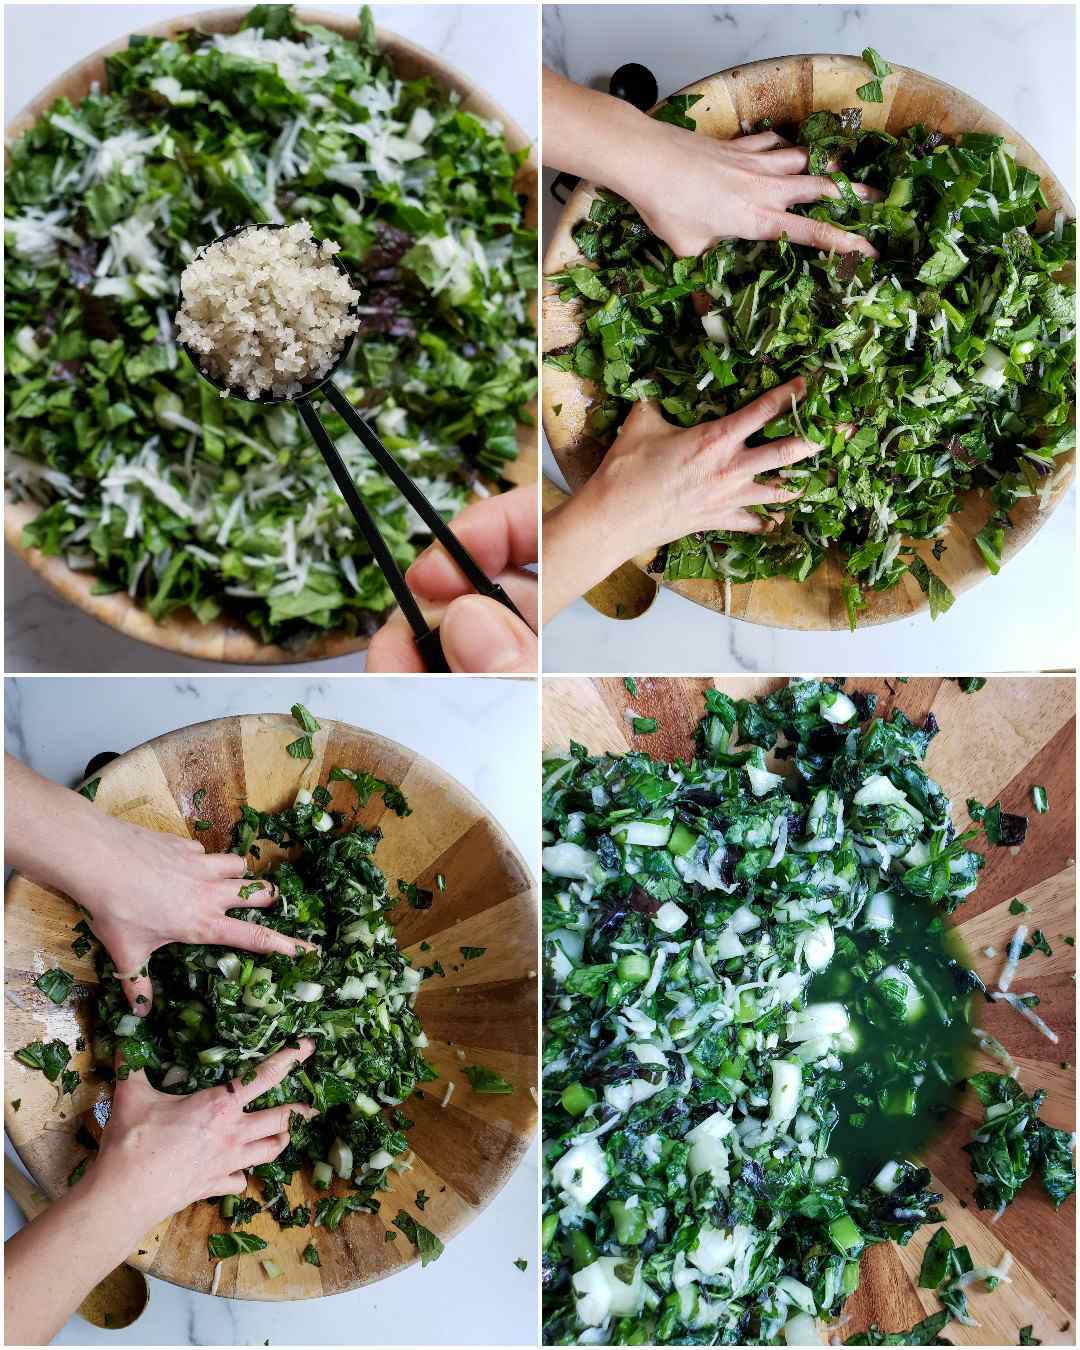
Once your greens are chopped, weighed, and in bowls, sprinkle on 1 tablespoon of sea salt for every 2 pounds of veggies in the bowl. Therefore, we used 2 tbsp salt over the four pounds of greens and grated daikon radish shown here. This is the standard salt-to-veg ratio for all massaged-style kraut recipes. Scale up or down as needed, depending on how much weight you have. If you’re somewhere between measurements, err on the lighter side for salt.
Tip: To evenly coat the greens with salt, we find it helpful to add only half the salt at first, use tongs to toss it all around a bit, and then add the remainder. Toss again.
5) Massage
In addition to preserving the veggies, salt also helps to draw moisture out of them. Especially when we massage it! Unlike our fermented radish recipe – where we mix water and salt to pour over the chopped vegetables – this style of ferment preparation does not call for any additional liquid added. Instead, by salting the greens and giving them a good rub down, they will release their natural juices and moisture, creating their own brine to live in.
It should go without saying, but…wash your hands very well before diving in! I even wash mine in white vinegar, and remove my rings since bacteria can often hide there. You could also use food grade gloves if you prefer. Some folks use a wooden kraut pounder at this stage too.
Once the veggies are evenly coated with salt, massage and mash them for a minute or two. It will all be pretty firm at this stage, and not feel very wet. Let the greens rest for 10 minutes after the first massage so the salt can do its thing. Then, give everything another good massage. You should notice a good amount of brine liquid developing now. The veggies should also noticeably decrease in volume, condensing and becoming softer. Let rest for 5 more minutes, and move on to the next step.
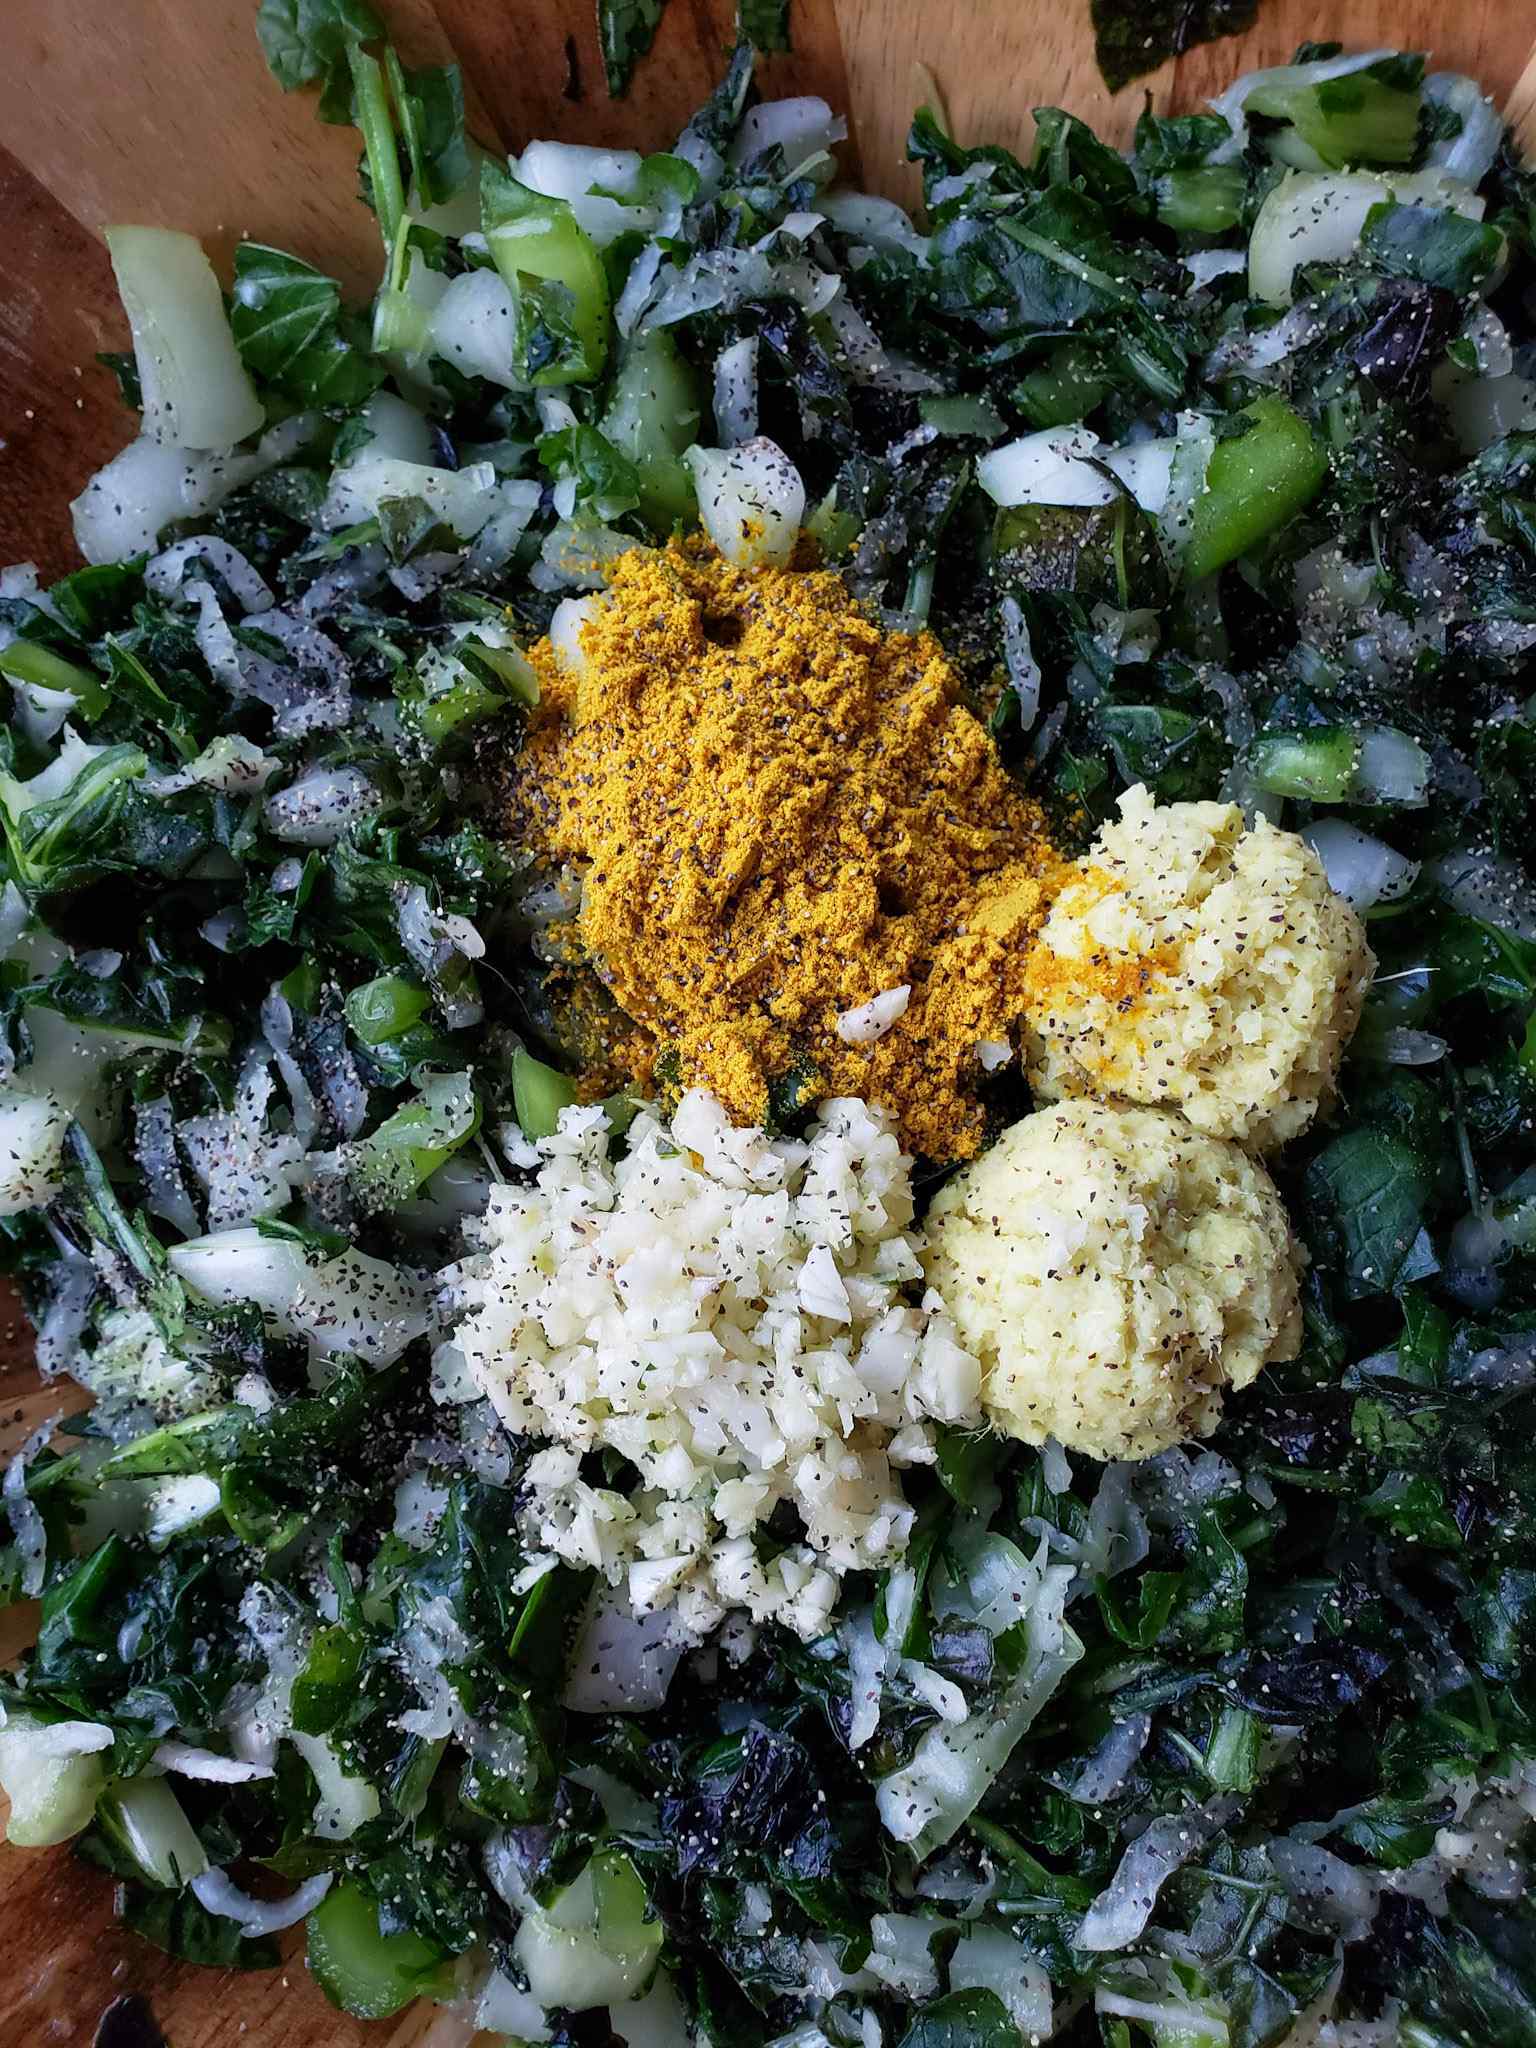
6) Add other green kraut seasonings
Now is a great time to add the minced garlic, grated ginger, black pepper, and turmeric (or powder) and any other optional seasoning you wish to add. Why not add these earlier with the salt, you ask? Well… Unless you like stained-orange hands that reek like garlic, I suggest incorporating everything else after the massage part is over. Stir well.
7 ) Pack the jar
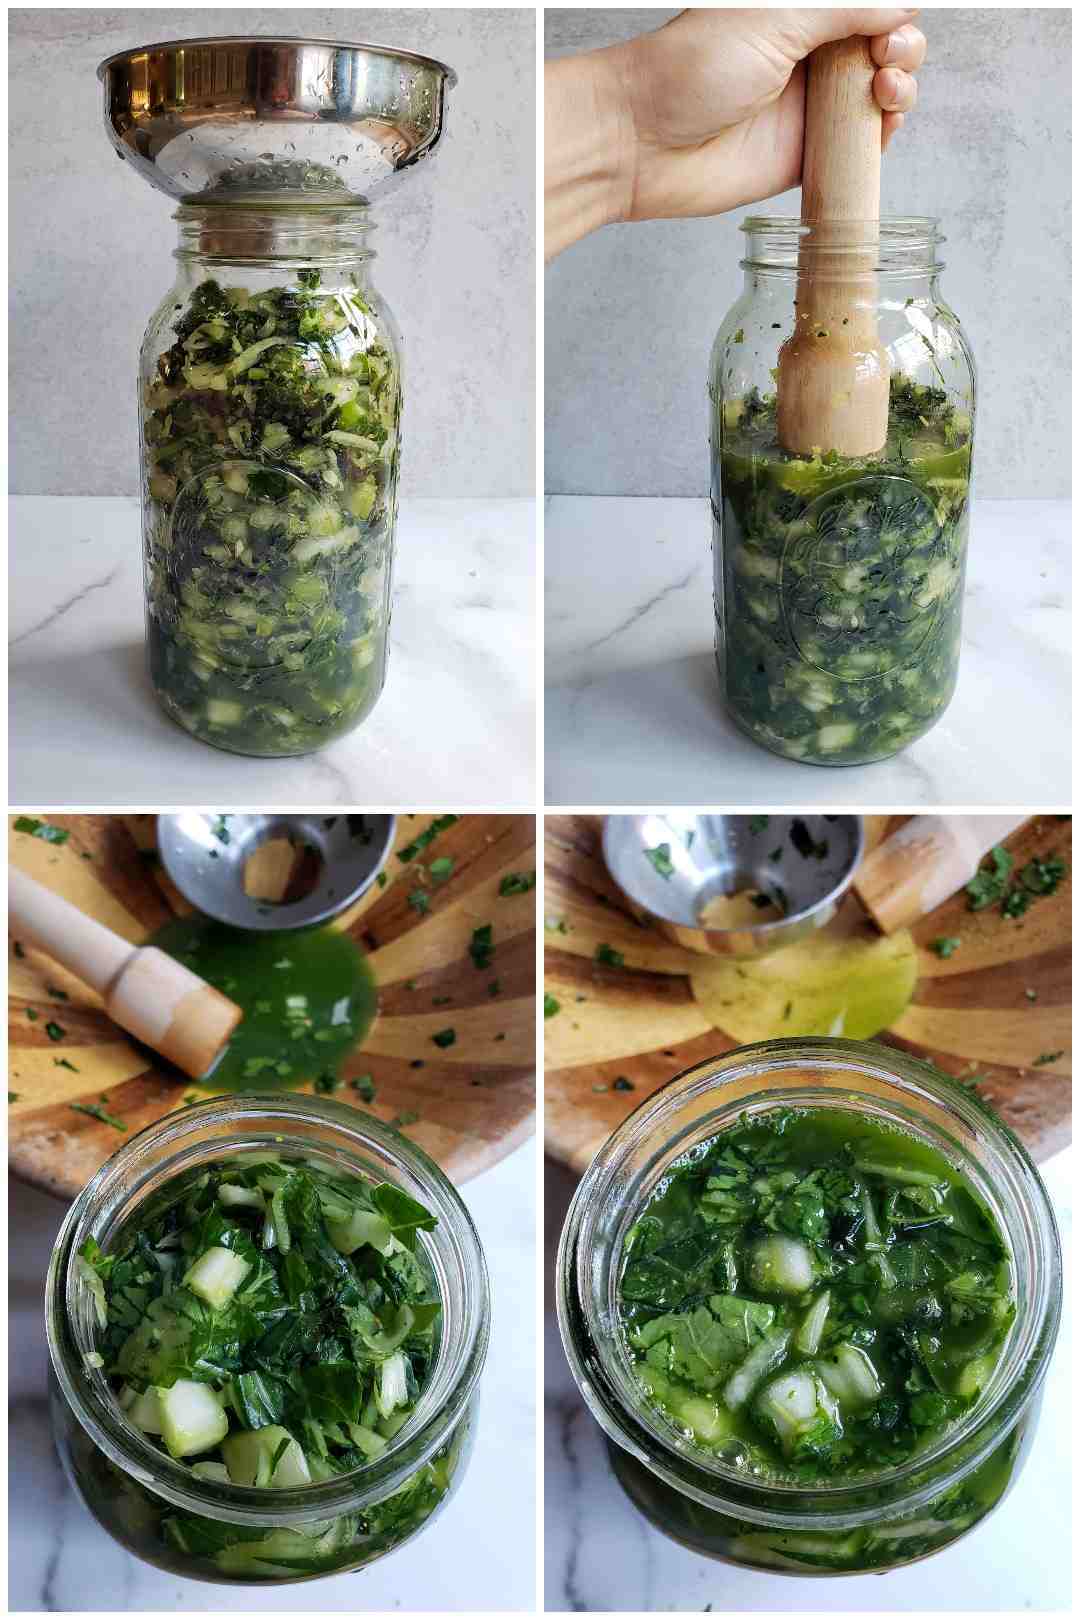
It is time to fill your fermenting vessel with greens! We have found it easiest (and least messy) to fill jars with the aid of a wide-mouth canning funnel and tongs.
Fill the jar, then press it down to compact the greens. Add more, press and compact. Repeat. You’ll be surprised at just how much smushed veggies can fit in a jar! Repeat this process until the jar is completely full and cannot hold any more, leaving no more than inch or so of empty space on top. The goal is to remove as many air pockets as possible.
This step is where a kraut pounder really comes in handy! Before we had one, I used the back of a spoon or even my fist, but I was never able to get it quite as packed in as I can now with a pounder. In addition to packing it in, the pounder is also further “massaging” the greens and creating more brine.
As you press it down, you should notice a decent amount of liquid formed around the greens. The goal is to have your veggies completely submerged in their own juices, so pour any leftover brine from the bowl into the jar if they’re still dry on top once packed in the jar.
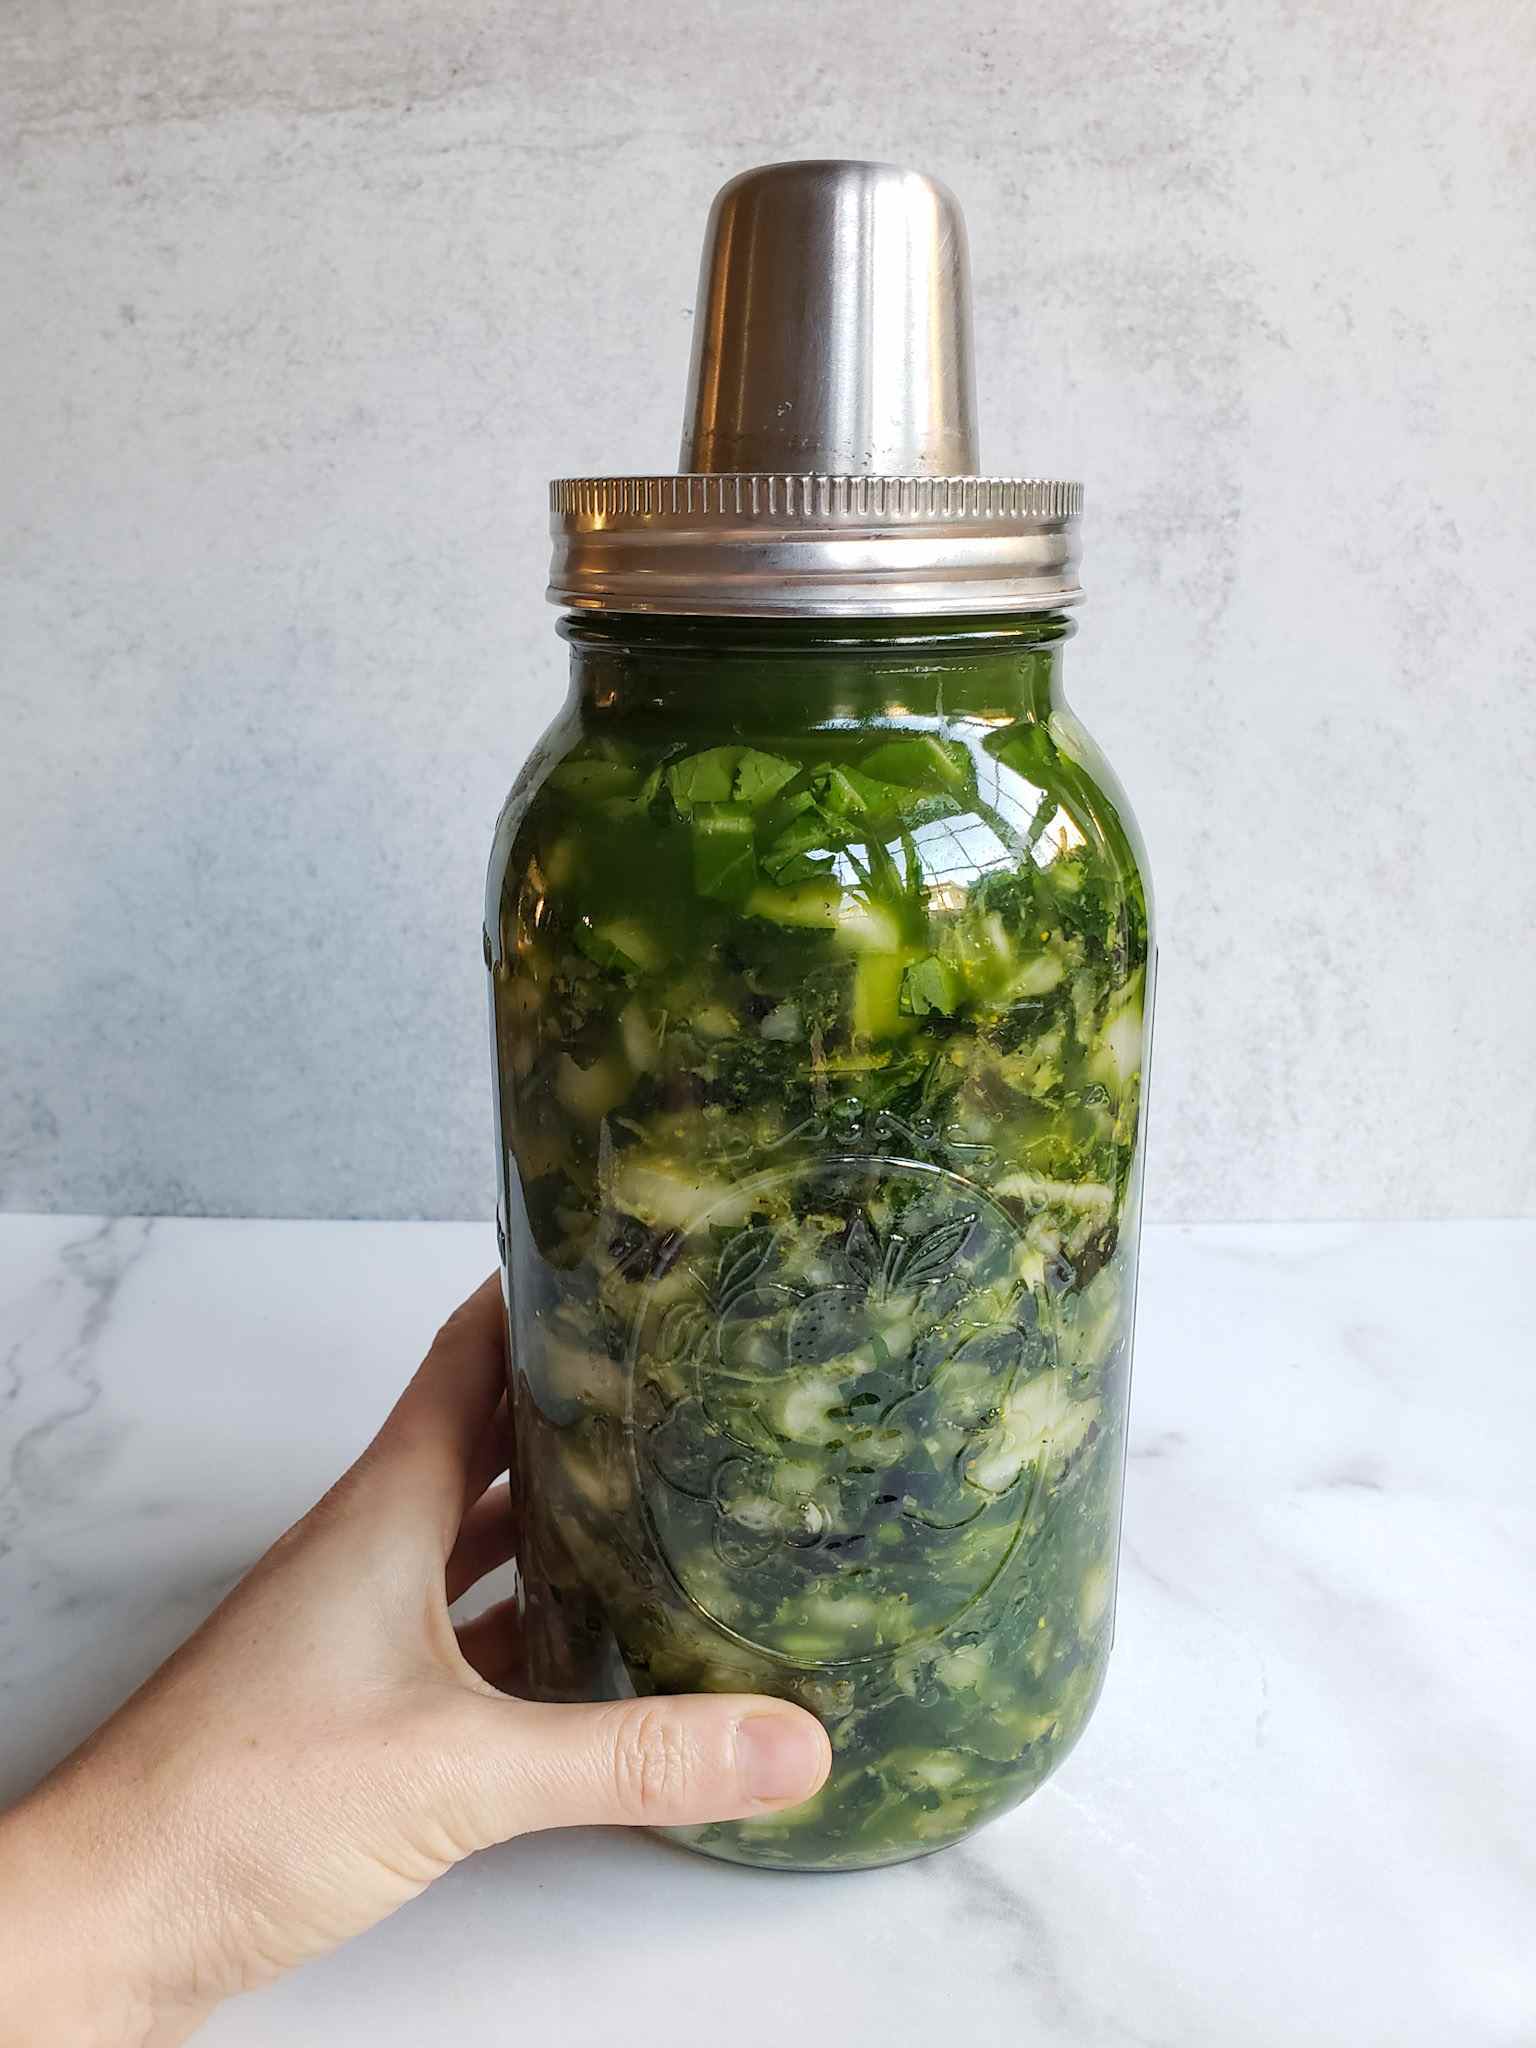
8) Add a weight
Once your jar is full, it is time to weigh it all down. The greens need to stay submerged below the brine level. If veggie bits are allowed to float and be in contact with air, mold can develop!
The all-in-one stainless steel Kraut Source ferment lids we use have a flat plate and spring inside that help to easily accomplish this, acting as a weight to keep everything down. Another option is to use a ceramic or glass weight made for fermenting. Some people get resourceful and use other clean items that fit inside their vessel, like a boiled rock or smaller glass jar.
Helpful tip: Even if you use a weight or Kraut Source device, sometimes pieces can still slip around them. This is particularly true with half-gallon jars, due to their larger size and “shoulders” in the jar. To keep the floaters at bay, we often use a large leaf of cabbage, collard green, or other hearty green to make a “cap”. This is placed on top of the veggies, below the weight, and keeps them trapped below. It should also be submerged as much as possible below the brine. The Kraut Source does a great job keeping floaters down in pint and quart size jars without the need for a cabbage cap.

9) Cover the ferment container
Next, the jar or container you’re fermenting in needs to be covered with a tight fitting lid. The use of an air-lock lid made for fermenting is preferable. These specialized lids allow for the release of any excess air and carbon dioxide that is produced during fermentation, without allowing new air or anything else to come in. This is one more reason why we really love the Kraut Source lids! They not only have the spring and plate that keeps everything submerged, but also have a little moat on top that you fill with water, thus creating an air lock (shown above).
There are a lot of other mason jar fermentation lids out there too. Here are some silicone nipple type. These would need to be used in conjunction with a separate weight of some sort, like these glass ones.
If you’re not using an air lock, you can tightly screw on a regular lid, but then make sure to quickly “burp” your jars every few days to release the built up carbon dioxide. I have heard and personally experienced mixed results with using regular lids for fermenting, which is why we suggest the use of an air-lock.
10) Ferment!
Once it’s all put together, let your green sauerkraut sit out at room temperature for 7-14 days to ferment. The time depends on your personal flavor preference, and the temperature of your house. We let most of our ferments go for about 10-14 days. Warmer conditions will ferment things more quickly, and cooler does just the opposite. The ideal fermentation temperature is around 70-75 degrees Fahrenheit. If it is summer time and your house is warmer than this, try to find a slightly cooler location for your vessel to hang out.
Notes during fermentation:
While it is fermenting, you will notice the green kraut start to undergo change. The lactobacillus is working away to convert the starches in the food into lactic acid, preserving it. In the process, carbon dioxide is formed, so you’ll probably see some bubbling activity in there. The veggies will also start to change color. Colorful vegetables will become more muted. The brine itself gets cloudy, and this is totally normal!
If you are using a Kraut Source lid, keep an eye on its little water-filled moat, making sure it always has some clean water in there. It doesn’t dry out easily though. On the other hand, our vessels usually overflow from the lid for the first several days of fermentation. Be forewarned that yours may do the same! So we alway set our fermentation jars on a plate or in a bowl to catch the overflow. Once that initial burst of activity subsides (about 5 days later), the moat can dry up and you’ll want to add more water into it.
11) Refrigerate
After 7-14 days at room temperature, remove the “cabbage cap” and air-lock lid, replace it with a regular lid, and move your finished green sauerkraut to the fridge. Most fermented foods are good for several months in the fridge, if not longer. We have enjoyed green kraut nearly a year after it was made – though we usually eat it up far quicker than that.
No, you do not want to hot-bath can your kraut! That would kill all of the beneficial bacteria we worked so hard to foster.
12) Enjoy!
Now it is time to fill your belly with probiotic-rich, home-fermented green kraut! We enjoy a little side of green sauerkraut to accompany most dinners, with everything from brown rice and sautéed vegetables to lentils, eggs, salads, homemade veggie burgers or sandwiches. Green kraut is also pretty dang good just on its own.
How do you take your green kraut?

See! That was simple, right?
If this is your first time fermenting, that may not have sounded all that simple. But trust me, fermenting foods at home is not as scary or complicated as it sounds! Not at all. You’ll get the hang of it in no time.
If you like this green sauerkraut recipe, you may also enjoy:
- Fermented Radishes with Garlic and Dill
- Simple Fermented Carrot “Pickles”
- Sweet & Spicy Pepper Fermented Hot Sauce
- Probiotic-Packed Fermented Dilly Green Beans
- How to Make Kombucha 101: Brewing Basics for the Best Booch Ever
Happy fermenting, and cheers to healthy bellies!

Super Green Kraut w/ Garlic, Turmeric & Ginger
Equipment
- Fermenting vessel, such as a mason jar (the amounts below fill one half-gallon jar, or two quart jars)
- Large mixing bowl (or two)
- Kitchen scale
- Fermentation weight and lid (or all-in-one device such as Kraut Source)
- Optional: Kraut pounder
Ingredients
- 4 pounds Organic leafy greens, chopped. Any combination of bok choy, green cabbage, kale, napa cabbage, mustard and/or collard greens. I highly suggest combining two or three different types of greens (including at least one with thicker crunchy parts like bok choy or cabbage) for a nice variety of texture. Avoid tender greens such as spinach or lettuce.
- Optional: Shredded/grated organic daikon radish and/or carrots (to be added to the weight including greens, to make 4 pounds total)
- 2 tbsp Sea salt, kosher salt, or pickling salt
- 2 tbsp Fresh ginger, grated
- 2 tbsp Fresh turmeric, grated (sub with 1/2 tbsp turmeric powder)
- 1 tbsp Minced fresh garlic (approximately 2-3 cloves)
- Black pepper, a few shakes
- Optional: a diced fresh hot chili pepper (such as a jalapeno or hotter), red chili flakes, or fresh finely-chopped dill.
Instructions
- Wash all of your supplies with hot water and possibly some plain white vinegar, but avoid using soap.
- Weigh and/or tare your mixing bowl (or two)
- Wash and chop the leafy greens into small pieces. Grate daikon radish and/or carrot into find shreds.
- Add prepped veggie material to the mixing bowl, until you reach the desired weight (4 pounds for a half-gallon batch, 2 pounds for quart)
- Sprinkle over 1 tbsp sea salt per 2 pounds veggies. Toss and mix well.
- Using clean hands, massage the greens for a few minutes. Stop and wait for ten minutes, then massage again. They should be significantly compressed and also release liquid – the natural brine for the ferment.
- Mix in other seasonings such as ginger, garlic, turmeric, black pepper, and optional hot chilis or dill.
- Pack all veggies into the fermenting vessel (jar). Use a kraut pounder or other utensil to firmly press down to compact and remove excess air. Repeat and add more veggies as needed until the jar is full to 1-2 inches from the top.
- Don't get rid of the excess liquid in the bowl! The greens and other veggies should be fully submerged with brine. Add leftover liquid as needed to cover top.
- Add optional "cabbage cap" leaf, fermentation weight, and air lock lid.
- Allow to sit at room temperature (70-75F is ideal) for 7-10 days, depending on personal preference and temperature. Cooler temps = slower ferment activity.
- Your ferment should bubble slightly during this time, colors will bleed or dampen, and the brine will become cloudy.
- After 7-14 days at room temperature, remove the “cabbage cap” and air-lock lid, replace it with a regular lid, and move your finished green sauerkraut to the fridge.
- Shelf life: Most fermented foods are good for several months in the fridge, if not longer. We have enjoyed green kraut nearly a year after it was made – though we usually eat it up far quicker than that! No, you don't want to hot-bath can this. It will kill all the good probiotics.


29 Comments
Judi Gooding
Hi, my red and white cabbage are not seeping enough liquid to fully cover them. Can I add a small bit of salt water? Or what do you suggest?
Aaron (Mr. DeannaCat)
Hi Judy, it will release more liquid with time but you can also press the cabbage down further and the liquid will typically rise more as the cabbage is pressed. If you still need brine to cover the top of the ferment, use the ratio of 1 Tablespoon of sea salt to 2 cups of water. Hope that helps and good luck!
Karen
I have experience with fermenting cabbage, kale and other harder vegetables with great success. I am about to ferment some turnips I grew this year for the first time and the greens look so wonderful I am wondering if you have tried fermented turnip greens or know if it is advisable?
Thank you for sharing your knowledge and experience I love your posts and refer to them often!!!
Aaron (Mr. DeannaCat)
Hi Karen, you can absolutely ferment turnip greens, or sauté them and eat them like any other green. They are more spicy in flavor, similar to a mustard green, they are quite delicious! Hope that helps and enjoy those greens!
Karen
Thank you so much for answering so quickly. I am just about to start so I can prepare both at the same time!!! I am very excited to try both the fermented turnips and fermented greens!!!!
Sharon
All I have is 2 types of kale and Swiss chard. Do you think it would be mushy? And would Swiss chard being added work? Do I add stems from both?
Aaron (Mr. DeannaCat)
Hi Sharon, your kraut may not be mushy but it may lack crunch and texture. However, adding the stems of the swiss chard would be delicious and would add more crunch to your ferment. You could use the kale stems as well if they are more tender and not too tough. Hope that helps and let us know how it turns out.
Sharon
Have you ever done this recipe with a salt brine instead of the dry method? I was wanting to do salt brine because it seems quicker and I am very new at all this.
Aaron (Mr. DeannaCat)
I Sharon, we typically use the brine method for chopped radishes, carrots, cauliflower, beets, etc. Whereas, when you use cabbage or greens, they contain so much liquid on their own that they release their own juices which creates your brine. We will also take a large amount of the cut kraut material and once it is salted and massaged, it reduces in volume a great amount so more finished product ends up in your jar. However, you can likely try the brine method with this recipe, just be prepared for the ferment to possibly overflow even more than usual as the greens release their liquid during the process. Let us know how it turns out and good luck!
Sharon
It worked. Yay
I am curious if you have ever used broccoli leaves. I know many people eat them and I have an abundance right now.
Aaron (Mr. DeannaCat)
Hi Sharon, we have not used broccoli leaves in a ferment but I think it is definitely worth a shot. Let us know how it turns out and good luck!
sharon
Help!
so I made a half batch becasue I didnt have enough big bowls. Tomorrow I will make another batch. But I filled one full quart but I had extra so I stuck it in I think It is a pint but it only filled half way. Will it be ok? Should I stick it in the fridge till tomorrow and add more tomorrow?
Also where do you get big enough bowls for pounds that would have been so much easier then 2 bowls for only 2 pounds.
Aaron (Mr. DeannaCat)
Hi Sharon, put the lid on the extra pint jar and store it in the fridge until tomorrow when you make another batch, it should be just fine until then. We have a few really large wooden salad serving type bowls that we accumulated in time but I am not sure where we even got them. The tough thing when making large batches of fermented kraut is just getting the greens or cabbage to break down in size with the addition of salt. It can start off a little crazy but everything will reduce in size as you combine the ingredients. Good luck and enjoy your ferment!
sharon
Hello,
Sorry for the follow up. SO my first btach bubbling away like nomal. The 2nd I wanted to give a little crunch so the only change was I added an couple orgnaic carrots. Not mine. And it has been 3 days not a bit of bubbling. Should I be concerned? I have been making ferments since last year I always have some bubbling.
Oh And I tasted some bfore the ferment yummy.
Aaron (Mr. DeannaCat)
Hello Sharon, I wouldn’t be too concerned with it as long as everything else is as normal, enjoy your ferment!
sharon
not sure if there is a way to save it. but my first batch overflowed so much that when it calmed down and reabosrbed it is now dry. I tried smashing it more to get a little juice. have you ever had that happen? were you able to save it? I hate for this to go bad it was so much work to make.
Aaron (Mr. DeannaCat)
Hi Sharon, we are used to it overflowing so we usually set the jar on a plate or some type of saucer to catch the brine that may run off. However, we have never had one go completely dry, to remedy this, make a salt water brine with 1 TBSP sea salt to 2 cups water (or do the calculations to make a smaller amount) and pour a small amount over the top of your kraut. From there, try and press it down some to ensure there isn’t any air pockets left within the jar and see if the brine seeps down. If the top is covered slightly in the brine, you should be good to go. Just be cautious with the brine as you don’t want to make your kraut overly salty. Also, if your kraut has been fermenting for at least a week, you can likely pull the ferment early and keep it in the fridge unless you still want it to ferment longer. Hope that helps and good luck!
Jim
My crock is to big and only button third is packed. Not covered with liquid also.
Can I put a cabbage leaf over it with a weight or should I try to find a hall gallon mason jar?
Aaron (Mr. DeannaCat)
Hi Jim, you may want to use a smaller container, however, as long as the ferment is submerged below the brine, it should still ferment without issue. We have found that sauerkraut can take a little while to fully release the liquid inside the veggies (depending on how much you massage them with salt) but it should produce brine or liquid shortly. You can cover the kraut with a cabbage leaf and weight it down, hoping that the brine will soon cover the veggies as your chance of mold increases if there is oxygen coming into contact with the kraut. Hope that helps and good luck!
Kelly
Would kohlrabi work in this recipe?
Aaron (Mr. DeannaCat)
Absolutely, we love kohlrabi. Enjoy!
Rachel C
Mine came out extremely salty. I added more water and put it in the fridge. Will the saltiness go down?
Aaron (Mr. DeannaCat)
Did you use the lower end of the salt amount that we mention in the recipe? Unfortunately salt is what inhibits the growth of harmful bacteria and enables the beneficial bacteria that lowers the pH of the ferment which helps with the preservation of the food. The ferment may be slightly salty on its own but once it is added to other foods it becomes greatly less so, it is typically eaten with other foods, not necessarily on its own. Hope that helps.
Suzanne
This looks so good! What a great way to get more greens and probiotics in your diet!
Camille
As a well seasoned fermenter, I’ve had some good green ferments and some awful ones! I came upon this magical kraut as I was searching for a way to preserve some collard greens that I received in my CSA box. With the addition of some mustards from my garden and shredded celeriac (I had no daikon), the results were awesome!
I’m ready to make a second batch.
Thank you, DeannaCat, for the instructions, as your recipe will be the backbone for my future adventures in successful and delicious green krauts.
Cravable.
Jamie
I haven’t tried this yet. It would be my first experience with fermenting. I have a couple of questions if you don’t mind. I notice you said no soap. Is that for all the supplies, including the bowl? If so, would it be best to buy a bowl only used for fermenting? I’m going to look into using the Kraut Source lids you recommend. For the after fermenting lid, does it need to be one of those metal two part lids? I only ask because I have reusable plastic mason jar lids. Now that I think about it though, all of those have been washed in soap, as have my mason jars. I’ll have to look into new ones. Anyway, thanks in advance for your help! I’m really looking forward to trying this out.
Aaron (Mr. DeannaCat)
Hi Jamie, if you use soap just be sure to thoroughly rinse it from your tools, containers, and lids so there is no residue left behind. For storage, it is best to use stainless steel or the plastic mason jar lids, the metal ones that typically come with mason jars will rust with time. Kraut Source lids make fermenting so easy and they can’t be recommended enough, good luck!
Jamie
Thank you! I’ll come back and comment how it goes.
Amanda Joy
This was the first recipe I’ve attempted with my Kraut Source lid because I had so many collards in the garden! I did only collards and one stalk of chard because that’s all I had on hand, and it turned out great! I was worried that it didn’t look as juicy as the recipe pic and something would be off but it worked out fine. Will definitely make again!