

Vermicomposting 101: How to Make & Maintain a Simple Worm Bin
Starting a worm bin is one of the best steps you can take in your gardening journey. It may not look like much, but a simple little worm bin is one of the driving forces of life and health on our homestead! When people ask how or why our garden is as lush and healthy as it is, I blame the worms. Vermicomposting (the term for composting with worms) is hands-down my favorite method of the four types of compost we utilize. We have been vermicomposting for over 12 years now!
Read along to learn more about vermicomposting, why it is so awesome, and how to set up and maintain a super simple worm bin at home! Plus, there is also a demonstration video of setting up a worm bin waiting for all you visual learners at the end of the post.
We buy our compost worms from Uncle Jim’s Worm Farm.
What is vermicomposting?
Compost is organic matter that has been thoroughly broken down and decomposed into rich nutrient-dense plant food. By adding worms to the equation, that decomposition is rapidly increased! This means you’ll have ready-to-use compost in no time. Vermicomposting doesn’t just create an extremely valuable and well-balanced natural fertilizer to improve your soil health – it is also an excellent way to sustainably dispose of some of your kitchen and garden “waste”.
Even if you don’t have a garden, keeping a worm bin is a stellar and easy way to divert some of your food waste from the landfill. Moreover, even if you live in an apartment with no yard at all, you too can keep a worm bin! We have vermicomposted while living in an apartment. Worms are very low maintenance pets. Contrary to popular belief, vermicomposting does not stink! When done right, that is… and that is what we’ll teach you how to do today.
From here on out, instead of going into the trash, your food scraps could instead be up-cycled into something miraculous: black gold! Also known as worm castings.
What are worm castings?
Worm castings, aka vermicastings, are an organic form of fertilizer produced by worms. To be blunt, it’s their poop. The most popular type of worms used for composting are Eisenia fetida, commonly known as “red wigglers”. As they eat through organic food scraps, garden trimmings, and the bedding (described more below) in the worm bin, they poop out an optimal soil enricher. Arguably the best soil enricher, ever!

Worm castings contain concentrated, highly-bioavailable nutrients from the materials they were originally fed. Even though the nutrients are more concentrated, worm castings are very mellow and cannot “burn” your plants like other animal manures can. This is because as the materials pass through them, they’re coated with a mucous membrane that turns the castings into the perfect little slow-release fertilizer granules. Beneficial microbes and bacteria are also introduced as the raw material passes through the worms body. If you have read my post about building the perfect organic soil, you already know how important beneficial microbes are to a healthy soil food web!
When added to your garden soil, worm castings increase soil aeration, drainage, and water retention. Worm castings also increase nutrient uptake by plants, and aid in seed germination. Some worms end up in our garden beds too, who then constantly turnover, enrich, and aerate the soil directly in the beds. Cornell University refers to worms as “a living soil amendment”. Worms are so amazing, they can even be used to bio-remediate contaminated soil, reducing heavy metals!
What do you think? Are you ready to start a worm bin? Good! Let’s do it.

WORM BIN SUPPLIES
1) A Bin
As you can see below, our bin is nothing fancy! (Chickens for scale.) There are plenty of neat worm-tower systems out there, but as long as I’ve practiced vermicomposting, this is what we’ve used: a heavy-duty storage tote with a lid. Choose a non-transparent plastic – worms like darkness! Also ensure the top lid area doesn’t have any holes, so rain can’t seep in. Pick up a bin at your local hardware store, Home Depot, or the similar.
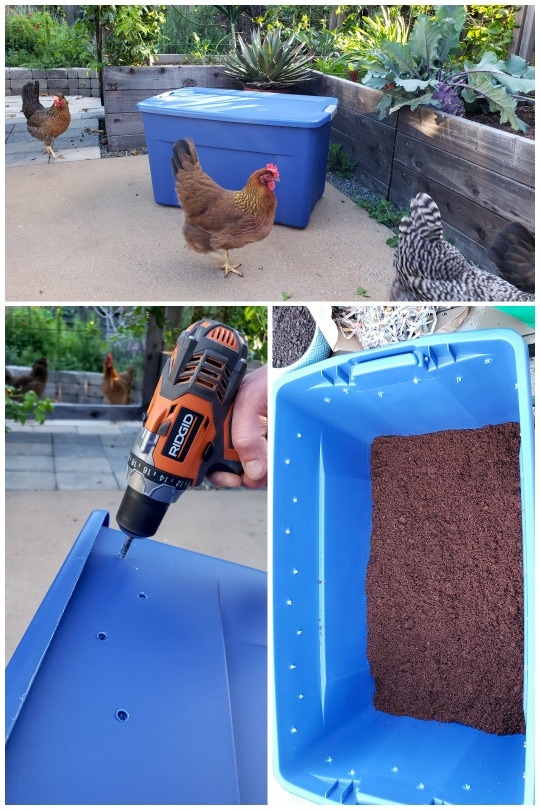
This tote is 35 gallons. We’ve used bins as large as 55 gallons, and as small as 15 or 20 gallons. Choose what size you think will work best for you. We’ll talk more about location and climate soon, but if you do live in a place with extreme weather conditions, I suggest a bin no larger than this – so you can easily move and store it elsewhere as needed.
Using a quarter-inch drill bit, air holes have been added in the sides near the top. Note that there are no holes in the bottom of the worm bin. Many people get confused about this and ask, “but what about drainage?” Well, a couple of things… One, if you add holes in the bottom, the worms will escape! Two, as long as you keep the bin the desired consistency and moisture level, drainage is not needed!
Some pre-made worm systems come with drainage catchment, but keep in mind the liquid that drains from the bin is NOT “worm tea” or “compost tea”. It is leachate, from an overly wet worm bin. Leachate is anaerobic (without air) meaning it is kind of nasty. It is not biologically active in the desirable or beneficial way that real compost tea is.
Check out this post all about how to make actively aerated worm compost tea (AACT)!

2) A location for your bin
Ideally, your worm bin should be kept in a sheltered location, protected from extreme temperature swings. Red wiggler compost worms are most happy and active at temperatures ranging from 55 to 85°F. Outside of that temperature range, they will slow down, eating less and reproducing less. This means that during the winter, you may have to gauge and adjust how much you’re feeding them, cutting back a tad from normal to make up for their decreased activity. In extreme hot and cold, they may die.
Freezing temperatures below 35°F or hot temperatures over 95°F can kill your worms.
Keep in mind the projected outdoor temperature doesn’t necessarily mean the internal temperature of the bin will be the same. A well-maintained worm bin with fluffy, healthy bedding and castings can naturally buffer and protect itself from temperature swings, to some extent at least. If you’re nervous about temperatures, I highly suggest getting a compost thermometer so you can check for yourself. We use one for the worm bin and our hot compost pile.
Our worms, like us, are spoiled rotten with our mild climate here on the Central Coast of California. They don’t have to worry about freezing or frying here. We can keep our worm bin outside year-round with little to no intervention. It is located on our side yard that gets some filtered morning sun and all afternoon shade. However, we have experience vermicomposting in more challenging climates! It is definitely possible!
Worm bins in the winter
If freezing winters below 35°F are the norm for you, plan accordingly. Can you permanently locate or move your worm bin inside a garage, shed, laundry room, or other spare space to help protect them from freezing? When we lived in Providence, Rhode Island while I was in grad school, our bin lived in the shared “indoor” hallway of our old Victorian house turned multi-level apartment. I put indoor in quotes because the hallway was not insulated, nor was it heated, so it was damn cold – nearly as cold as outside, which was in the single digits at times! We wrapped our bin in a large fleece blanket to help insulate it (wool would be even better).
Another way to keep worm bins insulated is to deep mulch inside the bin with a layer of cardboard then a lot of leaves on top. Ours weren’t all that active in the Rhode Island winters, but they survived. Here, we have occasional nights in the mid-30s during the middle of winter, and often forget to protect them at all. They’re tough little guys.
Worm bins in the summer
In the heat of the summer, definitely keep your worms in a shady spot with good airflow. If it’s crazy hot out, can you move the bin inside to a more cool location? Keep your worm bin away from radiant heat sources, like a hot south-facing wall.
If you can’t move your worm bin to a cooler location, and it’s projected be over 95°F, the following measures can help keep a worm bin cooler:
- Putting ice cubes or blocks of ice on top.
- Place a frozen bottle of water (wrapped in newspaper) down inside the bedding.
- Stir and fluff the bin to release some heat, then place damp sheets of newspaper, cardboard, or burlap on top to cover the bedding and worms, and leave the lid off a for a little while.
All that said, we kept a worm bin for years while we lived in Chico, CA where summer temperatures were regularly over 100°F and occasionally over 110°F! We lost the worms only once in a prolonged heat wave. Other times, some died but some lived, so the population bounced back once the weather improved. Back then, I didn’t do many of the intervention techniques I just described. I was a busy, distracted college student – and the worms did okay. Try not to stress about it too much!
The way to fret and fuss over them the least is to keep the bin in a location with moderate temperatures from the start. Because Chico was so dang hot, the environmental department I worked for in college found it easiest to simply keep a worm bin right in the office. This was perfect both for temperature control and ease of access for use and maintenance. Worms make for very well-behaved office pets!
3) Bedding
Once you have your bin situation figured out, you need to partially fill it with a little something before adding any food waste. “Bedding” is the bulk material in the bin that isn’t food waste. To start a fresh bin, we use a combination of shredded newspaper, rehydrated coco coir, and some native sandy soil from the yard. The soil adds needed grit for the worms digestive tract. If you have clay soil, I suggest adding a few handfuls of potting soil instead.
Other options for bedding include shredded or cut up cardboard, shredded phonebooks, straw, hay, dry leaves, or other scrap paper (though we usually try to avoid white bleached paper). The bedding is your “browns” carbon source that is vital in any composting operation!

Bedding is added to start a worm bin. Additionally, as that bedding breaks down and is turned over by the worms (they eat the bedding too!) you’ll need to add more. In an established worm bin, it is best practice to add a handful of “browns” each time you feed the bin more food scraps. The bedding/browns help to offset the higher nitrogen and moisture content of the “greens” – the food or garden waste. This is essential in keeping a well-balanced, healthy bin that doesn’t get stinky and gross! A nasty-smelling worm bin is usually the result of too much food, too little browns, too much moisture, and too little air.
A note about using coco coir:
Coco coir is a great bedding choice. It has excellent moisture retention and fluff, making it the perfect consistency. It is also already fairly broken down, ready to add straight in your garden – whether it passed through the worm or not yet! Coco coir has a neutral pH, which is ideal for a worm bin. In contrast, something like peat moss is slightly acidic. Worms do not like acidic conditions.
If you choose to use coco coir, try not to get it super sopping wet when you rehydrate it! I mean, you’ll need to add quite a bit of water to it… but the goal is to have damp bedding at the end, not soggy. Add some water, wait for it to absorb, then add more as needed until it’s all broken up and damp.
For reference, we had a 10-pound brick of organic coco coir to start. I knew that was a bit too much for our 35-gallon bin, so I cut it in half with a saw. Coco coir seems to be sold only in packs of 1-pound bricks, or 10-11 pound bricks! So you could either do as I did, or get a few smaller ones.
The amount doesn’t need to be exact. As you can see in the photos above, there have been times we started our bedding with varying ratios of coco coir and newspaper. I could have also rehydrated the whole 10-pound brick and used some elsewhere, like in the garden beds or other containers, which is what we’ve done in the past!

4) Worms
Now on to the most essential (and fun) part… the worms! You’ll need to get your hands on some compost worms. The most common are Eisenia Fetida, aka red wigglers. Many people love and use Uncle Jim’s Worm Farm online, us included. You could also check to see if you happen to live near a worm farm, and make a little field trip out of going to pick some up!
The amount of worms to start with depends on the size of your bin. For a bin the size we we’re using in this example (35-gallons) or larger, I would start with at least 1,000-2,000 worms (about 1-2 pounds). For smaller bins, you could start with 500-1000. They will reproduce and your population will grow with time! In the right conditions, a worm population can double in 90 days. On the other hand, worm bins and garden beds are also somewhat self-limiting. They’ll keep their own population in check, so don’t ever worry about having “too many” worms.
Fun worm facts: Did you know that worms have 5 hearts, can live up to 13 years, and are hermaphrodites? They can also eat their body weight in food waste per day! Think about that… Not many other species can accomplish that!

Adding Worms to a New Bin
- It is important to have your worm bin and bedding ready and waiting before your worms arrive so you can get those buggers put to bed straight away! Like any of us would be after a long road trip or flight, they’ll probably be a bit cranky upon arrival and need a snack and a nap, pronto.
- Upon arrival, dig a little hole in the damp bedding. Add some food as discussed below, dump in the worms, and cover them up with more bedding.
- Sometimes those little buggers like to try to escape on their first day or two. Don’t worry, this is normal! They’re just a little wigged out by their new environment. To help keep ‘em in and happy, their environment needs be how they like it: the right moisture level in the bin (damp but not soggy), enough of the right food to eat, and kept dark.
- A trick to help prevent them from crawling out at first is to place a few sheets of damp newspaper on top of the “soil” mound inside the bin. Go back and check the bin after a day. Ours will sometimes cluster around the lid and handle portion of the worm bin. Put them back under the damp newspaper.
- Fast forward a couple weeks. If worms are still trying to escape from an established worm bin? It may be a signal that there’s a problem with the bin, like not enough oxygen, too much acidic food, too wet of conditions. They breathe through their skin, after all!

5) Food
What to Feed A Worm Bin
You’ve got your bin, bedding, and worms – now you can start feeding those hungry little babies! Worms, believe it or not, do have some preferences in regards to their food. Certain things need to be avoided altogether – for their health and the health of the compost bin.
Here is a guide for what to feed your worms:
| Yes, feed us this! | No thanks, we’ll pass… |
| • Almost all fruit and veggie scraps (see the few caveats in the “no” list) • Tender garden trimmings • Eggshells, especially crushed or ground! • Spent coffee grounds • Spent loose-leaf tea or tea bags (staples removed) • Sourdough starter discard (in moderation, since it’s wet and goopy!) | • Meat or dairy products • Animal manure • Citrus (too acidic, we want a well-balanced neutral pH in the bin) • Processed foods • Moldy, rotten food • Spicy foods (we found our worms won’t eat hot peppers or radish greens… weirdos) • Limit amounts of bread, pasta, or other starchy foods |
Would you look at that… Worms know what’s up with a healthy plant-based diet!
How and When to Feed a Worm Bin
Remember, worms can eat their body weight per day. That means that theoretically, if you start with 1 pound of worms, you could feed them 1 pound of food waste a day! Most people find it more convenient to feed them weekly instead, storing up food waste in the kitchen in a compost crock between feedings. We keep a stainless steel compost crock under the sink, add scraps to it throughout the week, and feed them every Sunday. The crock has a carbon filter, so it doesn’t get smelly or attract fruit flies!
Before adding food each week, carefully stir and fluff all of the contents of the worm bin to introduce air, assess how much food they’ve eaten since last week, and generally check the condition of the bin. When you add food to the bin, dig a little hole in the bedding, toss in the food, and make sure to bury it after! You don’t have to cut up food into smaller bits, but it does help them break it down faster. I suggest cutting up large chunks of really dense material, like the butt end of a cabbage.
About every-other feeding we add a handful of new bedding in with the food waste, or, if it’s a large amount of food or kind of wet. You’ll learn to gauge and adjust your food-to-bedding balance with time. For ease, we always keep a bucket of dry leaves or shredded newspaper nearby.

How Much Food to Add?
I mentioned that “theoretically”, worms can eat their weight per day. However, that is under optimal conditions and activity. Sometimes they’re more sluggish, like if it is warmer or colder than their ideal temperature range. With time, you’ll see how much food they can eat in a week, and adjust as needed. If you go back to feed them a week later and there is no food left at all, you can increase how much you’re giving them. Or, even introduce a mid-week snack. However, if there is a bunch of food leftover, you should scale back and feed them less quantity each week.
Not over-feeding your bin (meaning, not giving it more food than the worms can eat in about a week’s time) is THE KEY element to not having a stinky gross worm bin. If there is more food than they can quickly break down, it starts to rot, get overly wet, introduces nasty microbes and fungus instead of the good ones, and goes anaerobic…. Viola, there is that wet trash landfill smell you ordered!
The other key to maintaining not only a pleasant-smelling worm bin, but a healthy, biologically active bin is the right air and moisture.
6) Air and moisture
A happy, healthy worm bin should always be slightly damp but never soggy. An easy way to remember is: the ideal consistency is that of a wrung-out sponge. Worms need air because they breathe through their skin! Fluff and turn the bed weekly to break up big clumps and introduce air before adding new food or bedding. Beneficial microbes also enjoy aerobic environments. If your worm bin seems soggy and stinky, stir in more shredded newspaper, leaves, ripped up cardboard, or other fresh brown material throughout the entire bin to help absorb the moisture.
On the other hand, the goal is not a dry bin! It’s all about balance. If the worm bin seems really dry, give it a light shower with the hose or watering can – but go easy! Start small, stir, assess, and then water. You can always add more water if needed, but it’s more difficult to dry out an overly wet bed if you overdo it.
We have just covered are all the key elements you need to create and maintain a simple worm compost bin! I’m sure you’re curious… what about actually using the compost though?
How to Harvest Worm Castings
Once you’ve had your bin up and running for a few months, you can start harvesting small amounts of finished compost – worm castings! With time, you can gradually harvest more and more as your population grows and they start turning more of the bin over.
Check out this post dedicated to how we harvest and sift our worm castings with a simple DIY screen, to get them nice and fine and fluffy!
In short, here is the easiest way to harvest worm castings from a worm bin like ours: A couple weeks before you want to harvest castings, spread all the material out fairly evenly in your bin. Then feed the worms exclusively on one far side of the bin for a couple weeks. Most all of the worms will migrate there to eat. Once they seem to have migrated over, you can scoop out finished castings/compost from the opposite side without collecting too many worms.
Try to keep as many worms in the bin as possible, but if a few hitch a ride from your bin into your garden, oh well! They’ll become useful residents of the garden in short order. Worms in the garden will continue to aerate, nourish, and improve your soil, in place! They will make your garden shine.
Watch along as I set up a fresh new worm bin!
That is how we vermicompost.
It’s simple, it’s fun, and it’s effective! I hope you find this tutorial to be the same, and feel ready to start your own worm bin at home! Stay tuned for more vermicomposting articles. Feel free to ask questions and pass this on!


160 Comments
Tessa Elsik
I love this and plan to start my bin soon. Is it possible to start a new bin with some worms from an existing bin to grow your worm farm? Of course after the original bin is established and thriving. If so, how is that done?
Aaron (Mr. DeannaCat)
Hi Tessa, absolutely you can use worms from an existing bin to make another worm bin. It may be necessary with time if your worm bin gets too full of worms, although they do a decent job of moderating their population. To do this, all you would need to do is set up another bin with bedding/food and toss a couple handfuls of worms or even vermicompost mixed with worms into your new bin. Just be sure you don’t overfeed them to start as the smaller amount of worms won’t eat as much food as quickly as a higher population. With time, your new worm bin will become more full of worms as they continue to lay eggs and castings. Hope that helps and have fun vermicomposting!
Ana
Thanks for all the info! I’m excited to start! Our winters and really cold up here in Canada so I’m aiming to have a bin that I can easily bring inside for the winters… Would a 7″ deep bin be just ridiculously too shallow?
Aaron (Mr. DeannaCat)
Hi Ana, having a bin that you can keep inside during your cold winters is a great idea, however, I don’t think a 7 inch depth is worth the effort, you may as well just use a bigger bin if you are going to take the effort to set one up in the first place. If you did use a 7 inch deep bin, it will still work, you just may run out of room quicker than you anticipate and you may not have as much depth in bedding to sufficiently cover your food scraps. Hope that helps and good luck!
Steph
Hi you guys
Thanks a lot for all this information. I love your website and I regularly visit it to find answers to all my questions!
Since a couple of months I run a worm bin, too. It worked quit well; as a bedding I used finished compost of our compost pile. The first harvest of the vermicompost was great. Then I wanted to speed up the process a bit. We are a household of four adults and four kids – a lot of kitchen scrap is produced every day and there is not enough space for more wormbins. In a video I saw the method to mix the scraps in a blender and give this mass to the worms which can absorb and eat it easier. Since I do that the amount of worms increased like crazy and I can put more food in the bin. Now the weird thing: sometimes I find parts in the bin, where the food mass is not eaten yet. It has a creamy consistent, often white and it stinks really, really bad as soon as I turn this specific spot. But: the worms like it like crazy! In those stinky spots I find a lot of “nests” – it is as if they like these stinky spots much more then the new food. The bin is not wet. I don’t put “bad” stuff in the bin. So my questions: are those stinky spots anaerobic? Does this influence the result of the worm compost in the end? How comes the worms like it so much? What would you change if you would find that in your bin?
Thanks for your help and greetings from Switzerland, Steph
Aaron (Mr. DeannaCat)
Hi Steph, I am not sure what are you referring to as “nests”? Usually if something is that smelly, it is typically anaerobic, I would just make sure to spread out the blended food more evenly in hopes that there aren’t masses of food inside the bin. It will create more surface area which will help the worms break it down quicker, I wouldn’t be worried about it effecting the final vermicompost as the worms will continue to break down the material in time. It seems like the worms are doing just fine in your worm bin so I would just keep up with what you are doing. Hope that helps and enjoy your vermicompost.
Claudia
I have ants when they find a worm. Attack and eat them. Therefore if I find a worm in the dirt, I am overjoyed!
This bin idea is great and hopefully the ants won’t find their way in and butcher the worms.
Any ideas or comments?
Aaron (Mr. DeannaCat)
Hi Claudia, ants can be a pain and can/will infiltrate your worm bin. They seem to get into ours during the warmer months when in search of moisture or food, although, we just have typical black ants and I haven’t noticed them eating the worms themselves. It may be less of an issue if you keep your worm bin in a garage or indoors somewhere. Setting the bin on a lid that contains water, creating a moat, may keep them from getting to your bin as well. Hope that helps and good luck!
Margo
I have an 18 gallon tote and I purchased 100 worms in March. Our worms live inside as the summers in SW NM are very hot. My question is how deep should the bedding be? I harvested castings yesterday and put in fresh bedding of some dirt and shredded cardboard. (It’s hard to find newspaper here as only a monthly paper and $1 for about 4 pages.) It is only about 3″ deep, but my first bedding back in April was about 6″ deep. With all the castings it kept getting higher and higher so I removed the castings and started with fresh bedding. Should I add more bedding to make deeper than 3″?
I love reading your articles.
Aaron (Mr. DeannaCat)
Hi Margo, shredded cardboard works great! Red wriggles typically are most active in the top inch or two of most bins but 3 inches doesn’t quite seem deep enough as you want to be able to bury any food scraps enough so they are completely covered. You could also add peat moss, coco coir, compost, or even some potting soil to add more bedding to your worm bin. Hope that helps and good luck!
Natasha Williams
Thank you so much for this helpful guide! The pictures (especially what kind of bins NOT to use) were especially helpful. I am excited to start my own worm bin for a fraction of the cost of the pre-made worm hotels!
Aaron (Mr. DeannaCat)
Good luck Natasha!
Luz Sanabria
Dear Deanna and Aaron, thanks for sharing all your knowledge. I consult your site for every garden decision I make.
I’ve using a vermicompost system for a year and I’ve harvested some castings already. Do I need to let them “age” for some time before using them in the garden ? I’ve heard that you need to “age” traditional compost for at least 6 months before actually using it.
Thanks again,
Luz
Aaron (Mr. DeannaCat)
Hi Luz, fresh harvested castings are safe to use immediately out of the bin. Most compost that is recommended to age is mostly animal manure, cow and chicken more specifically. Good job on the castings and I am sure your garden and plants will thank you.
Kathi
Hi, and thank you for the video! After harvesting the worm castings, will I need to add more coco core or have they processed enough that I will not need to?
Aaron (Mr. DeannaCat)
Hi Kathi, unless you harvest every bit of material inside of the the worm bin, you shouldn’t have to add more coco coir. We typically still leave some amount of castings/bedding in the worm bin and add more shredded paper/cardboard afterwards. If you have extra coco coir, it wouldn’t hurt to add it but it isn’t entirely necessary either. Hope that helps and good luck!
Luz
Thanks Aaron. I’ll start using my worm castings right away !!!
DeAnne
Hi Deanna and Aaron!
Love reading y’all’s site. It’s always been very informative and inspiring for me. Thank you for sharing your wealth of information!
We’ve been seriously considering adding worms to our homestead. In Arkansas our soil is very rocky with lots of clay. We are constantly adding to the garden to help the soil.
I read on the uncle Jim’s website you site “A year from introducing your 1,000 composting worms into your bin, you should now have 16,000 composting worms”. I’m curious what y’all do when you get to many worms in your bin? And how do you judge when to many are in said bin?
Thanks!
DeAnne
Aaron (Mr. DeannaCat)
Hello DeAnne, thank you so much for your support and we appreciate that you find the site so helpful! Red wrigglers can increase in population rather quickly but they self-regulate their population at the same time depending on the amount of food they are being fed. Optimal worm bin conditions will lead to them readily repopulating themselves but we have never been over run with too many worms throughout our years of vermicomposting. If you do end up with more than you’d like, you can always split up your worm population into a separate bin and have two worm bins instead of one. I would fully recommend you all start a worm bin, using their castings in compost tea has been a staple in our garden through the years and it’s a great way to help improve your soil. Hope that helps and have fun venturing into composting with worms!
Laura
Thanks for sharing this valuable lesson for putting together a portable-ish worm bin. I am transitioning from a large wood bin that lives outside to something that can be moved into a garage during cold winters. I especially like your description of why not to build one that has holes on the bottom for “drips” – I was one who thought the “tea” was valuable. Love your site and newsletter with so much great gardening and DIY information.