


How to Make a Homemade Rice Heating Pad (or Cold Pack) in 6 Easy Steps
Do you have sore muscles, kinks, and cramps? I know I often do, especially after a long day in the garden! Or, are you feeling too hot, or too cold? In the mood to be crafty? Perhaps you need an idea for a thoughtful and useful homemade gift for someone special in your life? Well, I have just the remedy. A homemade rice heating pad (or cold pack) is perfect for all of those things, and more. Infused with stress-reducing lavender oil, it will reduce your tension with aromatherapy too!
Back in my college days, I was on a tight budget but wanted to make something special for my mom for the holidays. So I came up with this simple design to create a heating pad, using nothing but an old clean pillowcase, organic rice, and essential oils. They were so fun, easy, and inexpensive to make, that I got on a roll and created one for every special woman in my life! I think I gifted about a dozen of these rice packs that winter. All the ladies (and their families) still love and use them regularly to this day – over 10 years later!
The rice packs can be heated in either the microwave or oven, and seem to stay warm for much longer than the average heating pad. I also like to keep one in the freezer, and use it to cool down my skin or the bed on hot days. The fact that they’re toxin and plastic-free, made from up-cycled fabric, durable, and so customizable makes them even more awesome!
So grab your favorite furry assistant, and come follow these simple step-by-step instructions to learn how to make a rice heating pad yourself!

Before we get started:
This tutorial uses a sewing machine, but I am not going to get into detail about how to use one. If you’re new to sewing, check out this tutorial to get a basic beginner’s run down. I got my sewing machine so long ago, it is no longer available. However, this similar basic machine is an award-winning best seller!
Keep in mind that this is a very easy “pattern” and project – and I am so not a seamstress! I did take sewing classes in junior high school and have tinkered around with it occasionally ever since, but I am definitely not well-versed on all the sewing lingo and methods. Nor have I ever walked anyone through one of my projects, but I will try my best here!
I should also note that throughout all of these instructions, it is okay if your dimensions vary slightly from the example.
SUPPLIES REQUIRED
- An old clean pillowcase. You could use what you already have around the house, or even go pick something out second-hand! When I made these in college, I had so much fun treasure hunting for the perfect patterns and fabric at thrift stores. Wash it of course! You don’t have to use a pillowcase though. Any sturdy 100% cotton fabric will do. However, a pillowcase is already sewn on three sides for you, and has the perfect dimensions for this project.
- Durable, thick cotton or polyester thread. Keep in mind that the thread will be fairly visible, so choose something neutral or one that you’ll like with your fabric. Do not use anything metallic.
- A sewing machine is ideal. You could also follow these same instructions and sew by hand if needed.
- About 8 to 10 cups of dry, uncooked rice grains. We get bulk organic jasmine rice, which has a very pleasant sweet smell. I find brown rice a little too earthy for this project. The exact amount of rice used may vary, depending on the final size of your rice pack. (Edit: Substitute some of the rice with flax seeds for an even longer-lasting heat)
- Optional: Essential oils. Relaxing, therapeutic lavender essential oil is our go-to! Instead of lavender essential oil, you could try adding dried lavender buds inside the pack.
Project time: About 30-60 minutes, depending on your comfort level and experience with sewing projects.
INSTRUCTIONS
Step 1: Create an Envelope
If you are using a standard pillowcase, it should be around 20 to 21 inches wide. This will be the total length of the rice pack, but obviously we aren’t going to be using the entire pillowcase! We need to get rid of about half of it. The open end where the pillow enters will be removed – which can be used to create another rice heating pad. Or, you could even use the leftover fabric to create a removable, washable cover for the heating pad.
Turn the pillowcase inside out, and then measure and mark a line 12 inches from the bottom closed-end of the pillowcase. See the photos below. Now cut along that line. The final result should be a rectangle that is 12” wide and 20” long, and is open on top but still sewn shut across the long bottom and two sides – thus creating an “envelope” shape.
If you are using fabric other than a pillowcase, cut two pieces of fabric to 12-13 inches wide and 21-22 inches long, giving yourself that little extra buffer to finish the edges. Keeping the fabric inside out, sew the two shorter edges and one long edge together, creating the same envelope the pillowcase accomplished for us. Or, you could cut one piece at 24” by 21-22”, fold it in half “hamburger style” and sew it up the two short sides. That way, the bottom of the envelope is one contiguous piece instead of an additional seam.

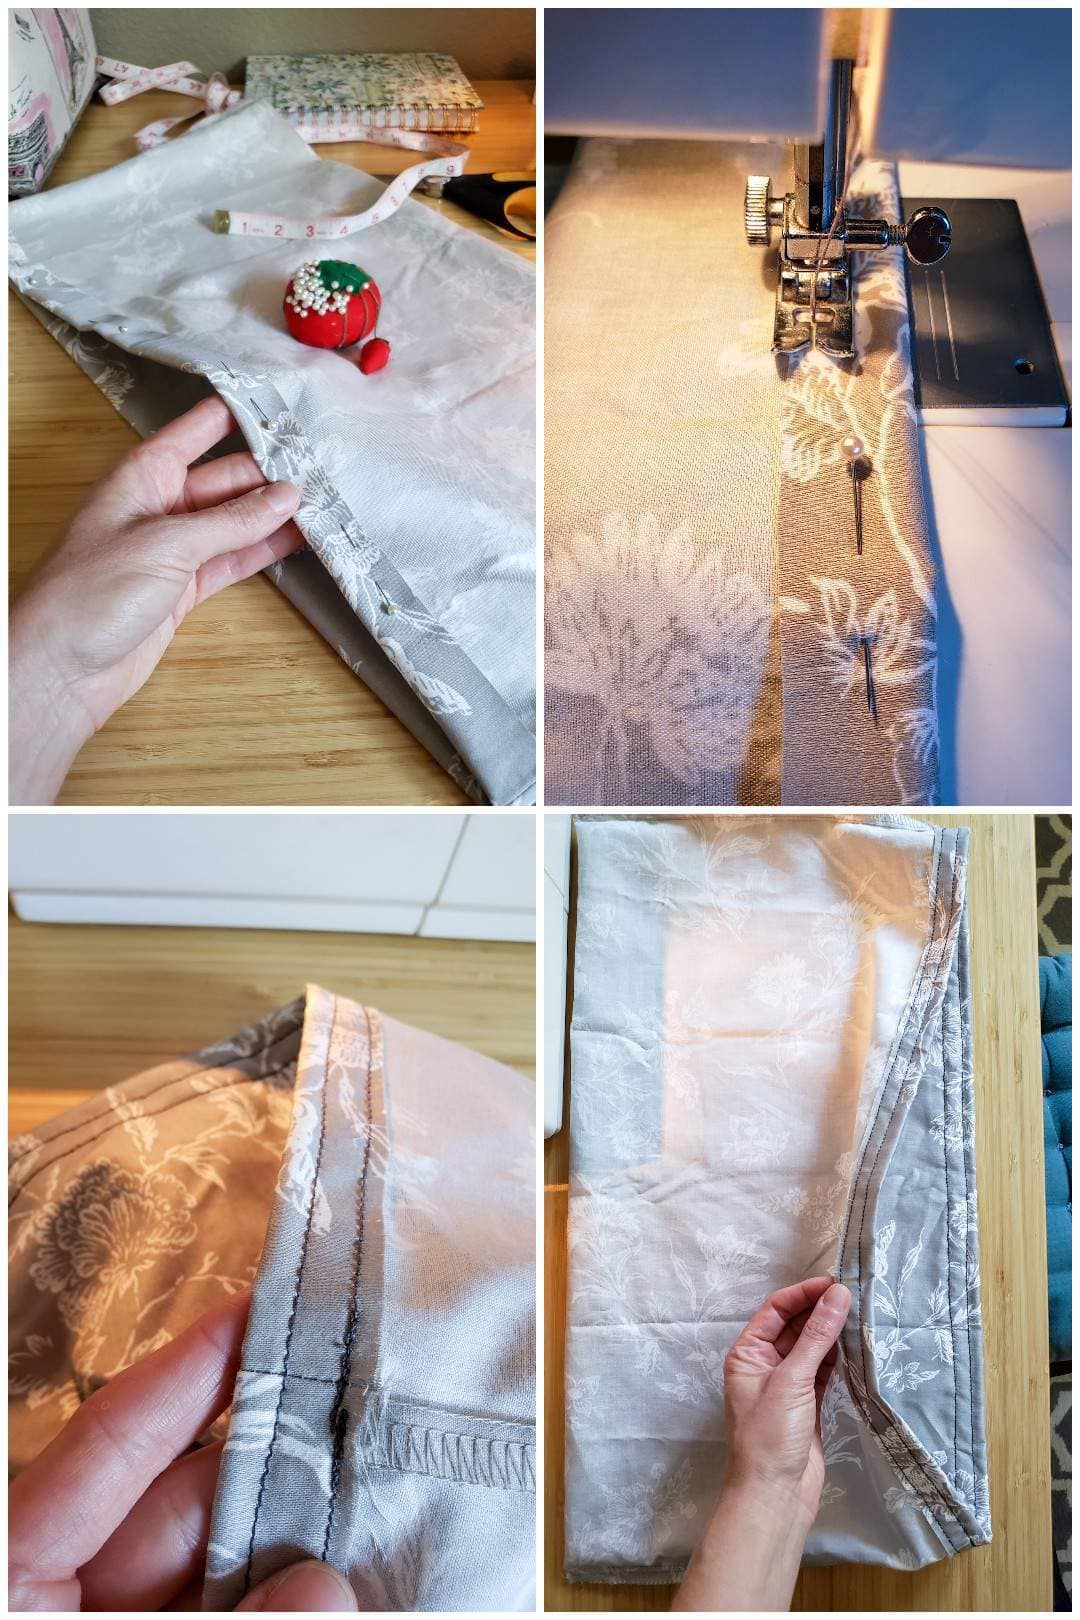
Step 2: Finish the Edges of the Envelope
Next, we need to finish the freshly cut top edges of fabric. Keeping the envelope inside out, roll the top perimeter of fabric down and out by 1 inch. Use straight pins to hold the folded edge in place. Using a straight stitch on the sewing machine, sew around the top border. I typically stitch one seam close to the raw edge of fabric, and sometimes go back around with another closer to the top (see the note in Step 6 to decide if you want to do just one or two lines here). Go back and forth a few stitches at the start and end of each seam to reinforce it. And be careful not to sow the opening of your sack shut!
Step 3: Create Rice Pockets
Turn your fabric envelope right-side-out, and measure the total length of your sack. The one I made here was about 20.5 inches. Across the center of the long side, we want to find the halfway point. So for this example, that was at 10.25 inches. Use straight pins to mark a line evenly up the middle of the sack. Next, measure and divide the right and left portion in the same manner, also marking it with pins. The goal is to mark 3 evenly-spaced lines, which will in turn create 4 individual pockets to hold rice.

Now use your sewing machine to add a straight stitch down each of the three lines you have created. Again, add a backstitch at the start and finish of each. I then follow over each straight stitch with a zigzag stitch, for a little extra support and flair.

Note: I mentioned at the start of this article that your measurements can vary a bit from ours. Meaning, it is totally okay to create a larger or smaller rice heating pad! However, you’re going to want to keep your individual rice pockets a somewhat similar size to this example – about 5 inches wide. Pockets that are 3 to 4 inches would also work well!
However, if you go too much larger, the rice will move around too freely and create an uneven, lumpy heating pad to use. I wouldn’t go any bigger than 5 inches wide. Furthermore, if the pockets are too small, such as less than 3 inches, I find the resulting rice pack becomes overly stiff and less comfortable to use – and also more difficult to fill with rice!
Step 4: Mix Essential Oils & Rice
Add the rice to a large mixing bowl. For this size heating pad, I found myself using just under 10 cups of rice. If you are unsure of the amount you’ll need, I suggest going on the lighter side to start. You can always add more, but won’t want to use the rice for much else once you add essential oils!
Sprinkle the rice with your essential oils of choice. Because we most often use our hot or cold pack during times of relaxation, I stick to using organic lavender oil in ours. Also, lavender essential oils are one of the few safe oils to use around cats, and we have three kitties in this household. I am not great about measuring… but estimate that I add about 15 to 20 drops of lavender essential oil to the rice at first. Then I stir the rice to distribute the oils and coat it well, give it a sniff, and may add another 10 to 15 drops more.
Feel free to scale up or down to your liking. In my opinion, you can never have too much lavender! Especially when it is a nice high quality oil. Keep in mind that the scent will likely be a bit strong at first, but will fade with time. You can always mist the heat pack with lavender spray to reinvigorate it in the future as needed.
Ensure that the oils and rice are thoroughly mixed. Let them sit together to soak in for a couple of minutes. If the oils aren’t mixed well, it may lead to obvious oil spots soaking into the fabric.

Step 5: Add Rice to the Heating Pad
It is time to fill those rice pockets! Honestly, I never used a measuring cup or knew the amount of rice I added before making this tutorial. I went by feel. But to make it easier on you all, I measured this time and found that about 2 ¼ cup of rice per 5” by 11” pocket was the sweet spot. The goal is for each pocket to have plenty of rice to retain warm and cold temperatures, but not so much that it is too bulbous or stiff. Our packs are usually about ½ – ¾” thick once completed and laying flat on a table.
Carefully add the rice to each pocket. I find it easiest to place the sack inside the bowl to catch any spills, because there are sure to be some! Start by filling one pocket. To assess how full it will be once it is sewn shut, pinch the top of the compartment closed, lay the pack flat on the table, and spread the rice out evenly inside. Once you have one filled to your liking, pin the top closed and continue the same process for the following pockets. One way to check if they are all evenly full is to stand the heat pack on its bottom, pocket openings facing up, and compare the levels of rice in each one.


Step 6: Close it Up
Finally, it is time to stitch the heating pad closed! You should be able to keep the end full of rice to the left, sitting alongside your sewing machine on the table, with enough empty fabric space to reach over to your needle – as shown below. I ran one straight stitch between the two existing seams we previously created in Step 2. Then, I add an additional zigzag stitch, tracing over the straight stitch closest to the top edge.
Note: If you want a cleaner finish with one less visible line, you could only sew one seam in Step 2, and then continue with the two closing seams at this stage. I think I have done that in the past, but forgot while I was making this example. It has been awhile since I have made one on of these bad boys!

Step 7: Relax & Find Comfort
It is time to enjoy the fruits of you labor! Or, maybe give them away – which is equally as rewarding, if not more! However, I do suggest that you do one microwave test with each heating pad that you intend to give away before doing so, just to be sure the materials you selected do okay. I also like to give them away with instructions, including tips about time, as described below.
To warm up this rice heating pad:
Simply heat it in the microwave for 3 to 3 ½ minutes. Every microwave varies a little in intensity. For ours, I have found 3 ½ minutes to be the sweet spot that gets it really warm and also stays warm for a long time. I suggest trying 3 minutes maximum first, and to never heat it more than four minutes at a time. Extended periods of time in the microwave can slightly burn the rice, leading to a less desirable odor.
On the other hand, if microwaves aren’t your thing, no worries! You can also heat this rick pack in the oven. Simply place the rice heating pad in inside a glass baking dish inside a 200°F oven for approximately 15 minutes.
WARNING: Due to the freshness of the rice and essential oils, you may find your pack to be a bit steamy at first! Moist heat can be great, but steam can cause more serious burns than heat alone. Therefore, use caution when you are getting accustomed to using your pack. I find that I can lay mine over my clothes almost straight out of the microwave, but not directly on my skin. Let it cool down as needed.
To use as a cold pack:
Store the rice pack inside the freezer to create a soothing cold pack! My favorite use for these rice packs in the summertime is to cool down hot skin when I feel a sunburn coming on, or to place inside our bed a few minutes before we tuck in on hot nights. Unlike most other cold packs, I find these rice cold packs have a cooling effect for several hours in bed! Even though they’re relatively heavy, I bring them with me when we travel to hot locations like Hawaii. They’re just that good.

Wasn’t that simple?
I hope you found this tutorial useful and easy to follow! Try it out and let me know how it goes! I think you’ll love it. Perhaps you’ll even follow in my footsteps and become a little heating-pad-making-machine, and bless the people in your life with one of their own!
If you’re into fun DIY projects, you may also like these fruit & veggie stamped tea towels, blown egg ornaments, or homemade beeswax food wraps. Those are other favorite handmade gifts to give! It’s also super fun to make DIY beeswax leaf garlands in fall.
Please feel free to ask questions in the comments below, and spread the love by sharing this article.


40 Comments
Em
Could brown rice work for this? I have an abundance of organic brown rice and would love to use it and not have to buy white.
Aaron (Mr. DeannaCat)
Hi Em, brown rice will work just fine, good luck!
Gala
Thank you for providing oven instructions! I figured I could find something to heat as I still use beans for pie weights. Every compress out there involves heating in the microwave and some of us choose to live without one. It’s nice to see the alternative method.
Ladette
I make mine with 100% cotton thread and fabric– wouldn’t want anything to catch on fire in when heating in the microwave!
Gloria S Anton
I use flax seed instead of rice – it seems to last longer. And I make my “case” out of muslin and then make a washable, removeable cover.
Aaron (Mr. DeannaCat)
Thanks for sharing your tips!
Lauren Bassett
I too have found that the bag is steamy when first heated. Is there concern about this in the long run? Will the bag mold due to the moisture? Is there a certain filler that produces less moisture?
Thank you!
Aaron (Mr. DeannaCat)
Hi Lauren, after using the same heat packs for years, we have had no issues with mold due to the steam produced. It is just something to be cautious of so you don’t burn yourself right after heating it by placing it directly on your back or other part of your body. Hope that helps and good luck!
Gloria Anton
I make organic eye, back and neck pillows using the fabric squares sold at Joann fabrics, flax seed, organic lavender and organic hops (the plants, not the oils). The hops and lavender help with sleep. The flax seed seems to last longer than the rice, especially when using it in the freezer and exposing it to moisture. I’m still using eye pillows I made several years ago (pre-covid). I send heating/freezing instructions along with the item so folks know what’s in them and can choose for themselves if there’s an allergy issue. 1 fabric square (inexpensive if you grab them on sale) will make 4 eye pillows or one back pillow. I actually make the back pillows and neck pillows out of muslin, and use the fabric as washable covers.
Aaron (Mr. DeannaCat)
Thanks for sharing Gloria! Adding hops is an interesting addition.
DoIHaveTo?
If giving as gifts and using oils, make sure the recipients are not allergic!
Lavender, chamomile, and many others are common allergens. 🙂
I wonder if small packs could be made using doubled up long socks and just tying them off?
(Really thinking more about freezer packs than hot. )
🙂
Aaron (Mr. DeannaCat)
Yes, be cautious if the recipient of the pack is allergic or not, the essential oils definitely dissipate with time and the smell only lasts so long. We use the packs during summer or winter and they likely see equal use in both seasons. You could make packs by using socks as you described, we just don’t like making packs that are too bulbous or hard as it can be less comfortable if you are going to be using the pack on your body specifically. Now if you just want to heat up or cool down your bed as opposed to leaning against the pack on the couch, that should work out great. Hope that helps and good luck making your packs!
Allison
Yes, you can! I have used rice socks for years! I bought white cotton tube socks at Dollar Tree, washed them, then filled one with rice, tied a knot and put it inside the other sock. The elastic at the top keeps the rice sock inside and It’s easy to remove the outer sock and wash it.
I use 4 on my side of the bed — heat for about 45 seconds to1 minute per sock and stick them in the bed while I’m brushing my teeth. They stay warm for hours. If I wake up during the night and they are still warm, I know I should just turn over and go back to sleep!
Aaron (Mr. DeannaCat)
Thanks for chiming in Allison!