


How to Make Homemade Chili Powder in 4 Simple Steps (Dried Chili Peppers)
As fall approaches, the garden chili pepper plants start to ripen and come on strong! Yet as a bit of self-proclaimed spice-wimp, I am not a huge fan of using hot chili peppers fresh. When Aaron dices them up to sprinkle over meals, I take a rain check. However, there are so many stellar ways to preserve and transform them – into less spicy and more versatile little creatures! One of our favorite ways to preserve chili peppers is to make homemade chili powder. Another way is to pickle them! Check out our easy refrigerator pickled peppers recipe here.
Read along to see how easy it is to make homemade chili powder in just 4 simple steps. Also, you can personalize it to suit your flavor palate, depending on the types of peppers you choose! Whether you’re preserving a homegrown harvest of chili peppers, or simply want to grab a peck of peppers from a friend or the farmer’s market – give this recipe a try! Bright and flavorful, homemade chili powder puts store-bought chili powder to shame. For real. It should quit and go home.
Creating homemade chili powder probably sounds rather straightforward. Dry, grind, done, right? Well, pretty much – but we do have a few tips along the way, to get the most excellent chili powder flavor and color possible! We prefer to dry our chilis in a food dehydrator, but I will include tips for drying chilis in an oven as well.

INGREDIENTS & SUPPLIES NEEDED
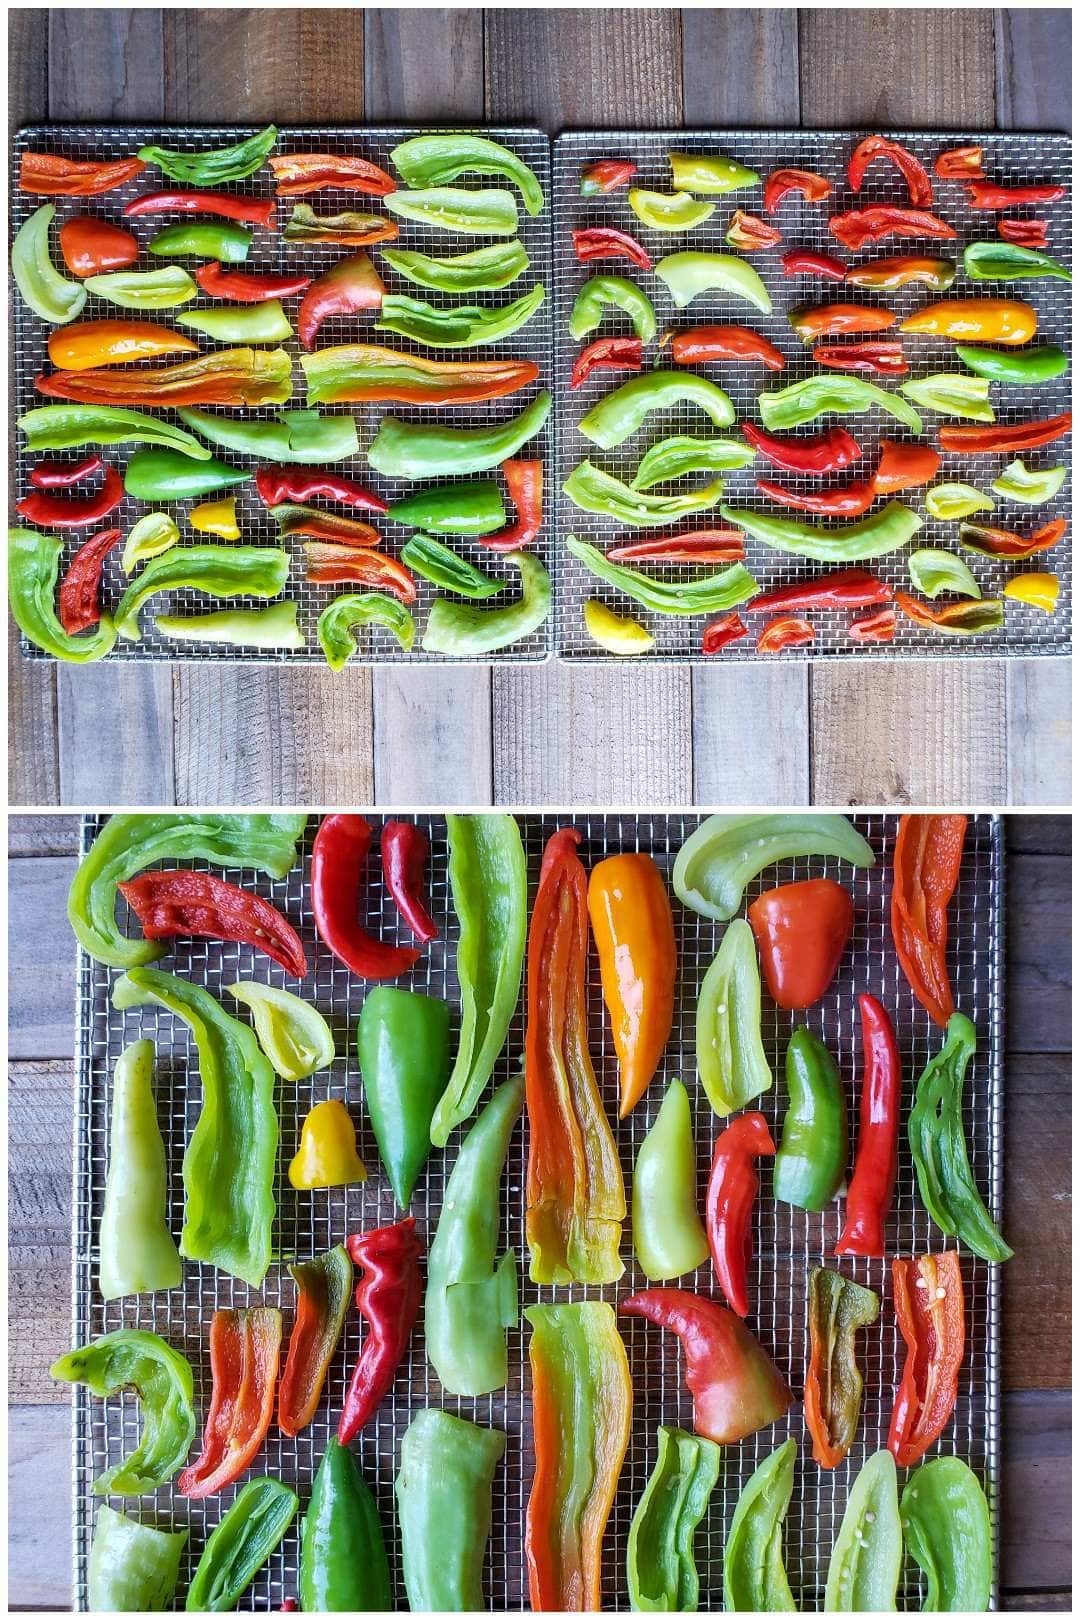
- Peppers of choice. This can include hot chili peppers along with mild or sweet peppers! We always like to use a combination, to create a balanced, flavorful, not hellaciously-spicy finished chili powder. In this particular batch, we used a mix of Corne de Chevre (hot), Banana peppers (mild), mini bells (sweet), Gochugaru (traditional Korean hot chili) and Cayenne (medium-hot) peppers.
- Gloves – highly suggested!
- Large pot and bowl, for the blanch and ice bath process
- Food dehydrator, or oven
- Blender or food processor. Or, if you’re kicking it old school – a mortar and pestle.
Caution!
Before you start your prep work, I suggest gloving up! Even with wearing gloves, wash your hands thoroughly after handling hot chili peppers. Nothing is worse than burning your fingers, or touching your eyes, nose or other sensitive parts later! Capsaicin, the neuropeptide within chilis that makes them so hot, is a corrosive irritant. I also suggest doing your prep near and open window in a well-ventilated room. Be cautious working with hot chilis around children and pets.
INSTRUCTIONS
Step 1: Prep Chilis
Inspect your chili peppers. Avoid using any with soft spots, disease, or other signs of rotting. Wash the peppers of choice. Cut off the top stem portion, and then slice the chilis in half lengthwise.
Unless you’re a heat-heathen, I also suggest to scoop out and discard the inner membrane and seeds. We do, which also makes drying and grinding less messy. It is okay if a few seeds or a little membrane is left behind. Perfection isn’t the goal, but overall we try to remove most of them. If you’re into seed-saving, feel free to set some seeds aside on a paper towel to fully dry – then store away for next year! For tips on seed storage, see this article.

Step 2: Blanch & Ice Bath
You might be wondering about the purpose of this step, or if it is really necessary. Truth be told, it is not required! If you want to skip ahead and start drying your chilis, be my guest! But hear me out first.
By blanching the chilis before dehydrating them, it destroys certain enzymes within the peppers that will otherwise slowly break down the quality of the chilis with time. Though not nearly as extreme as roasting, the quick heating process also enhances the complexity of flavor of the peppers. Therefore, blanching chilis helps to maintain the best flavor, color, and texture of the dried chili powder. The same concept is applied to many frozen foods!
Heat a pot of water on the stovetop, full enough to completely submerge your prepped chilis. While it is heating, set up an ice-bath (a bowl full of ice water) also large enough to hold the chili peppers. It is important to rapidly cool the chilis after blanching to stop the cooking process. Once the water reaches a rolling boil, dump in the chilis. Take note of the time, or set a timer for one minute.
After one minute of blanching, carefully strain the hot water, and get the chilis into the ice bath as quickly as possible. Use caution here! The steam from the pot will be extra spicy! Once the chilis are completely cool, strain away the ice water.


Step 3: Dehydrate Chili Peppers
Drying chili peppers using a food dehydrator:
Next, lay out the blanched chili peppers on your favorite slotted food dehydrator trays. Do not overlap the pepper pieces, as they need some air flow between them to dry properly. We love and use an Excalibur dehydrator these days, but previously used a more basic Nesco dehydrator for many years prior!
Set the dehydrator to 125°F (or the designated “vegetable setting” on your dehydrator), and dry until they’re completely crisp. Again, you might want to do this in a spare room or near an open window. The drying chilis can exude quite a bit of spice into the air! The time it takes for the chilis to fully dry will vary depending on your machine, and the thickness of the type of peppers used.
The goal is to dry them to a state where they snap and crunch when bent, and should not have any flexibility or moisture left to them. Ours usually take around 14 to 18 hours to achieve this.
Drying chili peppers using an oven:
Preheat your oven to 175 to 200°F. The lower the better, as we want to avoid burning the peppers. The goal is to dry them, not cook them! Lay the chili pepper slices out on a baking pan/cookie sheet. To promote quicker drying, it may be worthwhile to cut any larger peppers into slightly smaller slices than when using a dehydrator – no more than 1 inch wide.
Place them in the oven, and allow to dry until they’re completely crisp. The time can vary from 4 to 8 hours or more, depending on the size and thickness of the chili peppers. Flip them over halfway through.

Step 4: Grind Chili Powder & Store (or, in reverse)
An experienced gardener friend once told us that dried chilies stay most fresh and flavorful if they are stored whole, ground in small batches as needed. Therefore, we typically only grind one half-pint jar worth at at time (or less) – which lasts us many months! If you dehydrated a fairly small batch of chili peppers, this may mean grinding all of them at once. That is totally fine! However, if you dried a large amount of chilis or have some leftover from a previous season, wait to grind some of them until your pantry needs restocking.
Next, to transform the dried chili peppers into chili powder, we grind them in a Vitamix blender until the desired consistency is reached. The same can be accomplished in a food processor, large coffee grinder, or similar appliance. When you go to open your chosen appliance after grinding, keep your face back! If you stick your nose in to take a whiff, you’ll inhale a bunch of finely ground, airborne chili powder – aka, Fire.
Finally, store the ground chili powder or whole dried chili peppers in a glass container with an air-tight lid. It will “stay good” for over a year in the pantry!


Step 5: Enjoy!
Now go enjoy some of your very own homemade chili powder, and see what I meant about that sad store bought stuff first hand. The flavor of homegrown chili powder is so complex, savory, spicy, and beautiful! Despite being a self-proclaimed heat-wimp, I thoroughly enjoy a little sprinkle of this stuff – in many meals. If you need help growing your peppers and chilis, check out our top tips here.
We love adding chili powder sprinkled over sautéed vegetables or eggs, in our madras curry lentils recipe, added to soups, salsa, guacamole, hummus, tacos, and more! So, what about you? How do you like to use your chili powder? Tell us in the comments below!
Furthermore, one fun thing you can do with your homemade chili powder is mix it with other seasonings to create your own custom spice blend. To dial down the heat, consider cutting the chili powder with dried herbs, homemade onion powder or garlic powder – or both! Check out the instructions on how to make both of those here:


Homemade Chili Powder
Equipment
- Food Dehydrator, or Oven
- Blender, Food Processor, or other appliance for grinding
Ingredients
- Hot chili peppers of choice
- Optional: sweet and mild peppers
Instructions
- Put on gloves. Use caution when working with hot peppers! Open the kitchen window.
- Wash chili peppers of choice. Select peppers in good condition, free of disease or damage.
- Cut off the top stem portion, then cut the peppers in half lengthwise.
- Remove excess seeds and membranes from inside the peppers.
- Bring a pot of water to a rolling boil. Add prepped chili peppers, and blanch for one minute.
- Remove peppers from hot water and directly to an ice bath (ice water in bowl). Once they're fully cool, strain peppers from water.
- Place blanched peppers on dehydrator trays, or baking sheets for the oven. Do not overlap.
- In a food dehydrator: dry chili peppers on 125F for until they are completely dry, and crunch and snap when bent. Time will vary depending on peppers and dehydrator use, but should be done within 12-24 hours.
- In the oven, dry the peppers on 175-200F until crunchy dry. Flip halfway though.
- Once fully dry, either store whole dried peppers in a jar with a tight-fitting lid until needed, or grind into chili powder for immediate use.
- Grind dry peppers into a powder using a blender, food processor, coffee grinder, or mortar and pestle.
- Store in a glass container with an air-tight lid. It will be good for over a year stored in the pantry. Flavor is best if chilis are ground as-needed in smaller batches, one small jar at a time.


20 Comments
Mary W
Just got my last harvest of peppers on the dehydrator and sat down for cup of coffee and YT. Saw this comment for lemon powder and linked to it. I bought my first Meyer lemon tree last year and have fruit!!! Now what to do with it come December when it should be ripe (Florida). I got a ton of ideas from your article on lemon powder and won’t waste a single priceless organic peel! Karen from The Art of Doing Stuff blog turned me onto you guys a couple years ago when I started journey into sourdough and been very happy with what you provide to me. THANK YOU! I do make my own chili powder – peppers are a real work horse in my garden!
Aaron (Mr. DeannaCat)
That’s great to hear Mary! We really enjoy making chili powder and we are glad to have you here, enjoy those Meyer lemons (our favorite) when they are ready for harvest.
Amy miller
So happy to find this recipe, and your blog. I love your writing voice and I’m going to try your recipe as soon as I get my hot peppers harvested. Can’t wait! I’ve never made chili powder before, but I’m expecting that it’ll be in a different bracket altogether from the store-bought stuff. Yay!!
Bruce
What sweet peppers to you recommend drying with the chili peppers?
Aaron (Mr. DeannaCat)
Hi Bruce, really whatever sweet chilis you have growing in your garden will work. We like banana peppers, different varieties of sweet mini peppers, cayenne (slightly hot), or even red bell peppers would work. Hope that helps and enjoy!
vince picchiello
Totally awesome recipe. This is my favorite website by a country mile. I thoroughly enjoy receiving your weekly publication.
I have a question in regards to peppers hot and sweet alike. This year many of my peppers have rotting/black seeds inside their membranes. Most times the peppers look completely healthy on their exteriors. In fact, I have Turkish eggplants that display the same symptoms. Many of the peppers have soft outer spots that indicate rotting.I live in Toronto Canada and our weather this summer has been extremely hot with very little rain. I’ve tried to maintain a regular watering routine but the ground doesnt appear to absorb water aswell as a steady rainfall can. Can you help diagnose this problem with me.
Thanks in advance
Aaron (Mr. DeannaCat)
Hi Vince, thank you so much for the kind words and for supporting the website. The black seeds may just be bad seeds that either died or didn’t develop properly. What color are the spots on the peppers? The soft spots on your peppers could be due to sunscald which happens when the fruit receives too much direct sunlight which in turn burns the fruit, this often happens to tomatoes as well. The sunburned part of the fruit will turn dry and leathery with time. If the spots are occurring on the bottom of the fruit, it may be blossom end rot which can occur with irregular watering. There is also a disease called anthracnose that usually affects tomatoes and potatoes but it can show up in peppers as well. Hopefully that gave you a few ideas to work with and hopefully you can get it all figured out, good luck!
Pey-Lih
You also made lemon powder? Did you dry out the rind and then grind them up? Do you use this for baking? You are encouraging me to get a food dehydrator and make my own spices. That’s pretty cool.
Aaron (Mr. DeannaCat)
Hello Pey-Lih, we make lemon powder, garlic powder, onion powder etc. We have articles for each of them, here is the link to lemon powder so you can see the whole process and the different ways you can use it; How to Make Dehydrated Lemon Powder + 13 Ways to Use It. Hope that helps, thanks for reading and good luck!
Greg Corning
I have chiles from last year which I dried using a traditional “ristra” – stringing them together and hanging up. Do you know anyone who has used air-dried chiles to make chile powder? Are there any specific tips about doing so?
Thank you.
Aaron (Mr. DeannaCat)
Hello Greg, we don’t typically air dry chiles for chili powder though we will let them air dry when we want to seed save from certain chili peppers. You could make the chili powder from chiles dried using a ristra, just be sure to avoid the twine or other materials used to keep them together. Dried chilis are also best used within a year for optimal flavor. Good luck.
Doug
Have you done this with Jalapeños?
DeannaCat
Hi Dough – Yep! We haven’t done jalapeños just by themselves (we always use a combo of a few different types of peppers) but have definitely included them in the mix! I’m sure they’d made a great powder too.
susan horst
I have also made jalapeno salt – dry the jalapenos and when you go to grind them I add some kosher salt – amount depends on you – makes the powder go further and so tasty!!
Aaron (Mr. DeannaCat)
Great idea Susan and it sounds delicious!
Karen L K
Thanks for the information. I got a lot of peppers this year and I am thinking of drying them. My son has dried some of his very hot peppers a couple years ago. Do you tend to have several different peppers types in the batch?
admin
Yes! We like to mix some sweet and mild with the hot ones to create a more well-rounded flavor profile 🙂 Enjoy!
Lavona
I like to pan sear my peppers before oven drying. It gives a slight smoky sweetness to the final product. Much better than just dehydrating.
Aaron (Mr. DeannaCat)
Thanks for the tip!
Sarah Post
Perfect timing again!! I’ve just harvested two huge bowls of chilis the past couple of days and planned to make chili powder for the first time!! Thank you for all these tips!!!