


Homestead Update: Deep-Cleaning the Chicken Coop
Well friends, we officially tackled our first big project at the new homestead: preparing and deep cleaning the chicken coop that we inherited. Excuse my French, but talk about a sh*t show! Literally. (You’ll see what I mean soon) Don’t get me wrong: I’m incredibly grateful to not have to start completely from scratch! But oy vey, this place needed a LOT of elbow grease to get to a level that I felt comfortable moving our girls into. After all, we can’t move in until the girls can move along with us!
So, come along and look at plenty of pictures of poo while I walk you through the process we took to clean, sanitize, rehab, and refresh the existing coop and run while also addressing concerns about biosecurity, predators, parasites, and more.
I should mention that I don’t want this scene to overwhelm or deter anyone who may be on the fence about getting chickens! The condition of this coop was NOT normal, and easily avoidable with more routine (and less cumbersome) cleaning. I find it even easier to keep a smaller coop clean, like our old coop. If you’re considering or new to chicken keeping, stop by our “Backyard Chickens 1010: What to Expect When You’re Expecting” article.


The State of the Coop-ion
The existing chicken coop is a converted 8×12’ shed with an attached 18×18’ fenced run. It sits about 30 feet to the right of our back patio, and I love that we can easily keep an eye on them from there – as well as from our upstairs bedroom balcony. From what I can gather, the coop was installed in either 2016 or 2017.
No offense to the previous owner’s… but it seems like perhaps they were attempting to use the “deep litter method” (but not correctly) or the coop was simply neglected, because we were left with what appeared to be about 5 years worth of chicken poop to deal with. It’s hard to tell from the photos below, but the bedding on the floor was about a foot deep in some places. There were two extra-large cat litter pans poised below the old roost that were completely overflowing with crap.
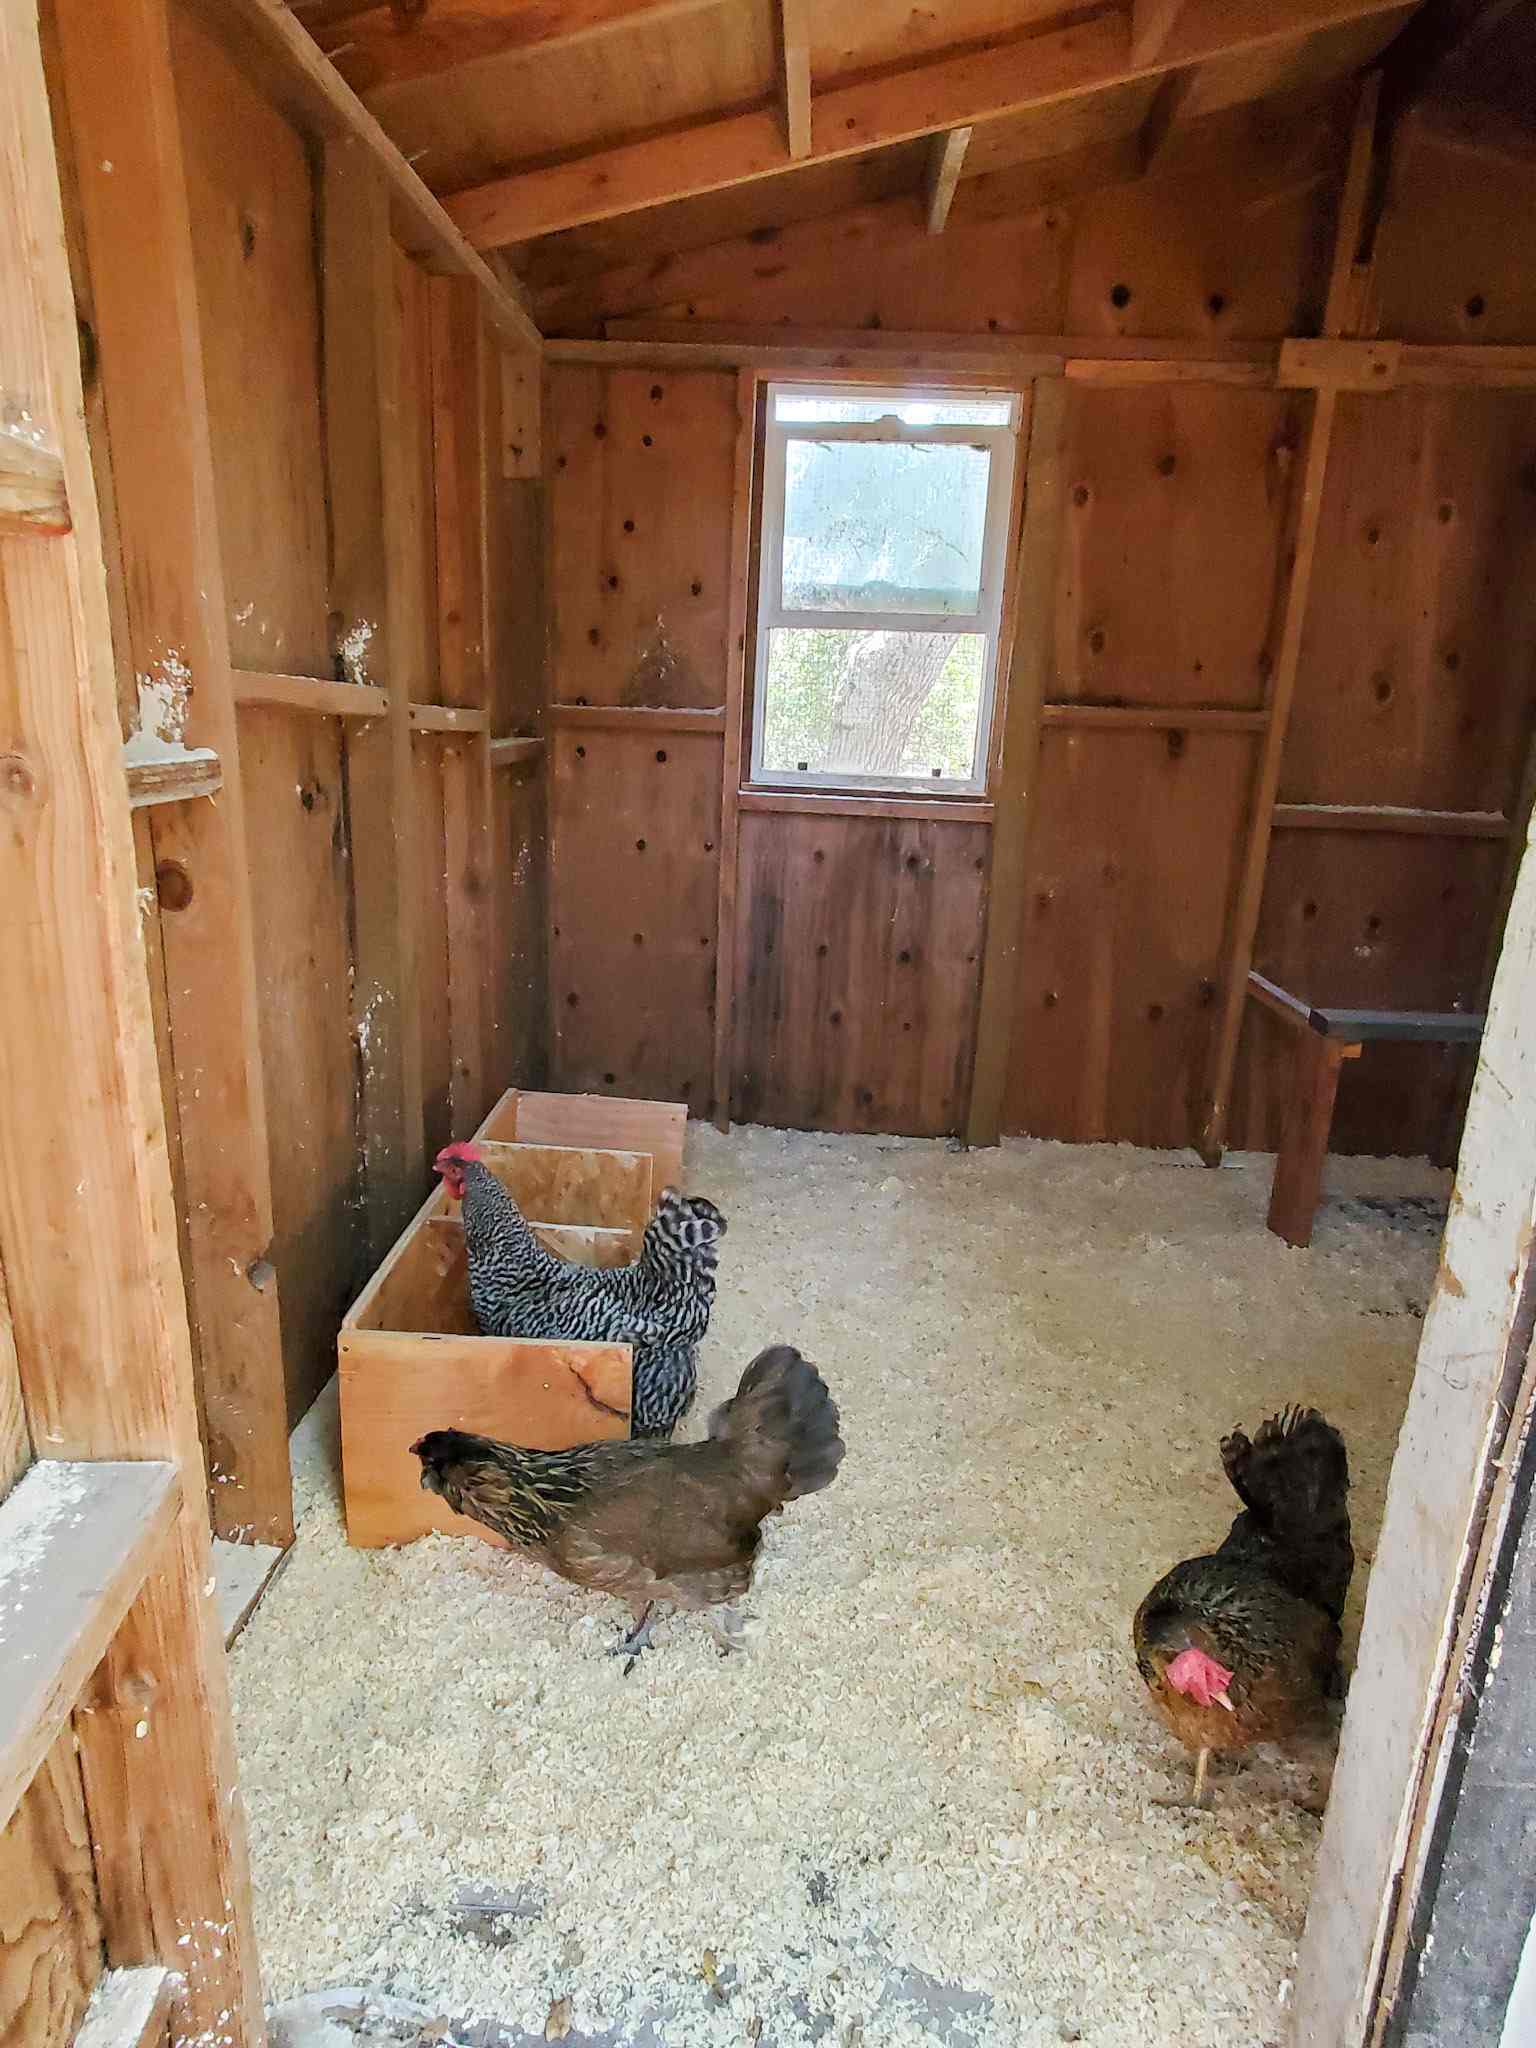
And let’s not forget the window… The nesting boxes were positioned in front of a window and secured in place. If you know chickens, you know they like to perch (ahem, sit and poop) as high as possible, which is why I always suggest keeping the nesting boxes lower than any other available roosts. The top of these old nesting boxes was the highest perch point in the coop. So naturally, they hung out there – and pooped into a void between the backside of the nest boxes and the window behind it. The result = years of accumulated poop in the open screened window.
Alright, I think you get the picture… but just in case, here are some photos:


Biosecurity & Pest Concerns
Trust me friends, I understand that chicken coops aren’t going to be pristine! And it’s one thing to have your own chickens living in certain conditions. Yet there was no way in hell I was going to move our girls into this place without a thorough and deep cleaning – for everyone’s health and safety. In addition to being downright gross, we had no idea about the health of the previous flock and potential issues that could be lurking in the contents of the old bedding, poop, and coop or run.
Things I was concerned about and needed to assess or address:
- Adequate predator-proofing
- Potential disease, bacteria, pests and parasites
- General cleanliness (e.g. dust control, odor, leaf litter accumulation on the run, etc)
- Functionality – both for us and the chickens
Let’s talk about the first two now, then I’ll get more into functionality later as I share the changes we made to the inside.
Chicken Coop Predator-Proofing
Chickens have more predators than most folks imagine! On this particular property, the primary chicken predators we’ll have to contend with include hawks, owls, coyotes, raccoons, skunks, and opossums. Someone mentioned we may also have weasels in our area, which also kill chickens. In other places, fox, bears, bobcats, or mountain lions and other large predators or birds of prey could be of concern. You also don’t want rodents or snakes to get in, as they’ll threaten the eggs, feed, and generally become a nuisance.
The very first thing I did with the new chicken coop was a perimeter check. I was pleased to see that they used hardware cloth for the run, as a skirt under the coop, and over the windows. Hardware cloth is the best option for predator-proofing a chicken coop area since it’s incredibly durable and has very small openings for any critters to slip through.
Despite the misleading name, “chicken wire” shouldn’t be used for predator-proofing a chicken coop or run. The holes are large enough for mice or some rats to squeeze through, and it’s not very strong at all. Certain animals can tear through it, rodents can chew through it, and it also degrades, rusts, and weakens significantly with time.

However, as I cleared off branches and leaf debris from the top of the run, I did find a number of large gaps in the hardware cloth over the top (big enough for an opossum or raccoon to enter) as well as some rodent-size gaps along the sides. We don’t have the time to fully batten down the hatches before the girls move over, but I was able to close up the biggest gaps with large zip ties for now.
At this point, I consider the run safe for daytime use, but we’ll close up the coop overnight just in case anything sneaks in then. The coop itself is pretty sound. We’ll eventually add an automatic chicken door that will open the coop to the run at dawn and close again at dusk.


Disease and parasites
After the predator safety check, it was time to tackle deep cleaning and sanitizing the inside of the chicken coop. You’ll see our step-by-step process below, which included carefully removing all the contents of the coop, washing and sanitizing the inside, installing a new easily-cleanable floor, new nest boxes, roost, and applying lime in both the coop and run.
My main concerns were potential for lurking poultry lice, mites and general bacteria and dust, followed by Marek’s disease and any other disease that inflicts chickens. The virus that causes Marek’s disease can reportedly live for up to 5 months in the environment, and the last flock moved out of this space about 4 to 5 months ago, so we’re right on that threshold. Our girls were vaccinated for Marek’s as chicks, though that isn’t always 100% effective. Because the soil is super dry here 99% of the year, parasitic worms aren’t a huge concern but also something I had in mind.
For us humans, I was worried about histoplasmosis – a harmful fungus that lives in bird and bat droppings, and can result in serious illness if inhaled. Therefore, OF COURSE we thoroughly masked up, and worked slowly and methodically in an effort to not stir up any more dust and movement than necessary while we worked.
Deep Cleaning the Chicken Coop
Step One: Removal
The first couple of days of deep-cleaning the chicken coop was spent clearing out everything from inside: the deep poopy bedding, poop-filled cat litter trays, old nesting boxes, and old roost. We ended up filling ten 40-gallon trash bags full of bedding and poop! And poop is much heavier than one may imagine… No, we didn’t fuss with composting any of it because a) all the biosecurity concerns I just mentioned above b) we don’t have a proper compost system set up at the new homestead yet, and c) we simply didn’t have time to mess around. We needed this thing chicken-ready, pronto.
Again, we took great care during this process to move slowly, wear masks, and stir up as little dust as possible. Rather than dumping shovel-fulls inside the coop itself (and creating dust clouds) we kept the trash can outside the coop door where it could air out. While Aaron worked on clearing out the inside (bless his soul!), I was busy removing branches and leaves from the top of the run – using a combination of a push broom from above and my new favorite battery-powered leaf blower from below.


Day two of removal was just a quick one after work, but an especially gross (and honestly, comical) task: removing the old nest boxes that had caused the infamous “poop window”. As we pried the very attached nest boxes away from the wall, a literal cascade of sh*t came pouring down from behind it as we ran from the coop. Even then, a several inch thick wall of poo was still stuck in the window, so next we poised a trash can below it, and Aaron pushed on the screen from the outside to get the poo wall to fall forward and into the can – while I filmed and laughed. Then I got in there and finished the job from the inside.


Step Two: Cleaning & Sanitizing
Next, it was time to hose this baby off. Some folks suggested a pressure washer, but that strong of a blast in a confined space would have just sent poopy water splattered everywhere – including on me. So instead I started with a gentle “shower” spray to knock all the dust down first. Then I switched to a firm jet stream and went over all the walls and floors again. The water pooled in one area of the coop so we used an old push broom to usher it out the door.
Once all the standing water was out, I sprayed everything down with several coats of plain undiluted white vinegar by adding it to a garden pump sprayer, and focused on the heavily soiled areas the most. Vinegar is an excellent natural sanitizing agent, albeit not quite as strong as bleach (I wasn’t keen on coating the space with bleach, especially because I was going to be in there working, and even spraying the ceilings above me).
Because the chicken coop is a plywood-based shed, it was important for it to dry out as quickly as possible thereafter in order to not warp or ruin the plywood. We had brought over a box fan from the old house and set it up in there with the coop door and all 3 windows open. It was totally dry 24 hours later. I also needed everything to be dry before we proceeded to the next step, adding a new floor.


Step Three: Install New Flooring
Next, we added sheet vinyl (laminate) to the bottom of the chicken coop to create an easily-cleanable and nonporous floor. That’s what we have in our old smaller coop, and it makes routine deep-cleaning of the chicken coop much easier! The coop shed is 8×12’ and we found that our local Home Depot carried sheet vinyl in that exact size, though you could also order a larger roll and cut it down as needed.
First, we unrolled the vinyl out on our patio in the sun for a few hours to get it to relax and lay flat. Then we brought it inside the coop and quickly realized it was a bit too large, so we aligned it along two sides of the walls and used a razor blade (box cutter) to cut off the excess from the others. Next I pulled up/back half of the vinyl and applied a strong construction adhesive (rated to bind to wood, plastic, and vinyl) all along the sides and middle of the existing plywood floor below, laid the vinyl back down over it, and walked all over it to squish it all down. Then we repeated the process on the other half.
Finally, I added a handful of roofing nails along the perimeter to provide extra hold – in the corners, along the doorway, and in a few odd raised spots. That step probably wasn’t totally needed because the adhesive bonded quite well, but I had the nails already so… just in case!


Step Four: Dust for Pests & Parasites
Though the walls had been sprayed down and sanitized, I still hadn’t done anything to address potential mites, lice, or similar pests at this point. Poultry lice and mites are tiny parasites that feed on chicken skin, blood, and feather parts… Gross, I know. Even more, red poultry mites are known for hiding out in between wood boards, roosts, nesting boxes, and similar crevices – and can live for many weeks without a meal! So the next step was to dust the walls, beams, corners, and perimeter of the new floor with lime powder. (We didn’t dust the old floor first so that the adhesive would stick).
I dusted everything using First Saturday Lime, including the dirt in their run. It’s a natural, nontoxic, and pet-safe pest product that desiccates (dries out and kills) any insect with an exoskeleton – inducing mites, fleas, lice, ants, beetles, and ticks. It has a very similar method of action to DE (diatomaceous earth) but doesn’t pose the same respiratory risk as DE, a natural silica-based substance. Food grade-DE is technically non-toxic to humans and mammals, is safe to consume, but shouldn’t be routinely inhaled. I know many chicken keepers use DE; we did for years as well. We’ve been transitioning over to lime instead.


Step 5: Fresh New Additions
Now, let’s make this house a home! Using random scrap wood we already had around the homestead, we whipped up a new set of nesting boxes and a basic roost. Fresh pine shavings went on the floor as bedding, and I also sprinkled a little lime around in that too. We also brought over their favorite sawhorse roost for the run.
As a roost, I like to give the gals a flat board (a 2×4” on it’s wide side) instead of a round dowel or branch, and they seem to prefer it too! After all, I can only imagine how much more comfortable and stable it is to settle in for the night when you don’t have to wrap your feet tightly around something to hang on. I intentionally used more narrow 2×2” side supports to encourage them to sleep on the main wider roost instead, since that is positioned over the poop board.
Poop board, huh? Just like in our old coop, we created a poop board that sits below their roost. It’s simply a piece of plywood wrapped in sheet vinyl that is glued in place. The idea is that 90% of their coop poop ends up on that board, and then we can easily scoop it up every day (or every other day) using a wide paint scraper and dust pan. It keeps the coop so much more clean, tidy, and odor-free! The vinyl makes it easy to periodically wipe down and sanitize too.


In regards to the nesting boxes, we really only needed two for our four hens, since chickens prefer communal nests and often lay in the same box anyways – but figured, hey why not add another? We kept that on the coop floor since that is what they were used to in their old coop, and also to discourage sleeping in the nesting boxes.
99% of the time, chickens will roost (and poop) at the highest point of the coop at night, so it’s always best to keep nesting boxes at a lower elevation than their roosts. The previous nest boxes were the perfect case-in-point: that’s what caused the infamous poop window! The top of the nesting boxes was the tallest thing in the chicken coop. I’ll write a separate how-to for building the next boxes soon, for those interested.

Step 6: Moving Day!
Or should I say, moving night? Did you know that chickens can’t see in the dark? That is why they instinctively find an elevated roost come dusk. That said, chickens are typically far easier to handle and seemingly more calm (maybe just scared and still?) in the dark or night. So that makes it a great time to quietly slip them into a new environment, add a new chicken to a coop, or even swap eggs for baby chicks under a broody hen.
The first evening we were ready to stay in our new place, we headed back to the old house to collect the girls after the sun went down. We loaded them up in a combination of cat crates and cardboard boxes (with air holes) and puppy pads on the bottom. Still working in the dark, I plopped each one down on their new roost and said goodnight. Come morning, they were mildly cautious to get down and explore their new digs – but with a little coaxing and black oil sunflower seeds, they were happily scratching around in no time!


Going Forward
So we finished deep cleaning the chicken coop… now what? Many of you have inquired if bigger coop = more chickens for us? For now, nope! We don’t plan to add to our flock any time soon. Four chickens provide us with more than enough eggs, egg-citement, and clean-up! Also, because we have more predators at this property and they’ll therefore be spending most of their time in the run, I love that they have ample space per bird rather than crowding it. The minimum recommended run space for chickens is about 10 square feet per bird, and 3 to 4 square feet in the coop per bird.
The next thing we’ll be tackling is adding a couple vertical supports to the sagging run roof using 4×4” boards and concrete footers. Those supports will double as a place to attach branches to create a daytime “tree” to roost in. I also want to make a nice landscaped pathway from our patio to the coop – you know, so I don’t twist my ankle in gopher holes, and have a dry and clean path on our few rainy days here. Finally we need to continue to patch up the small gaps in the hardware cloth around the run, and maybe add a few solar spotlights to further deter nocturnal predators.

From grimy to glamorous!
And that’s the story of how we transformed our inherited “poop coop” to a pretty, clean, functional, and safe environment for our beloved flock. I hope you enjoyed reading along with this messy task, and picked up a few tips on deep cleaning a chicken coop if needed! If you happened to miss the story of our move to this new homestead, read more about it here, and then be sure to check out the related chicken articles below! Thanks so much for tuning in.
- Backyard Chickens 101: What to Expect When You’re Expecting
- How to Ferment Chicken Feed for Healthy Hens & Eggs
- The Top 18 Chicken Breeds For Your Backyard Flock
- 10 Ways to Keep Chickens Cool During Heat Waves or Hot Summer Weather
- 10 Tips on Caring for Chickens in Freezing Winter Conditions


33 Comments
victoria
Hello Deanna! I LOVE your content! I’m curious how you are able to have your chickens in the same space as your garden, without the chickens destroying your plants? We are currently planning our garden and with the space we have, have contemplated movingn the coop in the same area. Our garden will be in raised beds, but I’m wondering if the chickens will just destroy it all! Thanks!!
Aaron (Mr. DeannaCat)
Hi Victoria, thank you so much for the kind words and we are glad that you enjoy the content on the site! On our new property, we have a lot of birds of prey, along with possible coyote and fox so we don’t let our chickens free range as they did in our previous property, yet they do have a large coop and a run that is likely 400 square feet or so. If chickens have access to your garden space, even if the plants are in raised beds, they will likely get into the beds and eat whatever plants you have growing (assuming its something they like), at the very least they will likely pick and kick around in the soil. On our previous property, we used different fencing materials to create screens on raised beds or even full on small fences with a gate to keep them away from garden beds. If you want to have your chickens in the same area as your garden, you are likely going to need to create some type of barrier so they don’t have direct access to get into the raised beds themselves, our chickens would often pick at whatever plant might be hanging along the fence line, but they couldn’t do more damage than that. Hope that helps and reach out with any other questions, good luck with your garden planning and have fun!
Linda
One more question, we ‘inherited’ a chicken coop on property we purchased. It is built on the ground, dirt floor. Many coops seem to be elevated. Why is that? As we improve the old coop, should we try to elevate the floor a bit? Thanks for your help!
Aaron (Mr. DeannaCat)
Hi Linda, the coop that came with our property is more or less on the ground although it does have concrete cinders underneath so it is slightly elevated. Depending on the size of your coop, if it is small, it may be easier to access for cleaning and collecting eggs if it is elevated, you may have less issues with rodents if they are a problem where you are, and chickens typically like to roost in an elevated location for safety reasons. If your coop has an attached run with different perches and roosts for the birds to use, they may choose to stay in the run overnight if the run roosts are a higher elevation than the coop itself.
As long as your coop is secure and easy enough to access, I don’t see an issue with it being on ground level. However, I would try and make sure the coop is not accessible to predators that may and try and access the coop if you have chickens inside. Also, depending on the state of the chicken coop as far as age and what not, it may be just as easy to build a new coop that fits your needs better. Coops can be made quite easily and you can build it to your specific needs and wants as far as number of chickens, accessibility, location, etc. Check out our article: Backyard Chickens 101: What to Expect When You’re Expecting as it shows a few pictures of the old coop we built along with a video tour of the coop and run area. Hope that helps and reach out with any other questions.
Linda
Hi, we live in the country and are thinking about getting a few chickens. We have an old chicken coop, so thanks for the info on cleaning and getting started with that! My husband is a wood worker, can we use his sawdust, instead of buying shavings? Also, I’ve been reading online and I wonder, do you provide any artificial lights, I read that 16 hours a day is optimum?
Thanks for your help! : )
Aaron (Mr. DeannaCat)
Hi Linda, it’s great to hear you are thinking about getting chickens. Yes you can use sawdust instead of shavings in the chicken coop if your husband produces a surplus amount of material, however, sawdust is more dusty than shavings themselves so it is something to be aware of. Also, since sawdust is so dusty, it may cause respiratory issues for your chickens or for yourself when you are inside the coop, also cedar wood should typically be avoided altogether if possible. As far as additional lighting goes, we do not provide artificial lighting for our chickens as it goes against the natural process of things. Chickens only have a finite amount of eggs that they will lay throughout their lives, if they continue to lay eggs through months in which they would naturally take a break, they will likely stop laying eggs at an earlier age compared to a chicken that was allowed a break during the darker winter months. Hope that helps and reach out if you have any other questions.
Linda
Thank you! Just to let you know I really enjoy the info on your website, very thorough and I like to know the reason why to do, or not do, things, I learn alot! Keep up the great work!! And thanks for the answers!
gail g stephens
I love chickens. Papa Joe took me with him all the time and now my DIL has chickens and her girls have pet chickens.
Things I don’t know and wonder about and could google but want to ask: How old are your girls? What is there life expectancy and how will you handle that? Do they lay all the time or go dormant for periods? My Papa Joe had lots of chickens and sold eggs at the feed store and they also ate their chickens for meat. They were old school subsistance farmers.(1920-1970). Granny made the best Egg Noodles and chicken soup. He made “clabber” from his extra buttermilk and cornmeal(they had cows) and fed it to his chickens, guessing for the nutrition and extra calcium for shells. They composted everything in the large veggie garden.
Theirs was not nearly as pretty as yours and they dealt with South Texas drama weather!
I did not know the yellow flowers made the yolks darker yellow! Fun fact.
I really enjoy reading your posts.
Aaron (Mr. DeannaCat)
Hi Gail, thanks for sharing. Life expectancy on most backyard chickens is around 8 years although we have one hen that is 9 this year and a couple that are around 6 or so, our chickens don’t typically lay eggs over winter as the light decreases and the temperature drops. We have had chickens pass away and it typically happens rather quickly as they don’t give you too much warning ahead of time. Hope that helps and thanks again.
BEV
I’ve read this articles many times as we built our coop and run over the last month. Very, very useful information. Thank you. Do you have a recommendation for an automatic door? There are so many choices that it is overwhelming.
Aaron (Mr. DeannaCat)
Hi Bev, we have an Omlet automatic coop door opener that we have been using for the last year or so and it works great! I think they offer 5% off on your first order as well. Hope that helps and good luck!