


How to Kill or Remove Grass (& Grow Food Not Lawns!)
Congratulations! I am stoked to see you here, interested in learning how to remove grass. A solid choice. When we first bought our modest .19 acre soon-to-be homestead, nearly every outdoor space was covered in grass. And not just any grass! Our “lawns” were nothing but a hot mess of both weedy crabgrass AND bermudagrass. So over the years (and with some help from the chickens) we slowly removed, smothered, or otherwise killed every bit of grass on our property to grow more useful plants in its place. The front and back yards are now littered with raised garden beds, pollinator-friendly perennials, fruit trees, edible shrubs, herbs, and more.
Read along to see exactly how we removed our grass to transform the space into a food forest instead. Because we were dealing with extremely invasive weedy grass, we had to take fairly extensive measures to make sure it was gone for good. Yet not every yard or lawn will need the exact type of treatment we gave ours! Therefore, this article will discuss several different options to remove, kill, or cover grass to prepare the ground for planting. Then you can choose what method best suits your space and situation.
What You’ll Find in this Article:
- Why Grass Sucks
- Should I Remove My Grass, Or Simply Cover It Up?
- 4 Quick Ways to Remove Grass
- How to Smother & Kill Grass in Place
- Ground Cover Options
- Borders & Edging
- Next Steps: Resources to start growing food, flowers & more!
- Plenty of photos of our grass-removal projects

The Problem with Grass Lawns
Many people like to maintain a modest lawn as a place for their kids to play. Or, to serve as a doggy potty. I get that. On the other hand, the majority of grass is not used for those purposes. Our country is obsessed with maintaining excessively huge green lawns simply out of bad habit, and lack of creative vision for something different! According to the National Resources Defense Council, turf grass lawns cover up to 50 MILLION acres of land in the United States alone. And all of that manicured green grass comes with a cost.
“Every year across the country, lawns consume nearly 3 trillion gallons of water a year, 200 million gallons of gas (for all that mowing), and 70 million pounds of pesticides.”
NDRC.org
Wow. Pretty nasty, huh? Those pesticides run off into waterways, kill bees, and poison wildlife. The gas used pollutes the air. Think of all that water used! Furthermore, grass takes away valuable habitat space from native wildlife. Sure, a few worms and grubs may enjoy living in a lawn – unless it is doused in pesticides, that is. Otherwise grass is a pretty lifeless space.
Now imagine if those 50 million acres of grass (or even half!) were transformed to grow veggies, flowering perennials, edible shrubs, annual flowers, native plants, and fruiting or ornamental trees instead? Those are the building blocks of a diverse and healthy ecosystem right there. Plus, with thoughtful design, organic native and edible landscapes require far less maintenance and resources than grass.
My vision of “grow food not lawns” doesn’t stop with human food! The goal on this homestead is to provide food for us, along with food, shelter, water, and habitat for pollinators and local wildlife. Learn more about how to turn any size yard into a Certified Wildlife Habitat here.

Should I Remove My Grass, or Simply Cover It?
There are a few ways you can approach transforming your grass area into an edible garden. Some folks choose to completely remove their grass before changing the landscape, like we eventually did. In other situations, it may be possible to simply build or plant on top of the grass, smothering it in place. (We’ll talk more about ways to smother and cover grass more below.) Or, you may choose to do half-and-half. For example, remove the grass only where a future raised garden bed will sit, but leave grass in the pathways between the beds.
Things to consider when deciding if you should remove your grass entirely, or simply landscape over it:
What kind of grass do you have? If your yard is made up of classic lawn grass like fescue (or other types that don’t creep and run) then simply covering it up may work out just fine. On the other hand, if your lawn is full of invasive, creeping grasses like crabgrass (or has a lot of weeds) then you may want to think twice about leaving it in place.
What is the desired use and design of the garden? Have you thought about whether you want to build raised garden beds, or plant directly in the ground? Clearly, if you want to create in-ground garden beds, you’ll need to remove the grass in that space. On the other hand, tall raised beds can be placed and filled right on top of grass – especially if the bottom is lined with cardboard, landscape fabric, or other material to smother grass and weeds below. Read more about the pros and cons of raised beds versus in-ground planting here.
What is the space height and borders like? Imagine if you covered the top of your grass with cardboard or landscape fabric, added raised beds on top, and also a nice deep layer of mulch, gravel, or other ground cover of choice. Would the added height make everything spill over the edges? If your grass that abuts a patio, driveway, pathways, or other hardscaping that is already at an equal height as the grass, adding material on top may not work well. By removing our grass, we created a nice 4 to 6-inch deep void within the borders of our yard, perfect for filling back in with gravel, fresh soil, compost, and plants.
Irrigation. If you’re thinking about possibly leaving some grass behind (such as between your raised garden beds as pathways) first think about how everything is currently watered. Also, about how it will be watered in the future. Does it rain enough in your area to keep the grass watered without sprinklers? Because if the vitality of the grass depends on overhead sprinklers, you do not want to keep it between your garden beds. Veggies have different watering needs than grass. I don’t recommend spraying wood beds and plants with overhead sprinklers. Learn more about garden irrigation here, including how we converted our pop-up lawn sprinklers to drip irrigation manifolds.

4 WAYS TO QUICKLY REMOVE GRASS OR LAWN
Below are four different organic ways to quickly remove grass. I emphasize organic because I am not going to suggest using sprays to kill your lawn. That option sucks, for many reasons! One, I will never recommend using toxic chemicals in your home or garden, period. Nor would you want to grow food in that space if you did! Also, even if a chemical spray kills the grass, you would likely still need to remove the leftover dead stuff and roots anyways.
No matter what option you choose below, keep in mind that it is easiest to remove grass when it is moderately damp to semi-dry. Removing grass when it is wet and soggy makes for a heavy, muddy mess. Alternatively, really dry grass falls apart easily – making it more difficult to lift and remove in solid pieces.
1) Manually Remove Grass with a Shovel (& Muscle)
Ready to get digging? Using a shovel to cut and remove grass is a great choice for smaller spaces, or in tight areas with a lot of curves or obstacles. While slightly more laborious, this is also the least expensive option to remove grass. Even though our yards are fairly large, this is how we removed our grass. For example, our front yard had about 1000 square feet of grass. To make the task more manageable, we removed our grass in two phases. We tackled the back half with raised beds in fall of 2015, the front half closer to the house in fall of 2017.

To manually remove grass using a shovel:
- It is best if you have at least one flat-edge shovel (or lawn edging shovel) – used to easily cut clean lines in the sod.
- If you are removing only a portion of the grass, mark the desired edge line with a rope, string, or spray paint as a guide.
- Starting at one edge of the area, cut a deep straight line along the grass. Use your weight to step down on the shovel.
- After you make each cut, stick the shovel below the sod to pry up and loosen it slightly as you go.
- Continue cutting parallel lines to the first one, about 1 foot apart.
- Next, come back through and cut lines perpendicular to the ones you already did, creating approximately 1 foot by 1 foot squares. If you’re hoping to keep the sod intact to move and replant elsewhere, feel free to create larger strips to roll up – but they get heavier than you’d imagine!
- Now, use your hands (and shovel if needed) to pry up and roll back the cut squares of sod. We try to shake out some of the extra dirt to leave it behind.

Place the loose sod chunks in a pile to move and dispose of later. Or, put them right into your yard waste bin, compost bin, truck, or other final destination. Because our grass was so weedy, we added it to the municipal green waste bin instead of our personal compost. Commercial compost facilities generally heat their compost piles to a degree that kills grass and weed seeds. See this article from SF Gate for more ideas of what to do with removed sod.

2) Use a Sod Cutter
Instead of hacking away with a shovel, you could use a a sod cutter instead. Some sod cutters are smaller manual tools, while others are reminiscent of oversized lawnmower-like machines that cut the grass into long clean strips for you. Engine-powered sod cutters are best for large spaces and those without a lot of obstacles to work around. They’re very efficient and save you the major step of cutting the grass into pieces yourself. However, you’ll still need to roll up and remove the sod – no minor feat!
Because sod cutters have the ability to create nice even rolls of sod, there is the possibility of saving the grass and planting it elsewhere if desired – be it on your property or someone else’s. If you do opt to use a sod cutter, remember to be conscious of where your irrigation lines and sprinkler heads are.

3) Till the Lawn Under
Rather than peeling the lawn up to haul it away, you could also break it up by tilling it in place – and then work the grass back into the soil. There are human-powered hand tillers which take a lot of physical effort. You can also rent or buy an motor-powered rototiller to make the job significantly easier. I have never personally worked with a tiller but I understand they can be a bit awkward to maneuver, so plan to manicure any curved or tight edges of your space with hand tools like a shovel or edger first.
One benefit of tilling grass is that you’re not losing all of the top organic matter that you’d otherwise need to dispose of. Nor do you need to haul it anywhere! On the other hand, you could also rake up any exposed loose grass after tilling to dispose of it if you wish. The soil is loosened in the tilling process, which makes working in compost and other amendments into the planting space even easier.
I am not usually a huge fan of tilling since it disrupts the precious established soil food web below the surface. Thus, we follow a mostly no-till practice in our raised garden beds. However, tilling up grass in order to create a garden is one time I could get behind it. One serious drawback of tilling is that it often turns up and promotes weed seed propagation. It is also difficult to do in rocky or clay soils. Finally, tilling would not be a good choice for areas with persistent creeping grasses like crabgrass.

4) Hire Help
Surprised to see this suggestion here? Don’t be! Not everyone has the ability (or desire) to cut, dig, lift, and haul heavy sod! And that is totally okay. Know your limits and recognize when you need some help. We’ve learned to leave it to the professionals for occasional homestead jobs as well. Most local landscape companies should offer the service of removing grass. While paying someone will be more costly than a DIY job, this is the most quick and back-saving option!
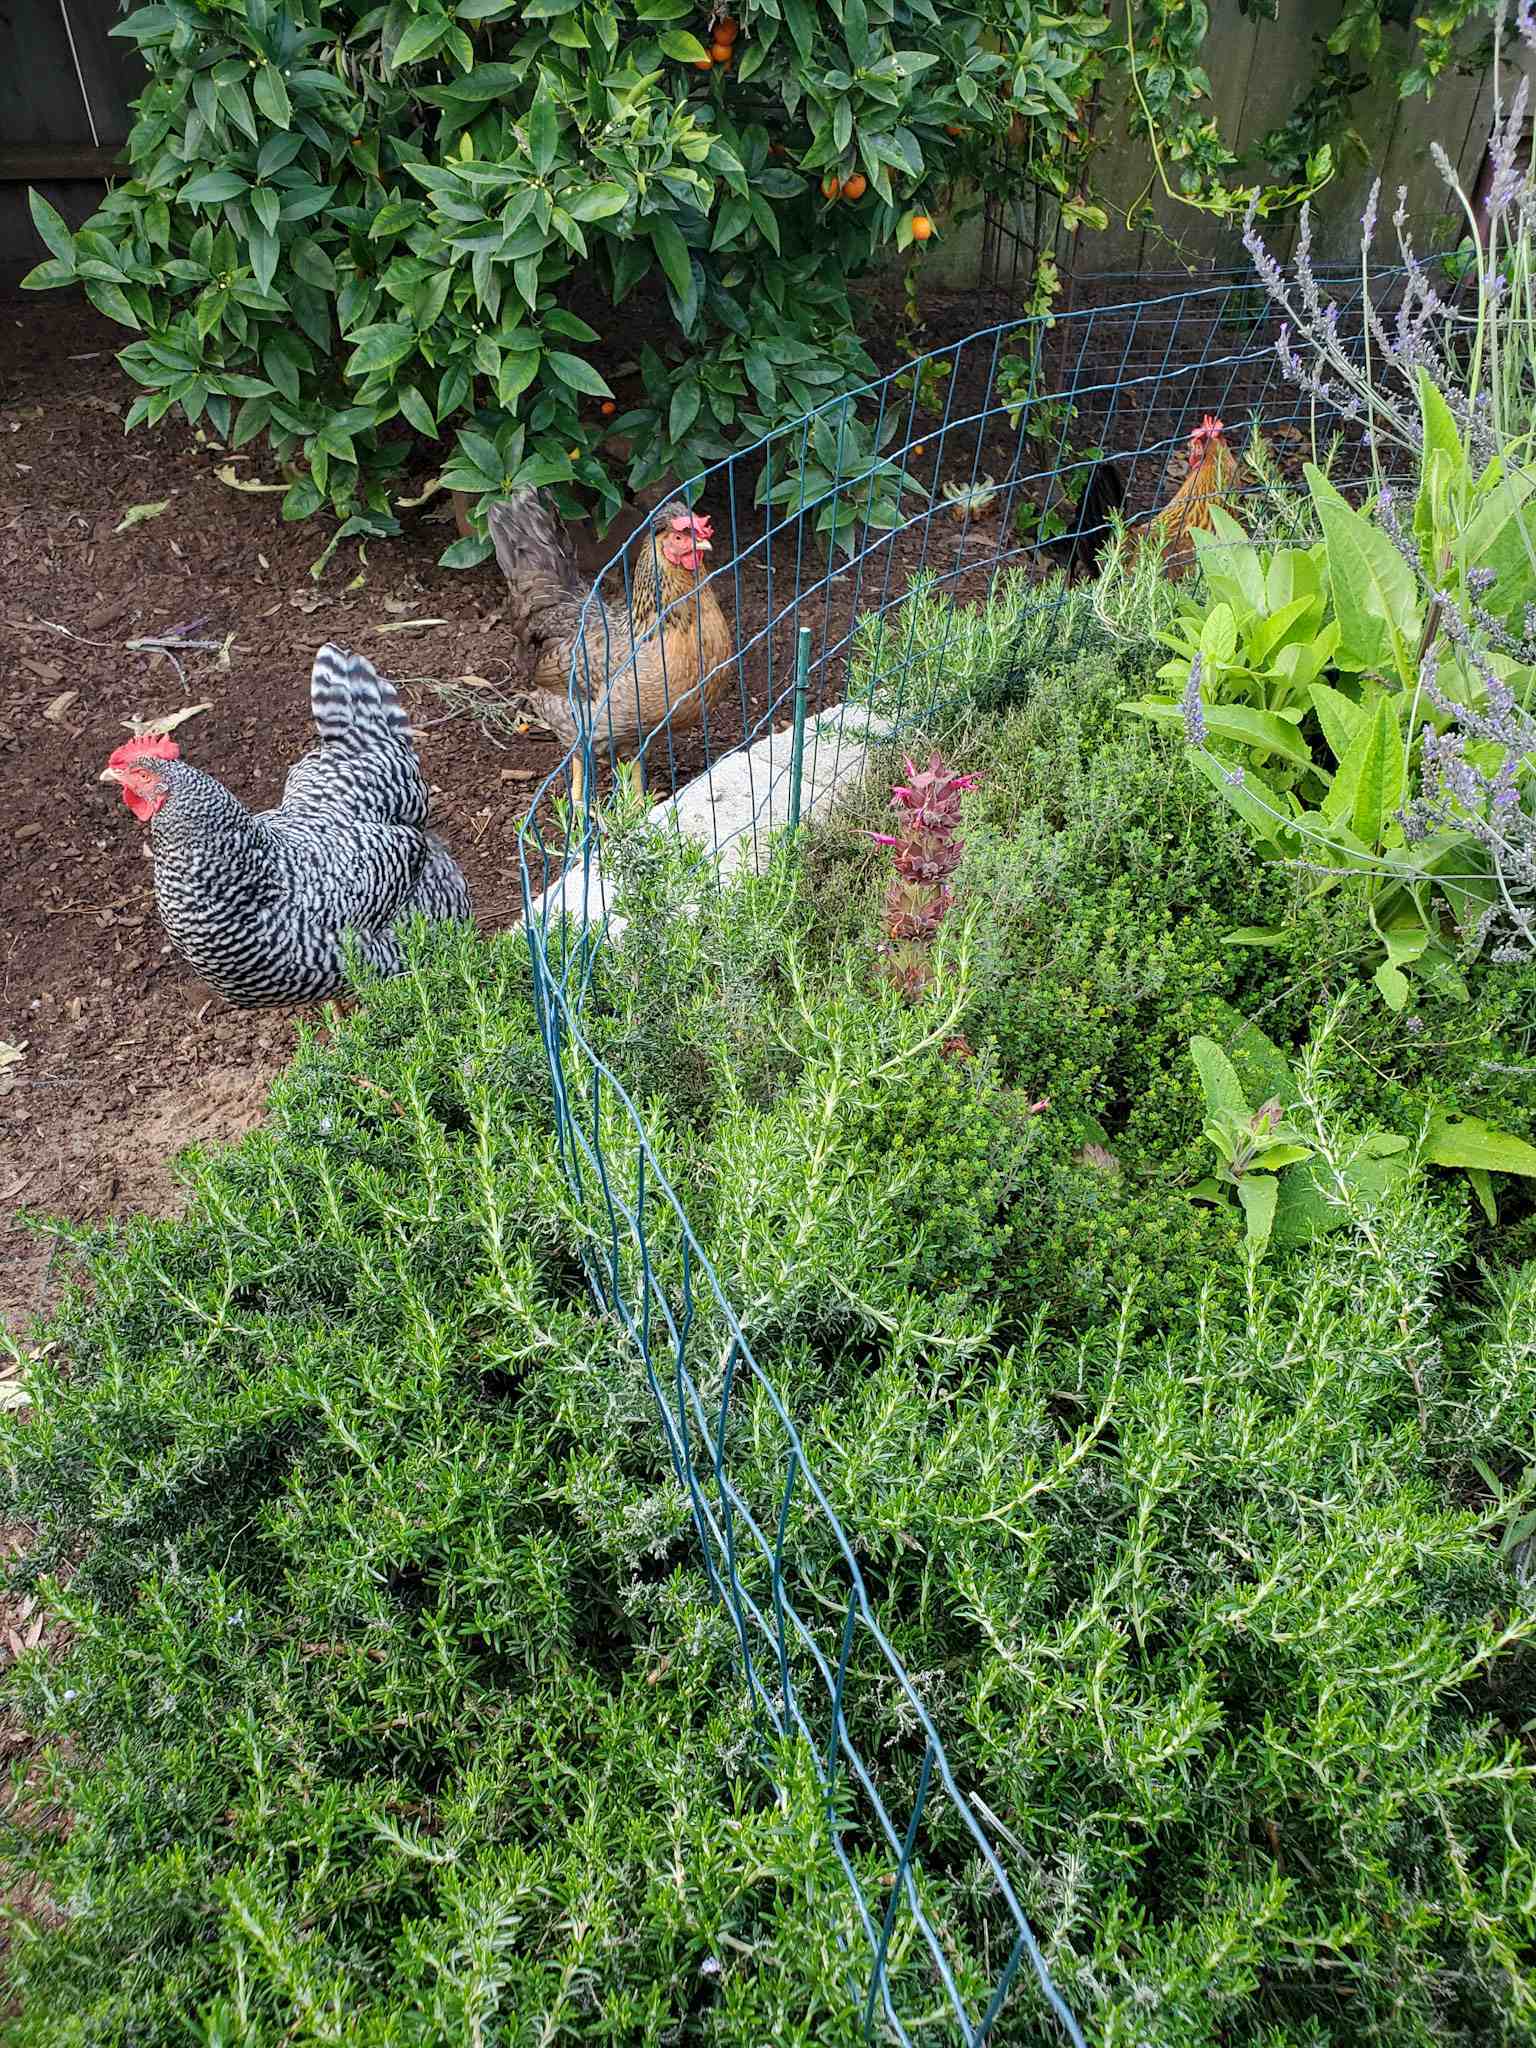
You could also think about enlisting some really “cheep” help… chickens! (See what I did there?) Chickens are superbly talented at two things: eating grass, and digging or scratching at grass. While they may not be nearly as neat or quick as human helpers, our chickens did assist in removing a section of our grass little-by-little. They free range in the backyard where we have several (fenced off) raised garden beds, their coop and run, and what was once a small patch of grass. Over a few years and with four persistent chickens foraging, the little grass island got smaller and smaller – until it was nothing more than picked-over roots. We pulled out the remaining weedy spots and roots by hand. Then we installed our stone raised pollinator island in its place.

HOW TO SMOTHER & KILL GRASS OR WEEDS
If completely removing grass sounds like too much work, you could cover it instead – smothering and killing it in place. Generally speaking, smothering grass is a much slower process than digging it out. That is, unless you cover it and then add raised beds and other ground cover on top right away, before it has a chance to fully die. That is a valid option, though keep in mind the ground surface may settle and sink slightly as it decomposes below. On the other hand, if your goal is to plant things directly in the ground where the grass once was, plan on this process taking several months.
Deep Mulch & Sheet Mulching
One very organic and sustainable way to kill grass is to cover it with a deep natural mulch material. For example, by mulching over the top of grass with leaves, wood chips, compost, leaf mold, bark, pine needles, and/or paper material. In order for mulch to successfully kill grass, it needs to be several inches deep – enough to block out sunlight, provide decent weight, and effectively smother the grass. Fluffy material like leaves will compact and break down with time, so start out with even more on top – a couple feet even.
One of the best ways to kill grass with deep mulch is to apply a thick layer of paper material over the grass first with mulch on top. For instance, use newspaper (at least 8 to 10 sheets thick), unwaxed cardboard, or a couple layers of bulk unbleached masking paper. You know, the stuff you can buy in a huge roll?
After you lay paper material over the grass, wet it thoroughly. Then add mulch of choice on top and wet that material too. Paper or no paper, spray down the deep mulch material every so often (unless rain is otherwise keeping it wet for you). Damp conditions accelerate decomposition, and will also help prevent fluffy mulch material like leaves from blowing away in windy conditions.
Fall is a great time to start this process, allowing the mulch to sit over winter. Over the next few months, the grass will die and disintegrate below. From there, you can clear away the mulch to plant in the grass-free soil below. Or, if you are worried about invasive and persistent weeds coming back, add other types of ground cover to the now-cleared space before adding raised beds or other landscaping on top. Clearly, this method of removing grass requires an abundant supply of mulch material – as well as a dash of patience. (We didn’t have enough of either!)

Solarizing Grass
Solarizing is another way to kill your grass, though it doesn’t necessarily “remove” it. Haven’t heard of it? Solarizing is the process of covering the grass in clear plastic to both heat and smother it. When done right, solarizing lawn effectively “cooks” the top foot of soil and can kill grass, weeds, insects, nematodes, and pathogens. It also kills grass and weed seeds, theoretically preventing future growth.
How to solarize your lawn:
- It is best to solarize your lawn during the summer (the hottest time of year) and when the target area receives the most direct sun. When done correctly, the goal is to heat the grass and soil to around 140°F.
- First cut the grass short, and then very thoroughly water it. Wet conditions increase the effectiveness of solarization.
- Next, cover the entire area in sheets or tarps of clear plastic. Yes, it is important that it is clear! Think about the heat of a transparent greenhouse, versus the cooling effects of tinted windows or dark shade cloth. Using a dark tarp will make the grass discolored and less healthy below it, but will not provide the same strong heat as clear plastic.
- All sides and seams of the plastic must be tucked or held down tightly. This is to reduce fresh air entry and space below the plastic, and new growth.
- Leave the plastic in place for four to six weeks to heat and kill the grass.

Once the grass is dead, you can either remove it (now we’re back to square one) or apply mulch, compost, raised beds, or other desired ground cover over the top of it. In theory, the “dead” grass should disintegrate over time, essentially composting in place. I say in theory because it can be difficult to successfully solarize your lawn entirely, depending on the climate and technique used. It is not always 100% effective. And if you’re dealing with weedy stuff like crabgrass, I wouldn’t trust leaving it in place even after solarizing.
We have attempted to solarize our lawn in the past with mixed success. Our climate doesn’t get hot enough to intensely heat the soil and grass as desired. It did kill most of it… However, we found that removing the dry half-dead lawn was just as cumbersome as removing the grass that we did not solarize – if not more difficult, since it became crumbly! Therefore, I have mixed feelings about solarization. It also takes a lot of plastic to do…Like, a lot of plastic. Thankfully, we already had some on hand from when we painted our house.

GROUND COVER OPTIONS
Now let’s talk about grass alternatives for ground cover, including materials to put below raised garden beds, in pathways, or other planting spaces. These ground cover options can be used both in spaces where grass has been removed, over other open soil spaces, or directly on top of grass or weeds to smother them.
The ground cover you choose is ultimately a personal decision, based on your unique situation and preferences. A combination of several could be used as well! For example, in our spaces that were once full of weedy crabgrass, we chose to lay down a layer of bulk paper, then a layer of commercial-duty landscape fabric, along with a final deep layer of gravel mulch on top. Trust me, it was necessary! In other less weedy areas, we simply use small bark or shredded redwood mulch.
In order from the most permanent and protective ground cover option to the least:
Weed Barrier Landscape Fabric
Weed-blocking landscape fabric is tightly-woven material that is placed over the ground surface to effectively block weeds, grass, or other plants from growing up from beneath it. However, it is permeable to water, allowing for drainage and air exchange to the soil below. Landscape fabric comes in large rolls, and is typically pinned in place with landscaping staples. We like these long contractor staples – they stay put really well!
If you go this route, I highly suggest to invest in commercial-grade weed barrier fabric like this option, or this one. The average thin, stretchy, black plastic-like material usually found in your garden center is not very durable. It easily rips, tears, and otherwise makes a hot mess. The commercial-duty stuff is far more sturdy and will last indefinitely.
We install high-quality weed barrier fabric below all of our deep raised garden beds, along with hardware cloth to block the gophers. The fabric extends out beyond the outer edges of the beds to prevent creeping weeds from getting back in. Yet I don’t suggest using landscape fabric below shallow raised beds (less than 12” deep). That is, unless the space was intensely weedy and it is necessary. Why? Because the fabric will block and prevent roots from traveling deeper into the soil below. Many plants prefer more than 12” of soil to grow big and healthy.
If you choose to cover a large area with landscape fabric (such as a border flower bed, or around trees) cut holes in the fabric where the plants will go to allow their roots access to the soil below. Landscape fabric is also great to suppress weeds in garden pathways. We have it under the gravel paths around our raised beds, and under our greenhouse too.

Cardboard or Paper
Cardboard and paper do a great job of suppressing grass and weeds, albeit not as long-lasting as landscape fabric. But if the space you’re covering isn’t incredibly weedy, I suggest this route over landscape fabric. Using cardboard and/or paper is the more natural choice, as it will biodegrade with time. It is also a great way to up-cycle all those Amazon boxes you’ve been stockpiling, am I right? 😉
As we discussed in the “deep mulch” section above, unwaxed cardboard, layers of newspaper, or bulk sheet paper can be used to cover the ground surface (with or without grass beneath it). In open spaces like pathways, add a mulch of choice on top to keep the paper down and provide a clean finished look. You can also pin cardboard down in place using the same landscape staples if needed.
Many people also use cardboard or thick paper to line the bottom of their raised garden beds! This is what we did when we created our raised stone-wall pollinator island. It wasn’t weedy enough to require landscape fabric, though there were some leftover grass roots we wanted to smother. We even planted a few small citrus trees in that space. Because the cardboard will degrade with time, we knew the roots wouldn’t be permanently restricted as they would be with landscape fabric.

Mulch Only
If you’re fortunate enough to have a space that needs only minimal weed suppression, mulch away baby! Feel free to skip the layers of landscape fabric or paper, and simply throw down a nice layer of mulch on top of your soil. Mulch is SO important – on top of any type of open soil surface! Mulch helps reduce runoff and evaporation, retain soil moisture, and increase organic matter content. All of this leads to a healthy soil microbiome (aka “soil food web”) and provides habitat for earthworms, beneficial bacteria, fungi, microorganisms, and more.
Natural mulch options include bark or shredded bark, wood chips, straw, pine needles, compost, grass clippings, small gravel, or even larger rocks like river rocks or cobblestone. There are pros and cons to every mulch choice, which needs to be a discussion and article of its own!
We personally use several types of mulch in our gardens. In the perimeter and pollinator islands of the front yard garden, we mulch with a combination of compost and small bark. Around the front yard garden beds, we use small ⅜” green rock gravel. I love that it compacts and stays in place well, rather than sinking when you step on it like pea gravel does. (Though you can also install gravel stabilizers below pea gravel to help keep it in place.) Where the chickens free range in the backyard, we use a combination of small bark as well as shredded redwood. The shredded stuff is nice and fluffy, which the girls love to kick around in. Keep in mind that cedar isn’t recommended for chicken areas! It is slightly toxic to their lungs.


Living Ground Cover
Living ground cover brings a lush and whimsical look to any garden space! I especially love the way green ground cover looks between pavers or flagstone and around borders. If you choose to go this route, research what types of ground cover will grow well in your climate – with as little fuss and maintenance possible. For example, do you get enough rainfall to keep the living ground cover, well… alive? Or will it quickly become dead ground cover? If you live in an arid climate and the ground cover is going to need a lot of supplemental water, it may not be worth the resources and effort.
There are dozens of different options for living ground cover, including some edible ones! Many herbs make for excellent ground cover, such as creeping thyme or trailing rosemary. You can get quite creative with ground cover, choosing a variety of textures, heights, incorporate tall native grasses, or even succulents in the right climate. For more ideas, Gardeners Path has great articles about flowering ground covers as well as herb ground cover options.
Borders & Edging
To wrap up this article, I wanted to briefly mention your transition zones. For example, if you remove only a portion of lawn and thus leave an area that abuts the newly grass-free zone. In that case, you may want to consider adding an edging or border material to separate the zones. A sturdy border is particularly important to prevent creeping weeds and grass from invading the fresh space. Not to mention, borders add a nice finished look! We’ve used everything from large cobblestones and concrete pavers to this flexible but durable terrace board. The terrace board can be dug deep between the transition zones, effectively preventing shallow creeping grass from crossing to the other side.


And that is how you kill or remove grass to make room to grow food instead!
I hope this article gave you some great ideas and inspiration to kill some grass – and to Grow Food, Not Lawns! Please let me know if you have any questions or other ideas that I missed. I would LOVE to see your yard transformations! If you’re on Instagram, be sure to tag @deannacat3 or #homesteadandchill in your project photos. Last but not least, please spread the love by sharing or pinning this article. Happy digging!
Now, it is time to get planting. If you need some guidance going forward, these related articles may come in handy:
- How to Design & Build a Raised Garden Bed
- Raised Garden Beds vs. In-Ground Planting: Pros & Cons
- How to Fill a Raised Garden Bed: Build the Perfect Organic Soil
- How to Prepare & Amend Soil Before Planting or Between Seasons
- Composting 101: What, Why & How to Compost at Home
- Seed Starting 101: How to Sow Seeds Indoors
- Companion Planting 101 (w/ Companion Planting Chart)
- Top 23 Plants for Pollinators: Attract Bees, Butterflies, & Hummingbirds
- Choose the Best Edible or Ornamental Trees for your Garden
- How to Plant a Tree: Best Practices


38 Comments
Rachel Sementilli
Help!
Last summer (early August to November) I smothered about 1,000sq feet of lawn to prep for a native wildflower seed installation. I thought it went great! The lawn looked completely dead when I pulled up the heavy duty tarp we used to smother. I raked some areas to collect dead yellow grass and stir up the first inch or so of dirt (here it is varying from dense clay to silty loam) before laying seed. Covered the native wildflower seeds with commercial grade erosion control blanket.
Now the spring storms are rolling through and this week I can see grass coming through my erosion control blanket! I am devestated. Do you think these are newly germinated seeds from the lawn or the old root system? Any thoughts on how to manage this as my new wildflower seeds germinate? Will they still make it if this grass grows through?
I am not sure you’ll have any answers for me but I am desperate for some strategies to keep the grass from getting out of control while the sproutlings of wildflower have time to establish.
Thanks to anyone who may have tips!
Aaron (Mr. DeannaCat)
Hi Rachel, I’m sorry, that can be incredibly frustrating. If you live in a more rural area with many grasses and weeds in surrounding properties, the wind can blow seed fairly easily and that may be part of the issue. For us, we found that using a shovel to literally dig out grass or weeds by the roots is the most effective way of getting rid of especially invasive plants. Right now, it doesn’t seem like you have many options at the moment aside from just seeing how it all unfolds as the weather warms, if your space does again get taken over by lawn, I would recommend manually removing the lawn and its roots in an effort to remove most if not all of the lawn and then proceed again with reseeding the area with native wildflowers. Hope that helps and hopefully your wildflowers can overpower whatever grass may be sprouting up, good luck!
Bruce Smith
We talked to a guy at Lowe’s and as a typical Lowe’s worker he didn’t know jack. He told us to cut the grass short and then cover it with the fabric sheeting. The roll wasn’t quite large enough for the lawn area so I finished it off with a small roll of black plastic I had. A few weeks after we were finished in places grass started back through the fabric, but not the black plastic. I’ll never use fabric again and next time I will remove the grass. It took 2 years to totally get rid of the grass. For the raised beds I used 2″ X 12″ rough cut dimensional redwood and I capped it with 2″ X 6″ laid flat to give me a little shelf on top. So my sides are 25 1/2″ tall and that is just right to sit on while gardening. I filled the bottom 8″ or so with tree limbs as filler. I had a dirt and gravel company dump a mix of garden soil with compost at the curb and I wheelbarrowed it to the beds. This was 14 years ago and the beds are still doing fine. We are shopping for a new home so soon I will get to do it all over again.
Aaron (Mr. DeannaCat)
Hi Bruce, landscape fabric has always worked great for us but you need to use quality fabric, most of the black plastic is really cheap and rips quite easily. There are more sturdy landscape fabrics that are black in color and come in up to 6 foot widths, they are typically available through irrigation supply stores, we used something similar to this product for our garden area in our new property. hope that helps and good luck on the search for your new home!
anne
Thank you so much for taking the time to put this article on the internet.
We have inherited a small piece of the original family homestead (2 acres). Our place is adjacent to the rancher’s field where he grows large crops of hay, alfalfa, peas, etc. He is a good rancher. But we are both surrounded by wild mountain grasses. I get grass seeds from all sides. The big fat tall grasses–right now they are up past my bum! I have tried Lowe’s landscape fabric before and it was a joke! I believe what happens is that the grass seeds blow in and somehow germinate on top–I had originally covered my fabric with about 4 inches of straw. What is your suggestion for living next door to these tall grasses and still having my raised bed garden?
Thank you,
Anne
P.S. We are in MT Zone 4
Aaron (Mr. DeannaCat)
Hi Anne, yes the cheaper landscape fabrics do not work well at all. Even with having our past and present raised garden bed area mulched with gravel on top of landscape fabric, seeds would still germinate in the gravel as they will usually find a way! Although I prefer that over invasive weeds and grasses coming up from beneath the fabric. It sounds like you are in a tough spot to stop the wild grasses from blowing in seed, straw works great as a mulch but I am sure the seeds are able to sprout quite well amongst the straw. Do you mow any part of your property? Maybe it would be easiest to just mow the grasses as they sprout up around your garden before they get too tall? Another option would be to sow low laying cover crop around your garden beds in hopes that it sprouts and takes hold before the wild grasses blow in and are able to germinate. Hope that helps and reach out if you have any other questions, good luck!
Steve
I love what you did!!!
We did the following to our front yard to kill the grass and weeds before doing our raised beds.
1. Mowed the grass / weeds as short as possible.
2. Collected all organic matter.
3. Tilled the soil.
4. Covered the front yard with landscape fabric.
5. Covered the landscape fabric with pea gravel.
We now have nut sedge and Bermuda grass coming up through the landscape fabric and pea gravel.
I have sprayed the grasses with horticultural vinegar (30%) to kill the grasses. This has killed the grasses. But we have so much grass coming up.
I was thinking of sweeping back the pea gravel and placing this thick brown paper ( Trimaco Trimaco X-paper Paper 3-ft x 100-ft Drop Cloth )over the landscape fabric and placing the pea gravel back on top of the thick paper.
Any additional or better suggestions?
Thank you for your help.
Aaron (Mr. DeannaCat)
Hi Steve, what type of landscape fabric did you use? We have found that you need to use contractor grade fabric to successfully keep the grass from growing through it. We have used this in the past and used something similar to this at our current property. If you can sweep away the pea gravel, it may be best to just lay down better landscape fabric over the top of the previous and use nice heavy duty landscape staples to secure it in place as it should do a better job of keeping the grass down compared to the paper. However, I am not fully familiar with the Trimaco paper and how well it would hold up or not, especially once water is introduced. Hope that helps and good luck!
Steve
Aaron,
Thanks for the quick response.
We used Dalen Pro-Shield Landscaping Fabric from Costco. It said it was commercial grade. What a mistake.
It looks similar to the landscape fabric from the link you provided from Home Depot.
The Trimaco X paper is about the thickness of the “cardboard” on the back of a spiral notebook.
I am going to look into the Dewitt fabric.
Thanks for your help.
Steve
Katie
Can you tell me more about how you
converted the sprinklers to drip manifolds?
I also hate the idea of having to cut into the landscape fabric every time I want to plant a perennial… do you think it would work to landscape fabric & mulch the yard except for 2 triangle beds leave open berms with fresh topsoil to group plant?
Aaron (Mr. DeannaCat)
Hi Katie, yes you can leave portions of your yard fabric free if you don’t want to cut holes in the fabric where you plan on growing plants. We just had really invasive crab grass at our old property so we wanted to make sure it had a difficult time reemerging, even though we removed most of it by the roots, there was still some of it that remained. If your grass or weeds aren’t that invasive or strong growing, once you have plants growing in your beds with a good amount of mulch, that may be enough to prevent too much weed growth. As far as the drip manifolds go, they essentially connect to the section that your sprinklers were screwed onto. I think we had to use risers to increase the height to where we wanted it above ground, from there, each manifold typically reduces the water pressure at each manifold so it works for drip irrigation. You can get drip manifolds with many number of outlets, I think ours had eight, from there, you connect 1/4 inch tubing with the desired GPH emitter at the end and place the emitter at the base of your plant. However, if you do this system, everything must be converted to the manifold/drip irrigation, you can’t still use one or two sprinklers in addition to. Hope that helps and good luck with your project, feel free to reach out with any other questions.
Blake
Hi! We love your use of the 3/8″ green gravel but can’t seem to find it anywhere. Is there a brand or store that carries it or is it local to you?
Aaron (Mr. DeannaCat)
Hi Blake, we have found that it really is dependent on where exactly you are located and what quarries are in your area. Rocks obviously are quite heavy so for the most part, what is available in your area is what is available to you. We have at least 3 different landscape supply companies within 20 miles of our house that all carry bulk gravel, rocks, bark, soil, etc. and the rock/stone that they carry is usually found within a two hour drive from their location. I would look into the landscape supply stores near you and see exactly what they may carry or if there is anything similar. Best of luck to you in your garden project.
Chelsea Peyton
I have been on your website all day just drooling over your garden. This is incredible inspiration, especially since I have just moved into a home where the big backyard has been seriously neglected. The small patches of lawn that do thrive are interwoven with invasive weeds, and it’s been a trip to figure out how to make a food-driven environment in my dry climate!
Aaron (Mr. DeannaCat)
You can do it Chelsea! Drip irrigation and heavily mulched garden beds and pollinator plant areas. Glad you found inspiration on our site and what we did on our little homestead, take it one thing at a time and in time, you will have your backyard transformed as well! Keep us up to date on your progress.
Ellisa Helen
Thanks for sharing this experience . I am also experiencing weed problem in my lawn along with my grass. This would definitely help me . Thanks
Dejah
Deanna & Aaron, SUCH a great, comprehensive article. We converted our front yard about six years ago, utilizing our local water district’s lawn conversion grant. It was great, it helped offset the cost of the materials and labor, yes, it was a LOT of work, but honestly, we’ve met more neighbors by being out in our front yard!
I want to stress what you said about using a commercial grade (read: PRO grade) weed barrier. We had a fantastic irrigation guy come out and help us with the hard parts – but the decades of accumulated crab grass and other grass kinds and weeds made the taking that top layer off with the turf removal equipment insufficient to prevent grow back. We refused to spray toxins, like you said, both bad for the environment but also if you’re going to eat the veggies and fruit it’s not a good thing to do. We learned a LOT. Even if you DO spray, things like crab grass will still come back because of their roots and underground activity. We used a standard landscape grade weed barrier from a local builder’s supply place and the damn weeds and crab grass came through, happy with the super nourished soil and watering we were doing in the raised beds. Within two years, we had to stop what we were doing and redo the whole thing. It was such hard work, but friends helped out, and we used a far heavier duty weed barrier, cardboard up the wazoo, and even double layered the weed barrier. It has made all the difference and if you’re doing this, there is no shortcut to the long-term success. Plus oh the money – spend just a bit more up front and you won’t have to spend double later.
Another thing we learnt from the irrigation guy: If you had gardeners coming out and mowing your lawn once a week, their equipment brings the seeds of other grass varieties AND weeds. There’s no way to stop it. So even though my dad put in a high quality lawn back in the 1970’s, the reality is it had pretty much a smorgasbord of turf and weeds in it, and the crab grass was (and remains) the worst part of it.
While we are still getting some intrusion of crab grass, it’s so much better and manageable than it was, and we’re so happy with our victory garden. I have incorporated pollinators into our beds like you encouraged us to do, and what a huge difference for our bounty. It’s four years strong with this rendition, and please know I’ve learnt SO much from your wonderful page! I wish you the best for your new adventure in the new place. <3
Aaron (Mr. DeannaCat)
Hi Dejah, that is amazing to hear how you have transformed your yard and thank you for your support! We have learned a lot through trial and error and have had to redo a project or two before, but it is definitely far easier to do it right the first time. Wishing you the best of luck and enjoy your front yard garden!