


8 Organic Ways to Get Rid of Cabbage Worms & Cabbage Moths
Cabbage worms are one of the most common pests in the garden. Every gardener I know struggles with them! They can be sneaky, frustrating, and cause a lot of damage to plants. But I have good news: there are many easy ways to stop cabbage worms from destroying your garden, and still reap a beautiful, bountiful harvest!
Read along to learn 8 ways to get rid of cabbage worms and cabbage moths. Some options are preventative in nature, such as covering your plants with floating row covers – or even tricking the cabbage moths with color! Other methods involve directly killing the caterpillars. No matter what you choose, rest assured that all 8 of these cabbage moth control options are organic.
Before we dive into the ways to control cabbage moth damage in the garden, let’s briefly familiarize ourselves with these pesky little jerks. Also, please keep in mind that an organic garden is not a perfect one. A few cabbage worms or nibbles holes is not the end of the world.
What are Cabbage Moths and Cabbage Worms?
“Cabbage worms” is a relatively generic term that refers to a handful of species of small green pest caterpillars. As their names suggest, they are most attracted to the cabbage and mustard plant family. Also known as the brassica family, this includes veggies like broccoli, kale, collard greens, brussels sprouts, mustard greens, turnip greens, and of course, cabbage. However, that isn’t all! We have found cabbage worms on a wide variety of other plants in our garden, including flowers.
Some cabbage worms are the larvae of small white butterflies, seen flitting around gardens during the day. The white butterflies are often referred to as “cabbage whites” or “cabbage moths” – even though they aren’t really moths at all. However, there is a similar caterpillar, the cabbage looper, that does indeed come from a brown nocturnal moth. Cabbage loopers closely resemble butterfly cabbage worms, except cabbage loopers are usually skinnier and move like inchworms… you know, humping along.
Both cabbage worms and cabbage loopers are controlled in the same manner.

Cabbage Worm Life Cycle & Damage Caused
Cabbage moths or butterflies don’t directly damage plants themselves. That fun job is left up to the their larvae – the “worms”! If you notice white butterflies dancing around your garden, they’re probably laying eggs, and thus creating future destructive cabbage worms. As they land on plants, cabbage moths often bump their butts on leaves to deposit eggs.
Cabbage moth eggs look like white or yellow oblong dots. They are almost always attached to the underside of leaves. If you find and recognize these eggs, squishing them is a great early control method! However, please note that ladybug eggs are also oblong and yellow, but are found in clusters. Cabbage worm eggs are usually sporadic and solo.
As the larvae of cabbage moths and butterflies emerge from their eggs, the cabbage worms begin to immediately feed on the surrounding plant matter. This creates little holes in the leaves, expanding to larger holes – or to completely demolished leaves and plants as the caterpillars grow in size and population.
Some cabbage worm damage is only cosmetic, but can otherwise be devastating to small tender seedlings. The caterpillars will continue to eat and grow for several weeks, until they’re old enough to form a chrysalis and transform into a cabbage white butterfly (or moth).

8 ORGANIC WAYS TO PREVENT & CONTROL CABBAGE WORMS
Now that you know more about their lifecycle, here are several ways to control cabbage worms in your garden – organically! Let’s discuss each of them below.
- Manual Removal
- Floating Row Covers
- Plant Purple & Red Varieties
- Use Polyculture & Companion Planting
- Beneficial Insects
- Decoy Moths
- Bacillus Thuringiensis (Bt) Spray
- Neem Oil Spray
1) Manual Removal of Cabbage Worms
Are you comfortable handling insects? I used to be a bit more squeamish, but the fact of the matter is: manually squishing or removing certain pests right when you see them is sometimes the most quick, easy and effective way to stop them in their tracks. Especially if you are only trying to manage a handful of plants! I do it all the time. This includes hand-picking cabbage worms and caterpillars from brassicas and leafy greens (which the chickens greatly appreciate, wink wink…) or squishing colonies of aphids. I also know some gardener friends that nab cabbage moths with butterfly nets and tennis rackets!
To reduce damage from cabbage worms by hand, you’ll need to inspect your plants frequently. Make it a routine to check over your plants once or twice per week. When you’re out on the hunt, keep in mind that cabbage worms are most often found on the underside of leaves, or tucked in the new growth at the plant’s center. Sneaky cabbage worms will also lay along the center vein of a kale leaf, blending in and perfectly disguised. In addition to holey leaves, the “frass” or poop that they leave behind is a key indicator that a cabbage caterpillar is nearby! Look for poop.
It can be effective to squish or collect cabbage worms by hand, but you can also go after cabbage moth eggs. Examine the underside of leaves for the little oblong white to yellow dots, and simply wipe them away. Then they’re gone before they can do any damage at all.

2) Row Covers
One of the best ways to keep cabbage worms from eating your plants is to prevent cabbage moths from accessing the plants at all! Mission “stop the butt-bumping”, if you will.
Individual plants, raised beds, or sections thereof can be protected with row covers, traditionally supported on hoop structures. Also called “floating row covers”, they block out pests or other undesirable elements. Some row covers are used to stop insects, while others may be used for frost-protection or providing shade. We use them in our garden to prevent cabbage worm damage as well as protect tender young seedlings from wild birds.
We use a combination of these sleek hoops along with this insect netting in our garden. The shorter version of the hoops work perfectly in our 2 and 3-foot wide beds. With the addition of these base extenders, they also fit well across our widest beds (4.5 feet), though they stay fairly short. To provide more “head room” or arch over larger plants like Brussels sprouts and tomatoes, the hi-rise super hoops would work best. You can also make your own hoops from PVC pipe.
It is easy to pull back the row cover material when needed (e.g. for harvesting) and simply leave the hoops in place. Be sure to check the various sizes of netting available to best fit the size of your garden! We ordered a large roll and cut them to size for each bed.


If you use the right material and tuck the corners and sides in tight (we use clothes pins for this), row covers can effectively keep out cabbage moths and their caterpillars, along with many other pest insects. Row covers may also protect your plants from squirrels, rabbits, birds, neighborhood cats, and other larger vertebrate pests too!
However, keep in mind that pollinators won’t be able to get in either. Thankfully, the cabbage plant family doesn’t need pollination to grow. Yet to use floating row covers with flowering plants like squash, you either need to open and close the row covers daily – or hand-pollinate the squash.
See this article all about hoops and row covers to learn more – including tips about DIY PVC hoops, and using row covers for shade or frost protection.
3) Plant Purple & Red Varieties
Did you know that pests are less attracted to red and purple vegetables? They sure are! Year after year, the purple cabbage and red kale in our garden is significantly less damaged by cabbage worms and aphids than their green counterparts. One reasonable theory is that green or pale-colored pests can’t blend in and hide as easily on brightly-colored vegetables as they can on green ones. That would make them an easy target for predators.
Furthermore, studies show that anthocyanin (the antioxidant-rich flavonoid that makes red, purple and blue-pigmented veggies so good for us!) is actually mildly toxic to caterpillars. It may even deter larger pests like squirrels!


So, choosing red and purple varieties of the cabbage family is one way to reduce cabbage worm damage. Yet I’m sure we all crave a bit more variety than a garden bed full of red cabbage! And that is more than okay. Variety is good, and leads us to our next point…
4) Polyculture & Companion Planting to Deter Cabbage Moths
Growing a wide variety of plants creates biodiversity in your garden. This is a way to maintain balance, and also attract more beneficial insects. Additionally, variety and polyculture – the term for mixing many types of plants in one space – reduces the chances of widespread devastation by pests that are all attracted to the same crop. Meaning, it may not be the best idea to plant an entire garden bed full of just broccoli.
I also highly suggest interplanting some companion plants with your pest-prone crops. For example, brassica companion plants like thyme, dill, oregano, lavender, onions, garlic, and marigolds are said to deter cabbage moths.
On the other hand, some companion plants can serve as a “trap crop” and attract cabbage worms – while luring them away from your veggies! Nasturtiums are a prime example. However, be sure to periodically remove infested trap crop plants to prevent a booming population of cabbage moths in your garden. Or manually remove and kill the cabbage worms from the trap crops.
For more information on companion planting combinations and natural pest deterrents, be sure to subscribe to our weekly newsletter to receive a free garden planning toolkit! There is a detailed companion planting chart included in the toolkit.

5) Use Decoy Cabbage Moths
This tip is a quick one. Apparently, cabbage moths are territorial and will stay away if there are other cabbage whites around! Thus, some gardeners have success in deterring them by placing decoy or dummy white butterflies around their garden beds. The most common way to do this is to make your own. There are printable templates available online to help.
6) Beneficial Insects: Parasitic Wasps
Parasitic wasps lay their eggs inside or on top of other arthropods, including caterpillars and their pupae. Therefore, these beneficial insects can be a great tool against cabbage worms and other pest caterpillars like tomato horn worms. There are dozens of species and types, so they won’t all look like the one shown below. Once their eggs hatch, the wasp larvae feed on the host caterpillar, killing it.
Did you know that you can buy a starter community of parasitic wasps to introduce to your garden? These Trichogramma wasps are a popular choice. Unlike other large wasps that you may be imagining, these do not bite or sting, and go virtually unnoticed by humans! I am leery of purchasing them for our garden, only because we raise monarch caterpillars.

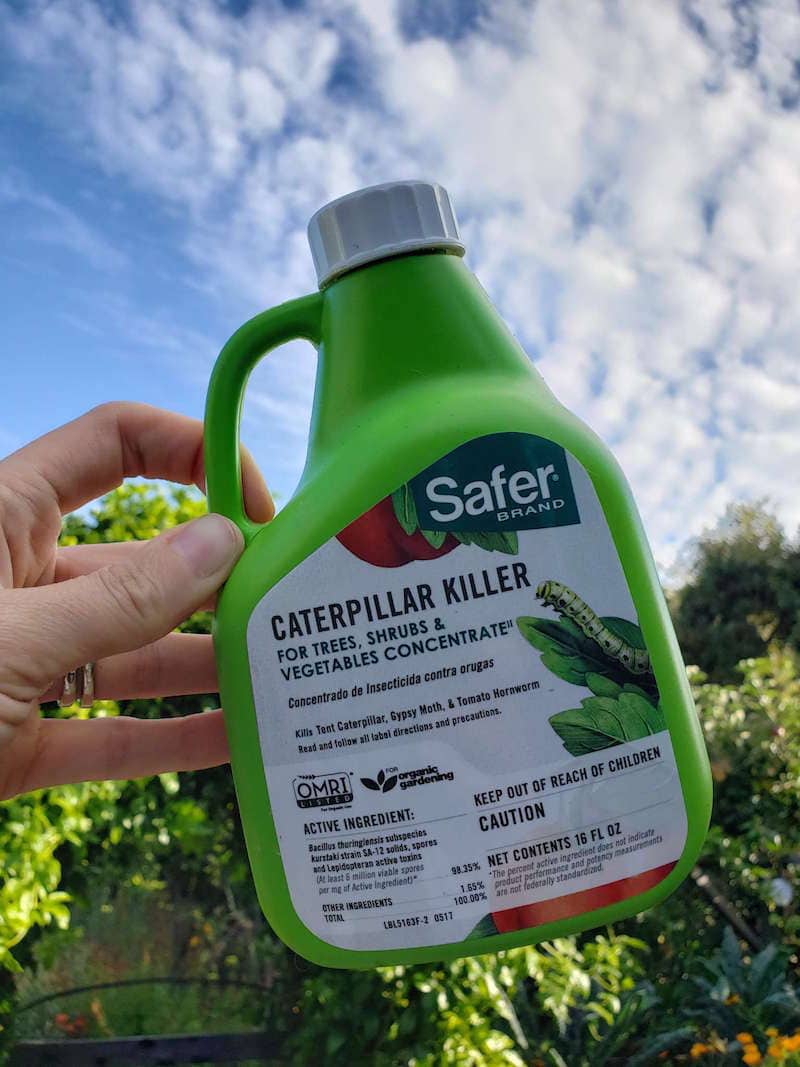
7) Bacillus Thuringiensis – “Bt”
Bacillus thuringiensis, also known as Bt, is a naturally-occurring, soil-dwelling bacteria. It is a common active ingredient in organic biological pesticides. Namely, it kills caterpillars. Bt is ONLY toxic against the larvae of butterflies or moths. It makes them stop eating. Therefore, Bt is commonly used to control cabbage worms and cabbage loopers on the brassica plant family.
“Bt is a bacterium that is not toxic to humans or other mammals, but is toxic to certain insects when ingested. It works as an insecticide by producing a crystal-shaped protein (Cry toxin) that specifically kills certain insects. Bt is naturally found on leaves and in soil worldwide, and has been used commercially both in organic and conventional agriculture for over fifty years. Over two decades of review, the EPA and numerous scientific bodies have consistently found that Bt and Bt-crops are not harmful to humans.”
Entomological Society of America
Bt spray is available to purchase either pre-mixed, or as a concentrate that must be diluted before it is applied to plants. Concentrates are the more cost-effective option. We use this concentrate by Safer Brand. Mostly, for our cannabis plants to stop “bud worms” from destroying them – and on rare occasions in the garden, when the cabbage worms are beyond other means of control. When applied to vegetable crops, Bt is considered safe for human consumption even if sprayed the same day as harvest. (To read more about cannabis-specific organic pest control, see this post.)
How to Use Bt in the Garden
When mixing your Bt spray, follow the directions on the Bt product you purchase. For the one we use, it calls to dilute 1 tablespoon of Bt per one gallon of water. Mix well directly in your pump sprayer. Spray your plants of concern to the point of dripping, including the bottom of leaves.
Like other foliar sprays, it is best to apply your Bt solution in the evening hours. Yet Bt is even more mild than others, and doesn’t pose the same risk for accidentally burning leaves with improper applications. On the contrary, Bt rapidly degrades in sunlight and also washes off with rain or other water. It is most effective the day or two after application, and considered virtually non existent after a week.
Bt is most effective against small caterpillars, so is important to treat caterpillar-infested plants early on. It may not impact larger caterpillars, such as those over 1 inch long. You may need to hand-pick those fatties. Speaking of fatties… you know how much I love monarch caterpillars! We are very, very cautious as to not spray Bt anywhere near our milkweed plants. Also, avoid over-spraying your plants onto non-target areas!
8) Neem Oil
Neem oil is a plant-based oil, extracted from the seeds of the India-native neem tree. Concentrated neem oil is diluted and mixed, and then sprayed onto plants for organic pest control. Neem oil is particularly effective at controlling small soft-bodied insects, like aphids, thrips, spider mites, mealybugs, scale, and white flies. When applied directly, the oil can coat their bodies and kill them – or otherwise interfere with reproduction and feeding.
Neem oil can also help repel cabbage moths, mosquitoes, and flies. Therefore, routinely spraying your garden with a neem oil solution may make your plants less attractive to pests. However, if your plant is already infested, neem oil will not typically kill cabbage worms.
That said, neem oil is last on this list of cabbage worm control options for a reason. Used in conjunction with other control methods, neem oil can help the problem – but will not likely prevent or eliminate the presence of cabbage moths entirely.
If you want to use neem oil in your garden, I highly suggest you read this article to learn more about how to properly mix and use it. Because neem combats fungal diseases like powdery mildew and doesn’t harm beneficial insects (when used correctly), it can be a great product to use in an organic garden! Yet when neem oil is applied incorrectly or in the wrong situation (which is common!) – it can do more harm than good.
And that is how we get rid of cabbage worms.
In closing, I hope you learned some new helpful tips to control cabbage worms! Again, perfection is not the goal here. Please don’t get discouraged (or feel tempted to reach for chemical pesticides) if your plants have a few blemishes. In contrast, be proud of your efforts to grow food in an organic manner! I commend you.
If you enjoyed this article, you’ll may also like:
- How to Make Homemade Insect Soap Spray to Kill Aphids, Mealybugs & More
- Organic Pest Control, Part 1: How to Prevent Pests in the Garden
- Identify the Top 18 Garden Pests, Plus Beneficial Insects
- Over 25 Organic Ways to Stop Pests from Destroying Your Garden
- Top 23 Plants for Pollinators: Attract Bees, Butterflies & Hummingbirds
Please feel free to ask any questions, and spread the love by sharing this article. Pin it below!


38 Comments
Popeye
We don’t plant brassica plants normally so Cabbage Worms are not a big issue. What Is a big issue is the darned Japanese Beetles. They wreck havoc on my Okra
Liz
Thank you so much for this article. It has been very helpful. I’m pretty new to vegetable gardening and this year had high hopes for my collards, kale, and broccoli. But alas, we couldn’t keep up with the cabbage moths/butterflies laying eggs throughout the summer or the resulting caterpillars who dined on the beautiful leaves! We removed caterpillars (and some other not so cute larvae) almost every day, but they still managed to destroy all of our plants. I was sorry that I wasn’t knowledgable about this probability in our area. I would have started my plants under the cover of the insect netting. I would like to try again for a fall crop. I’m growing my plants in fabric “smart pots”. Would you advise using the super hoops or the high-rise hoops that will be put into the ground on either side of a row of pots. I’m thinking that the high-rise size will be needed to allow for the height of the pots and the growth of the greens. Also, are the base extenders needed?
Aaron (Mr. DeannaCat)
Hi Liz, I think using the Hi-Rise super hoops would be best at that would give you more flexibility in being able to use for a number of crops. The base extenders are useful but you can probably get by without them, you will just have to “stake” the bottom of the hoops into the ground. We have done this by using landscape staples and will use two staples for each end to stake the hoop to the ground, tent stakes or something similar would also work. Hope that helps and good luck!
Heidi
Interesting what you say about red / purple varieties. I noticed my red cabbage seedlings were thriving, while the poor green ones look like lace 🙁. But we shall get there!
Another tip I just read about was planting land cress (yes, edible) which is toxic for cabbage white caterpillars.
Also mixing 50/50 baking powder and flour and sprinkling on plants will effectively kill these pests.
Aaron (Mr. DeannaCat)
Thanks for the tips and good luck!
Hannah
I have also discovered the little bugs on my columbines; they ate one to the stems 🙁 (it was NOT a trap crop, it was in my flower beds). BUT now I know nasturtiums and columbines will save my brassicas! And they’re pretty pops in the veg beds, AND hummingbirds like both of those flowers! Assuming, of course, the cabbage worms don’t eat them first.
Dave
I’m not sure how calling “cabbage moths” a moth has become so prevalent. “Cabbage moths” are actually butterflies.
DeannaCat
Yes, that is explained at the very start of the article 🙂 However, cabbage loopers (similar to cabbage worms) do come from a nocturnal brown moth. The remedies explained in the article addresses both.
Amanda
This is useful, thank you!
We don’t have a massive problem, but I did discover that we have them hiding out inside the forming cabbage heads. Since they are hiding inside, I can’t manually pick them off (I did get two, but now the heads are too tight and I know I had more than two). Which of these methods would you most recommend for when they are hiding in the heads? I’m just wondering if you think they will come out to the leaves that the spray reaches before they’ve decimated the inner head, or if I can pour some sort of liquid in there instead of spraying.
Also kind of wondering if pouring a bunch of water in there would effectively drown them, but I’m guessing probably not.
I will say that we don’t have a lot of cabbage worms. I think it might have been these that destroyed a few leaves on our kale, but I think that was mainly because we let them sit too long in the summer heat before harvesting, so they were weak. The main pests molesting our brassicas have been flea beetles. They’re everywhere, and the DE doesn’t seem to deter them much. I’ve resorted to manually catching them with sticky mouse traps.
(A warning to anyone reading this: do NOT just leave the sticky traps out to catch them hopping around. I did, and it worked, but I caught some flies, too, which turned into bait for our sparrows. I don’t want you to experience the same rotten feeling I did when I realized I had caught five sparrows and had to kill them because there was no saving them. Just get the beetles to jump on the trap and then toss the trap.)
Aaron (Mr. DeannaCat)
The cabbage worms typically won’t stay too far inside the head of the cabbage, that is usually what aphids do. BT spray will work because they will eventually come into contact with the outer leaves, just remember, BT is most effective on caterpillars that are less than an inch in size. The big ones will have to be manually removed.
Amanda
Thank you. We recently sprayed all our brassicas and are waiting to see the results. We’ll definitely spray more than once because the butterflies are still mating. I just saw a pair doing so today. Unfortunately, they are a little more quick to escape than most insects. I can even catch grasshoppers if I move slowly enough, but nothing fools those butterflies. Alas. I continue to check over the brassicas regularly, just in case. I’ve found a pretty good number the past few weeks, but so far they have been small.
Surprisingly, today I found a cabbage worm on our purple lady bok choy. I guess that butterfly decided to take a gamble.
Lisa M. Blacker
Thanks much for this! Very helpful to identify what’s been bugging us!
I’ve been picking them off of our brassicas for a week or so, several times per day in order to catch them while they are still small. This seems to have helped since our balcony container garden is small. We saw the moth and thought it was so nice that we had a pollinator!! When we started seeing the holes in our broccoli leaves, I went hunting for the culprit and pulled off those I saw. Then, we noticed the succession seedlings were attacked—a few of them decimated—and the mature curly kale was yet another feeding ground. If you brush out the poop when you remove a worm or two, then look for more poop next time, it’s easier to see if there are more worms to find.
You may want to advise your readers that the tiny worms will still live on the leaves after harvesting, even after a good rinse with the sprayers. I’m about to take the harvested leaves and soak them in cold salted water, which I’ve heard from another gardener is effective and safe.
Sheila
What about diatomaceous earth as a treatment for the cabbage worms?
DeannaCat
Hi Sheila – DE isn’t effective against caterpillars. It only works on things with an exoskeleton.
Brook
So you say to avoid over-spraying Bt but you also say one application only lasts two days. Does this mean it should be sprayed about 3 times a week to be fully effective? Just sounds like a lot! Thanks
DeannaCat
Hi Brook – By avoiding “over-spraying” I mean not off the target plants and onto nearby non-target plants, to avoid harming beneficial caterpillars like monarchs or swallowtails that may be around. Yes, the Bt is most active during the first few days (and takes a few days to kill the caterpillars), but can be effective for a week or so depending on the weather (rain, intense sun, etc). No, I wouldn’t recommend repetitive treatments like you’re saying. Not that it would be harmful… it would just be wasteful and unnecessary. You have to think about the life cycle of the caterpillar, and how the Bt works (they have to consume it, and then slowly die). If you treat the plants once and it gets rid of all the caterpillars, it will be a couple weeks until the newest eggs hatch, the small caterpillars grow, begin to feed, cause damage, etc. Even then, I wouldn’t treat that often. We don’t mind a few nibble holes in our greens and can usually manage a handful of caterpillars by hand. It is only when things get really out of control and they’re destroying the crops all together that we reach for the Bt. Even in the height of cabbage moth season, I wouldn’t find the need to use it more than once every 3-4 weeks (again, unless you’re hoping for picture perfect leaves with absolutely zero caterpillars). I hope that makes sense!
Susan Carroll
Thanks for you article. Until this year I did not control cabbage moths; there wasn’t much damage to speak of. This Spring however I decided to squish the moths and realized that there were dozens. I try not to kill bugs but strike a reasonable balance. Last year I had a lot grasshoppers that loved tomatoes and eggplant. It’s possible that managing them better will be enough.