


Pickled Fava Beans (Broad Beans): Quick & Easy Refrigerator Pickles
Are you ready to pickle some fava beans? I sure am! Yum. Of all the ways we like to eat and preserve our homegrown fava bean harvests, making pickled fava beans is one of my favorites. They are delectably tangy, earthy, mildy sweet and salty, and as spicy as you’d like to make them. Not only are pickled fava beans (aka broad beans) a super tasty and healthy snack – they’re also incredibly easy to make! Especially the way we do it.
This pickled fava beans recipe uses a quick “refrigerator pickle” method, meaning there is no canning required. However, you are welcome to hot-bath or pressure can these pickled fava beans if you desire! Simply follow the modifications for canning below.
If you’ve been around this blog, this may feel familiar – because it is essentially the same as our pickled pepper recipe. The brine is the same, though we take a few different steps during the pepper prep. Be sure to check that one out too!
About Fava Beans
If you’re here and interested in making pickled fava beans, then you are probably already aware of what an overall awesome plant fava beans are! Heck, maybe you even grew your own after hearing me rant and rave about them so much.
Just in case you aren’t up to speed, here is the low down: Fava Beans are incredible multi-purpose plants, and a welcome addition to any garden. As part of the legume family, the plants themselves are nitrogen-fixers. That means they bring in nitrogen from the atmosphere, store it in their root system, and improve soil fertility. Therefore, fava beans are a popular choice as cover crops. After the growing season, cut the plants down at the soil line and leave the roots to decompose in place – feeding the soil. Then, either compost or mulch soil surfaces with the leftover stalks. But before you go and do that…
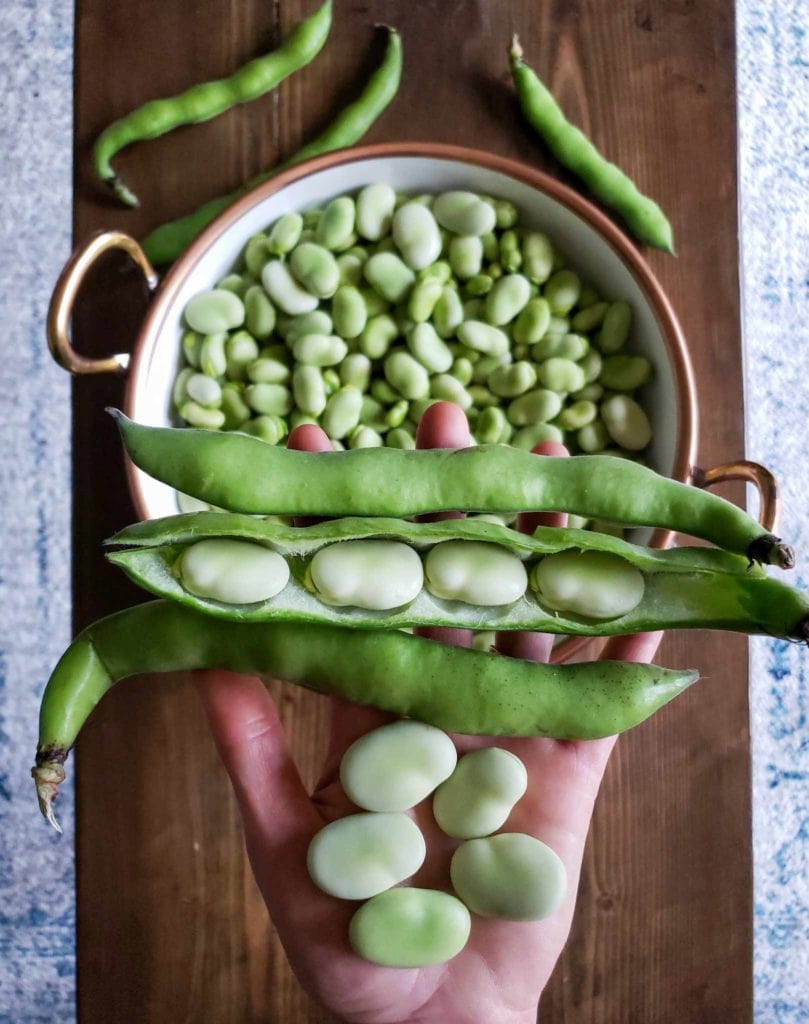
Did you know that the entire fava bean plant is edible? It sure is! The beans, pods, leaves, and all. They’re a great source of protein, fiber, and tons of micronutrients. While I don’t necessarily recommend munching on the tough stalks, the newest tender leaves are absolutely delicious – reminiscent of buttery, earthy spinach. We like to saute the greens, add them to salad, or make fava bean greens pesto from them. The pesto recipe is freezer-friendly too!
Learn more about how to grow and use fava beans here.
Ok, back to the pickled fava beans recipe.
HOW TO MAKE EASY PICKLED FAVA BEANS
Ingredients
Per quart jar:
- Fava beans – Enough to fill the jar. You can use either whole small tender pods, or individual shelled beans (see fava bean prep notes to follow)
- 1 cup of filtered water
- 1 cup of white vinegar
- About a dozen peppercorns
- A few sprigs (small handful) of fresh dill
- 2 to 3 cloves of garlic, lightly crushed
- 1 heaping tablespoon sea salt and sugar each
- Optional: A sprinkle of celery seed
- Optional: a fresh hot chili pepper (e.g. jalepeno) or red chili pepper flakes
- Scale ratios up or down as needed for varying size jars
Recipe Notes
Another optional addition is grape, oak, black tea, or horseradish leaves. All of these leaves contain tannins that help the pickled fava beans retain their texture. Tannin leaves are common additions to keep pickled cucumbers crisp, which are more prone to getting soft. However, I don’t find them as necessary for pickled fava beans. The one caveat is if you intend to hot-bath or pressure can your pickled fava beans! In that case, I do suggest stuffing a leaf or two in there. The heat will cause them to soften much more than the refrigerator method.
Speaking of canning, if you intend to can this pickled fava bean recipe to store them at room temperature, increase the vinegar-to-water ratio than what is listed above. For food safety, adjust the recipe to be about 3 times the amount of vinegar to water. For example, 1.5 cups of vinegar and 1/2 cup of water instead of 1:1.
INSTRUCTIONS
Step 1: Prepare the Fava Beans
You know that you can eat the entire fava bean, right? For instance, many people like to grill the pods whole! There is a TON of bangin’ flavor and nutrients in both the outer pod and the individual bean shell/skins (which many people peel off). However, the larger the pod and individual beans become, the more tough they become as well. So, the amount of prep and peeling you do for this pickled fava bean recipe is entirely up to your preference and the beans that you’re working with.
If you have small tender fava beans (finger size or smaller), feel free to pickle the whole pod! If the pods have become large and tough, shell them and use the inner beans only. You can take it a step further and peel each individual inner bean, if you’d like. We only do that for ones that are very large and have become tough. Otherwise, it is significantly faster and easier to not peel each bean.
No matter how you prepare them, give them a good rinse before adding the fava beans to your jar.

Step 2: Fill the Jars
In the bottom of each glass mason jar (or similar container), add a few sprigs of fresh, washed dill. Peel 2 to 3 cloves of garlic, crush them lightly with the wide side of a knife, and throw them in the jar as well. Finally, add a pinch of peppercorns. We add about a dozen per quart jar. If you want to add the optional fresh hot chili peppers, grape or oak leaves, add one or two to the bottom of each jar now.

Next, fill the jar with washed and prepared fava beans. I like to pack as many in as possible. It reduces the air space and also means I will use less brine – and get the most pickled fava beans possible!
Hint: This pickling recipe can be used for a variety of other veggies too! If you have extra space in your jar (or simply want to create a fun mixed-pickle jar) feel free to add a few slices of onion, carrots, green beans, peppers, or other garden goodies to your jar too.
Step 3: Make Your Pickling Brine
On the stovetop, combine equal parts white vinegar and water in a pot. Next, add equal parts sugar and sea salt – following the amounts list above. Finally, add a pinch of celery seed and/or red chili flakes if you desire. Stir, and lightly heat the mixture until the salt and sugar has dissolved.
We don’t want to add the brine to the fava beans when it is piping hot though! “Cooking” the fava beans in boiling brine will make them soften. Therefore, allow the brine to cool down a bit if needed. Lukewarm is good.
Once your brine is no longer hot, pour it into your jar of fava beans – until it is completely full and all of the beans are submerged. (Well, the top few beans are going to want to float, but you know what I mean.) If you somehow don’t have quite enough to fill the jar completely, no big deal! Simply top off the jars with plain white vinegar.
Feel your jars. If they’re still rather warm, allow them to sit out at room temperature to cool down for a couple of hours before refrigerating your pickled fava beans.

Step 4: Refrigerate & Marinate
After the jars of fava beans are fairly cool, add a lid to each jar. The acidic nature of pickles can make standard mason jar lids corrode with time, so we opt to use these rust-proof stainless steel lids, or these BPA-free plastic ones.
Refrigerate the jars, but keep them in the front of the fridge at first – where you’ll see and remember them! That is because you’re going to want to gently tip or shake the jars once or twice per day for the first few days.
Why? The fava beans floating on top need to either get rotated around or receive a nice splash of vinegar from time to time. It isn’t a huge deal if you forget, though it does help them pickle evenly, not dry out, and prevent mold. Mold is quite rare in vinegar pickling – but could happen if you have a solo floater for days on end – before the beans become nice and acidic. After the first three to four days, this isn’t necessary. A simple alternative is to use a ceramic or glass weight inside the jar to keep the beans submerged, commonly used in fermentation.
Now, allow them to marinate in the fridge for at least 2 to 3 weeks before enjoying. You can totally sneak an early taste of course! Just keep in mind that they will improve with time as the pickle flavor develops to reach its maximum, delicious potential.

Step 5: Enjoy!
These simple pickled fava beans will stay good for up to 6 months in the refrigerator, though they’re best enjoyed within 2 to 3 months.
I have always been a pickle-lover, and find myself snacking on these straight from the jar! Pickled fava beans make a great addition to any hors d’oeuvre plate, with cheese and crackers, on top of pizza, sandwiches, salads, or open-face avocado toast with homemade sourdough bread. And of course, pickled fava beans are excellent with a nice glass of chianti. 😉
See, I said this would be quick and easy, right?
In closing, I hope you love and enjoy this easy pickled fava bean recipe as much as we do! Please feel free to ask questions, share this post, and come back for a review! Until then, check out these other recipes I think you might like:
- Probiotic-Packed Lacto-Fermented Dilly Green Bean “Pickles”
- Quick & Easy Refrigerator Pickled Peppers Recipe
- Fava Bean Greens Pesto Recipe
- Super Simple Homemade Sauerkraut Recipe
- The Greatest Green Hummus Recipe (freezer-friendly)

Pickled Fava Beans (Broad Beans): Easy Refrigerator Pickles
Ingredients
- Fava beans (shelled or small tender whole pods)
- 1 cup Filtered water
- 1 cup White vinegar
- 1 tbsp Sea salt, kosher or pickling
- 1 tbsp Sugar
- Fresh dill, a few sprigs (small handful)
- Peppercorns, to taste (about a dozen per jar)
- 2-3 cloves Fresh garlic cloves, lightly crushed
- 1 pinch Celery seed (optional)
- 1 pinch Red chili flakes, or 1 fresh hot chili pepper (optional)
Instructions
- Wash your fava beans of choice. You can leave small tender fava bean pods whole (finger size or smaller), or shell them and pickle the individual beans only. I recommend peeling the skin off each individual bean only if they are large and tough. Otherwise, feel free to leave the skins on!
- Add the fresh dill, lightly crushed cloves of garlic, and peppercorns to the bottom of a clean quart jar. [ If you'd like to add a hot chili pepper (e.g. jalepeno) for some spice, or optional grape, horseradish, oak, or black tea leaves to retain a more firm texture, do so now. ]
- Pack the prepared fava beans into the jar, trying to fit as many as possible and reduce empty air space.
- Prepare the pickling brine by combining the vinegar, water, sugar, and salt in a saucepan on the stove. Add optional an optional pinch of celery seed and/or red chili flakes now. Heat lightly until the sugar and salt dissolve, but then allow the brine to cool slightly before adding to the fava beans.
- Pour the brine over the top of the fava beans until they are completely submerged. Top off with more brine or vinegar if settling occurs. Place an air-tight lid on the jar.
- Refrigerate the jar. During the first 3 to 4 days in the refrigerator, gently tip or shake the jar to wet/rotate the top floating beans – ensuring even pickling and that no "floaters" become dry or mold. Or, use a glass/ceramic fermenting weight to keep the fava beans submerged instead.
- For optimum flavor, allow the fava beans to marinate in the refrigerator for 2 to 3 weeks before enjoying.
- These pickled fava beans should last in the refrigerator for up to 6 months, though I recommend to enjoy them within 3 months for best quality and flavor.
Notes


8 Comments
Sharon
I was also going to try the fermenting recipe you mentioned above. Can o ferment the whole bean or do I need to shell them. I pick them young
Also can I save them in the fridge till o have enough right now I am harvesting about 5 a day but I think they are picking up unless the warm weather takes them out.
Aaron (Mr. DeannaCat)
Hi Sharon, yes you can leave the fava beans whole in your ferment, especially so since you are harvesting them small when they are more tender. Have fun and let us know how your ferment turns out!
Rosella
I’ve never done pickled fava beans before until I’ve tried your recipe. They came out really good and everyone loves them . We have the fava beans at their best here in Malta so I’m making alot of jars. However can you store them in the cupboard instead and once opened put them in the fridge? I don’t have much space in the fridge as it is quite small.
Aaron (Mr. DeannaCat)
Hello Rosella, we’re glad you enjoyed the recipe so much, we have another pickling recipe that we used for cucamelons that is quite tasty and can be used for fava beans as well. Unfortunately these recipes are not shelf stable, to keep your fava beans in the cupboard you would need to hot bath can them for room temperature storage. Hope that helps and good luck!
colleen
I never thought of pickling fava beans! I don’t normally do vinegar pickling, as I tend to like the taste of lacto-fermented veggies better…do you think it would be possible to ferment these too, or do favas not have enough sugar?
DeannaCat
Oh yes for sure! They’re great fermented too. I was simply trying to expand the vinegar-based recipes here on the blog since some folks are leery about fermentation, which I what I mostly share for these types of things (radishes, carrots, beets, etc!). Favas could be perfect subbed in our simple fermented radish recipe. Enjoy!
Colleen
Thanks for the reply. I think I’ll give fermenting them a try! I planted favas in a 20’x30′ block to improve an area with terrible soil, not expecting them to actually *produce* anything except greens and biomass before our hot (zone 10) weather set in…and I’m absolutely buried in fava beans right now (not that I’m complaining)!
Kathy Peters
Love these simple pickles, great for snacking from the fridge. I was overwhelmed by the amount of fava beans we harvested and this was such an easy delicious way to preserve them. The first jar actually didn’t make it to the recommended 2-3 week time frame since we couldn’t resist eating them early, they’re that good! Luckily I have a bunch more jars stored and will have yummy fava snacks for awhile. Thanks so much Deanna!