

How to Make Pumpkin Shaped Sourdough Bread Loaf
Ready to learn how to make a sourdough pumpkin? I think we can all agree: pumpkin shaped sourdough bread loaves are absolutely adorable. Stunning even. They’re the perfect festive addition to the table for fall holidays, dinner parties, or just because! In addition to being delicious, a sourdough pumpkin doubles as a beautiful rustic centerpiece – and a definite conversation starter! Even better, they’re quite easy to make, especially if you already know the basics of making sourdough bread.
Keep in mind this is just a pumpkin-shaped loaf of regular sourdough bread… not pumpkin-flavored! The lobes of the pumpkin make it superb for pulling apart, to dip in soup or other goodies, or to cut into roll-like sections. If you’re looking for a sourdough recipe made with actual pumpkin, try our Healthy Sourdough Pumpkin Spice Bread. It’s soft, fluffy, mildly sweet, and perfectly spiced. Made with whole wheat pastry flour, ample pumpkin, and no refined sugar, it’s more nutritious than other sweet breads too!
Supplies needed to make pumpkin shaped sourdough
- Uncooked sourdough dough, proofed in a round shape. If you’re new to sourdough or need a starter, keep in mind we offer organic starter in our shop. It comes with easy instructions and tips – success guaranteed!
- Cooking twine, like this natural organic cotton kitchen twine. Do not use regular old twine! It must be made for food contact and high heat.
- Scissors
- Parchment paper
- A cutting board
- Dutch oven or cast iron combo cooker
- Optional: a bread lame to score designs in the sides of the sourdough pumpkin
- Optional: a cinnamon stick, a half a pecan, or even real squash stem to create the sourdough pumpkin stem

Step 1: Make your dough
Use your favorite sourdough bread recipe to make a batch of dough. Follow all the usual steps to mix, proof, fold, and form the dough into a round shape. We followed our simple no-knead sourdough bread recipe to make the dough the night before, tucked it into the fridge in a round floured banneton overnight, and then created and baked the sourdough pumpkin the next morning.
For a fun twist, add turmeric powder to the dough to naturally dye the inside yellow-orange! (Add 1-2 tsp when mixing the dough or during stretch-and-fold, though this will change the flavor of the bread too.)
Step 2: Create a pumpkin shape
- Leave the dough in the refrigerator until you have all your supplies ready. I even popped mine into the freezer for just about 10 minutes to stiffen up slightly, which helped prevent the dough from spreading out too much while I was tying the twine around it.
- Cut four long pieces of twine – I found about 36” is plenty. Tie them all together with a single knot in the middle.

- Remove the dough from the fridge (or freezer) but keep it in the banneton or proofing basket for now.
- Spread the twine out on the top of the dough ball, with the knot in the center and the strings spread evenly to create eight lobes of the sourdough pumpkin. See photos below.
- Place a piece of parchment paper on top of the banneton, dough, and string, followed by a cutting board on top of that. Use the support of the cutting board to flip everything over. Gently pull off the banneton or proofing basket.
- Lightly and evenly dust the surface of the dough with flour and then spread it with your hands. (A small colander or fine mesh strainer helps here.) This will help prevent the string from sticking too much, and make your design pop!


- Readjust the strings to be evenly spaced if needed. Two at a time, grab strings from opposite sides of the sourdough ball and tie them in a knot at the center of the dough ball. Try to keep all the knots in the same spot near the top. The strings should be fairly tight against the dough, but not causing it to pinch in. The pumpkin shape will accentuate as the sourdough bakes and expands! Cut off the excess string just above the knots.
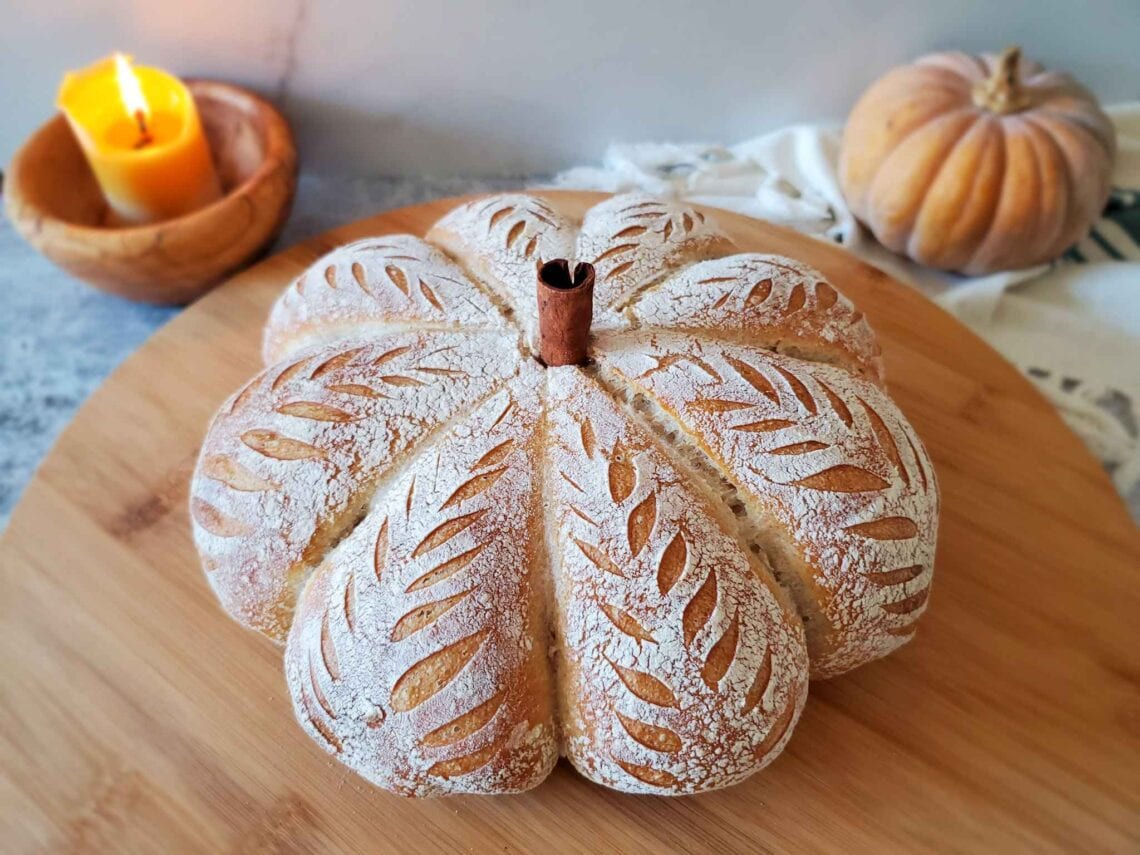
- Use a bread lame to score fun designs into each section of the sourdough pumpkin if you wish!


Step 3: Bake and cool
Use the parchment paper to carefully transfer the pumpkin shaped sourdough to your preheated baking vessel of choice – such as a dutch oven, or our favorite, a cast iron combo cooker. (It’s basically like an upside down dutch oven.) I love how easy it is to transfer the bread in and out of the flat portion, using the deep dome as a lid on top.
Bake the sourdough pumpkin following the recommended time and temperature from the bread recipe you’re using. We usually preheat the oven for an hour first (with the combo cooker inside) and bake our bread at 475°F covered for about 40 minutes, and then uncovered for just a few additional minutes at the end.
Transfer the finished bread to a cooling rack right after baking.


Step 4: Remove strings and enjoy!
Allow your sourdough pumpkin to cool slightly before removing the strings. They may be totally engulfed in bread around the sides. In that case, I find it easiest to cut off all the strings from the top portion first, then flip the bread over (being careful to not mess up your pretty design!) to cut and pull out the strings from below. Use the tip of a knife or other tool to gently pry loose any twine that is stuck to the surface of the bread.
Add a “stem” to the top of your pumpkin shaped sourdough to complete the look! Using my bread lame, I cut a small X in the crust before inserting the cinnamon stick so it wouldn’t cause a big crack.
I recommend allowing sourdough bread to cool for several hours before slicing. Warm steamy bread is great if you plan to eat it all right away, but steam is also lost moisture… so cutting bread open while it’s still warm will make it go dry and stale much faster.


And that is how you make pumpkin shaped sourdough bread!
Isn’t that fun?! I hope you love making sourdough pumpkins as much as I enjoyed putting this tutorial together for you all. I can’t wait to see what you create! Tag me on Instagram (@deannacat3) so I can see your pretty pumpkins! I’m sure your family and friends will be highly impressed too. If you found this to be useful, please spread the sourdough love by leaving a review below and sharing or pinning this post. Thank you so much for tuning in today. Happy baking!
You may also like:
- Basic No-Knead Sourdough Bread Recipe
- Simple Sourdough Focaccia Recipe
- Sourdough Pancakes recipe (discard or active starter)
- Healthy Sourdough Pumpkin Spice Bread (or muffins)
- Cinnamon Spiced Sourdough Chocolate Chip Cookies
- Soft and Chewy Sourdough Ginger Molasses Cookies
- Herb and Whole Wheat Sourdough Crackers
- Sourdough Cornbread
Pumpkin Shaped Sourdough Bread (Sourdough Pumpkin Loaf)
Equipment
- Cooking or baking twine (not regular string)
- Scissors
- Parchment Paper
- A cutting board
- Dutch oven or cast iron combo cooker
- Optional: bread lame for scoring
- Optional: a cinnamon stick, half a pecan, or real squash stem
Ingredients
- raw sourdough dough, proofed in a round shape
Instructions
Make the Dough
- Use your favorite sourdough bread recipe to make a batch of dough. Follow all the usual steps to mix, proof, fold, and form the dough into a round shape. (We make the dough the evening prior, proof overnight in the fridge, then create/bake the sourdough pumpkin the following morning).
Create the Pumpkin Shape
- Leave the dough in the refrigerator until you have all your supplies ready.
- Cut four long pieces of twine (I found about 36” is plenty). Tie them all together with a single knot in the middle.
- Remove the dough from the fridge but keep it in the banneton or proofing basket for now.
- Spread the twine out on the top of the dough ball, with the knot in the center and the strings spread evenly to create eight lobes of the sourdough pumpkin.
- Place a piece of parchment paper on top of the banneton, followed by a cutting board on top of that. Use the support of the cutting board to flip everything over. Gently pull off the banneton or proofing basket.
- Lightly and evenly dust the surface of the dough with flour and gently spread it with your hands
- Use a bread lame to score fun designs into each section of the sourdough pumpkin if you wish!
Bake
- Use the parchment paper to carefully transfer the pumpkin shaped sourdough to your preheated baking vessel of choice – such as a dutch oven or a cast iron combo cooker.
- Bake the sourdough pumpkin following the recommended time and temperature from the bread recipe you’re using. (We preheat the oven to 475F for one hour with the combo cooker inside, bake for 50 minutes covered then a few minutes uncovered at the end)
- Transfer the finished bread to a cooling rack right away.
Remove string and enjoy!
- Allow your sourdough pumpkin to cool slightly before removing the strings. Carefully cut away and pull loose the string from the bread. Use the tip of a knife to pry loose any parts that are stuck to the surface of the bread.
- Add a “stem” to the top of your pumpkin shaped sourdough to complete the look! Using my bread lame, I cut a small X in the crust before inserting the cinnamon stick so it wouldn’t cause a big crack.
- I recommend allowing sourdough bread to cool for several hours before slicing, unless you plan to eat it all within a day or two (cutting hot sourdough leads to loss of moisture and goes stale more quickly).


3 Comments
Cheryl
That is beautiful! You are so talented and I so appreciated everything you share with your followers. I look forward to your emails every week and I’m always browsing your website for info and ideas. Thank you!!
Aaron (Mr. DeannaCat)
Thanks you so much for the support Cheryl!
Maisy
This is so cute!!