


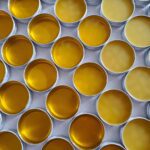
How to Make Salve or Balms 101: Simple Flexible Recipe
Are you interested in making homemade salves or balms? Then you’ve come to the right place! Read along to learn the basics to make salve or balm with a simple and flexible recipe. We’ll talk about the difference between salves and balms, wax-to-oil ratios, and various oils or waxes you can use – including vegan options. Finally, I’ll share how to customize and enhance a basic balm or salve recipe by using herb-infused oils or optional ingredients like cocoa butter, shea butter, and essential oils.
Luxurious lavender salve, calming calendula salve, radiant rosehip balm, cooling comfrey chickweed balm, luscious lip balms… After you read this guide and grasp the basics, the options of what you can create are truly endless! Bonus: making salve and balms is far easier than you likely imagine. You can find a printable version of the recipe at the end of this post.
What’s the difference between a salve and a balm?
Topical salves and balms are very similar overall. They’re both made by combining oil and some sort of wax and/or butter (beeswax being the most common) as a stiffener, resulting in a semi-solid but spreadable mixture to apply to your skin. Balms and salves are so similar, many herbalists and DIYers use the two terms and recipes fairly interchangeably (myself included).
Technically, the main difference between a balm and a salve is that salves are slightly more soft, while balms are a bit more firm. Therefore, homemade balm recipes usually have a higher wax-to-oil ratio to achieve a firmer end product, while salve recipes have lighter wax in comparison. Balms are better at creating a natural, long-lasting barrier on the skin and locking in moisture, while spreadable salves are excellent for moisturizing skin or treating specific conditions.
The firmer texture means balms can come in a wider range of packaging, including lip balm tubes or cardboard push-up tubes, while soft salves are usually best stored in a tin, glass jar, or other wide shallow container you can dip into. And in case you’re curious, an ointment is simply an even softer, more oily version of a salve.

Supplies Needed to Make Salve or Balms
- Herbal oil or plain oil of choice such as olive oil, sweet almond oil, or jojoba oil (explored more to follow)
- Beeswax or alternative natural wax
- Optional ingredients like shea butter, cocoa butter, vitamin E oil, or essential oils
- A double boiler, which allows the salve ingredients to heat and melt evenly without overheating or burning. Consider this modest double-boiler, this large one, or this top melting pot you can set over an existing pot – which also has a handy pour spout! You can also make a DIY double boiler by nestling a smaller pot or heat-safe bowl inside a slightly larger pot.
- Measuring cups and/or digital kitchen scale
- Storage containers such as salve tins (1 ounce or 2 ounce tins), small glass jars (I love these 2 ounce amber jars or 4 ounce cobalt jars), lip balm tubes, or other suitable container.
- A small heat-safe pitcher, glass measuring cup with pour spout, or confectionery funnel for filling containers.


Understanding Salve and Balm Wax-to-Oil Ratios
- To make a salve or balm, simply heat 1 part beeswax with 3 to 5 parts natural oil of choice in a double-boiler until combined (see detailed instructions below). For example, ¼ cup of beeswax pastilles or shavings and about 1 cup of oil, or 1 cup of beeswax for every 3 to 5 cups of oil.
- A 1:3 wax-to-oil ratio will create a firm balm, a 1:4 ratio is great for a standard salve, and a 1:5 wax-to-oil ratio creates a soft, spreadable salve. You could even use a 1:6 ratio, which will result in an extra soft, gooey salve. Any additional oil beyond that, the salve will fail to properly set up or stiffen.
- To measure by weight and ounces, use a 1:8 ratio such as 1 oz beeswax (1/4 cup) to 8 fluid ounces of oil for a standard salve. This is particularly helpful if you’re working with beeswax blocks or chunks.
- Scale the recipe up or down as needed while maintaining the recommended ratios. Note that other types of natural waxes require slightly different ratios than beeswax, explored in the “alternative wax” discussion to follow.
- Keep in mind that adding additional ingredients like butters will also influence the texture. For example, we generally use a 1:4 ratio for salves but also add shea butter, which softens it up a bit. Lip balm recipes almost always include a butter component (like our lip balm recipe with cocoa butter).
Basic Homemade Salve Recipe
- 1 cup (8 ounces) of oil, plain or herb-infused. Use ¾ cup for a firm balm (1:3 ratio) or up to 1.25 cups for a softer salve (1:5 ratio)
- ¼ cup (1 oz) beeswax pellets or pastilles
- Optional: 1 to 2 Tbsp shea butter, cocoa butter or mango butter
- Optional: Up to 1 tsp of essential oils (100 drops maximum) for a very strong-scented salve. I recommend using ¼ to ½ that amount or less. Lavender, roman chamomile, eucalyptus, rosemary, and peppermint are a few popular options. We like to use certified organic essential oils from Plant Therapy.
- Optional: ½ tsp of vitamin E oil
This recipe makes just over 1 cup of finished salve – around 10 ounces, or five 2-ounce jars.
Next let’s explore the various types of oils, herbal oils, waxes, and optional ingredients used to make salve or balm. Or, feel free to skip straight to the salve-making instructions to make salve here.

Homemade Salve or Balm Ingredients
Oil of choice
To make a salve or balm, you can use any high-quality natural oil you prefer – or a combination of two or more! Sweet almond oil, jojoba oil, and argan oil are some of my favorites. Olive oil, coconut oil, and avocado oil are also popular choices. Using coconut oil that is solid at room temperature will increase the overall firmness of your salve, while fractionated (liquid) coconut oil will behave like any other oil.
Hop over to this article to explore 11 carrier oil options for skin care, including the unique benefits, characteristics, and comedogenic ratings of each one. Use these oils as-is or infused with herbs first (explained below). For the most healthy and healing salves, I suggest using cold-pressed, virgin, and organic oils whenever possible.

Beeswax
Beeswax is the most common type of wax used to make salves or balms. It’s readily available, easy to work with (especially beeswax pastilles or pellets) and creates an ideal smooth salve or balm texture. Even better, studies show that beeswax is naturally antimicrobial, anti-fungal, anti-inflammatory, and has the ability to both soothe and protect the skin while locking in moisture!
Alternative (vegan) wax alternatives for salve or balms
Beeswax aside, you can make salves or balms with other natural plant-based waxes too. For instance, soy wax, carnauba wax, or candelilla wax are popular vegan wax options to make herbal salves or balms. However, this may take a little experimentation on your part since they have different textures and therefore may yield different results than beeswax.
- Soy wax is an especially easy and direct swap for beeswax (1:1) in any salve recipe. I recommend using organic soy wax if possible, since conventional soy is notoriously pesticide-intensive. Also be sure to choose cosmetic-grade or food grade soy wax, not one designed for candle making or crafts only.
- Candelilla wax is more firm than beeswax, so use slightly less candelilla in your salve recipe (try 1 part candelilla wax to 5 or 6 parts oil). Note that products made with candelilla are more prone to cracking. It also has a very high melting point, so will likely be the last ingredient to melt in your pot.
- Carnauba wax is the firmest of them all, and even more prone to cracking. Try 1 part carnauba wax for every 6 to 8 parts oil to create a smooth, spreadable salve and a 1:5 ratio for a firmer balm. Carnauba makes the best salve or balm texture when combined with plant-based butters like shea or cocoa butter.
Optional Ingredients
Herb-infused oil
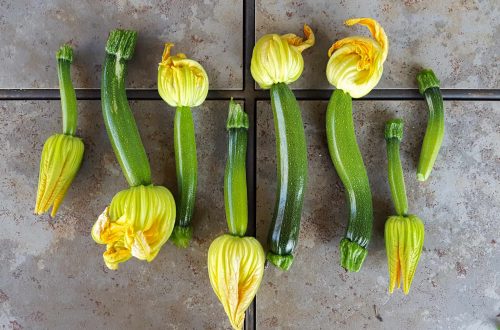
Plain, high-quality carrier oils like sweet almond, olive or jojoba oil will nourish and moisturize skin on their own. However, you could also infuse dried herbs in oil before making salve to combine the healing and therapeutic benefits of both! I love incorporating homegrown goodies in our herbal salves.
Dried lavender, chamomile, rosemary, calendula, hemp, comfrey, yarrow, chickweed, rosehips or rose petals are a few excellent choices – and all bring their own unique properties to the herbal salve or balm! If you’re new to herbs and want to learn more about the uses and benefits of each one, I highly recommend this Beginner’s Guide to Medicinal Herbs by Rosemary Gladstar.
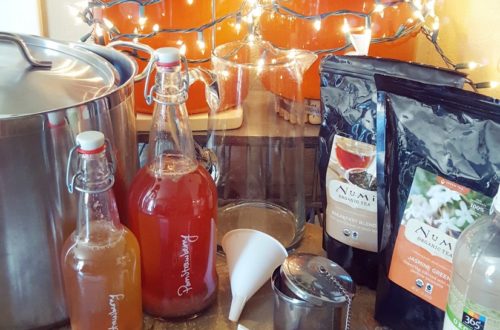
To make herb-infused oils, you can either passively steep dry herbs in oil for several weeks (the no-heat method) or lightly heat fresh or dried herbs in oil on the stovetop or in a crockpot for more immediate results. I prefer the slow no-heat method, which best preserves the medicinal compounds in the herbs but does take more patience and planning in advance.
Learn how to make herbal oils here. After straining, you can use the herb-infused oil alone in a balm or salve recipe, or in addition to another plain carrier oil (as long as you maintain the recommended wax-to-oil ratio).


Butters: Shea Butter, Cocoa Butter, and Mango Butter
Plant-based butters can make salves and balms extra smooth, creamy, and nourishing! However, using too much can negatively influence the consistency of your finished product, such as making it too soft, grainy, or crack as it dries. Using the basic salve recipe I shared above, start with just a small amount of butter (about 1 or 2 tablespoons butter per cup of oil) and then experiment and adjust as needed.
- Shea butter is highly moisturizing and rich in vitamins, minerals, essential fatty acids, and polyphenols. Studies confirm that shea butter has potent anti-inflammatory, anti-aging, and antioxidant properties. It also helps with skin barrier repair. Shea butter has a high melting point, so it may be the last to completely melt in your double-boiler.
- Cocoa butter is a rich moisturizer that replenishes the skin’s natural protective barrier, sealing in long-lasting moisture. Like shea butter, cocoa butter is loaded with fatty acids, minerals, polyphenols and antioxidants. When used in salves and balms, cocoa butter also tends to absorb into skin nicely rather than feeling greasy.
- Mango butter contains similar good fatty acids, antioxidants, vitamins and minerals that shea and cocoa butter provide. Yet Mango butter is incredibly high in Vitamin C – a powerful antioxidant in skincare that helps to stimulate collagen production, and prevent or correct sun damage and premature aging. It’s also highly hydrating!

Vitamin E Oil
I often like to add vitamin E oil to my homemade salves and lip balm, just for a little extra oomph of goodness. With high levels of antioxidants and the ability to both protect skin and ameliorate a wide variety of skin issues, Vitamin E is a known powerhouse in natural skincare and cosmetics. Like essential oils, pure Vitamin E oil is highly concentrated. A little goes a long way! A salve or balm recipe with no more than 0.5% to 1% vitamin E oil is plenty (about ½ tsp of vitamin E oil per cup of oil).
Essential Oils
Essential oils (EOs) can bring a lot to a homemade salve or balm. Obviously, essential oils smell nice! Most natural herb-infused oils don’t have much of an aroma, so adding a few drops of essential oils can really elevate the final product.
Essential oils also offer unique therapeutic benefits when used topically. For instance, chamomile and lavender essential oils are excellent at calming nerves and skin issues, while refreshing peppermint and eucalyptus oils are uplifting, antibacterial, and can help clear sinuses. Learn more about each of their benefits here.
Essential oil precautions
It’s important to remember that essential oils are very concentrated and must be thoroughly diluted before they’re safe to use directly on skin. The recommended maximum concentration or dilution rate for most EOs is 2-3%, or about 1 tsp (100 drops) of essential oils per cup of regular oil for adults, and often even less for kiddos.
However, remember that’s the maximum recommendation – and would result in a very strongly scented salve or balm! We prefer more natural, mellow products and usually use a quarter of that, or less.
Avoid using phytotoxic essential oils in topical salves and balms, including lemon, grapefruit, bergamot, mandarin, lime, and bitter orange – they can cause skin to burn easily in the sun. (Sweet orange is not phytotoxic). Strong amounts of “hot” oils like cinnamon, lemongrass, clove, oregano, and cassia may be irritating for those with sensitive skin.
Also note that most essential oils are toxic to pets, with the exception of lavender, frankincense, chamomile, and rosemary.

Which essential oils are best for salve and balm?
Common essential oils used in homemade salves and balms include: lavender, sweet orange, roman chamomile, peppermint, tea tree, eucalyptus, geranium, sandalwood, cedarwood, jasmine, rose, lemongrass, clary sage, frankincense, ylang ylang, vanilla, and rosemary. Use one scent alone, or try mixing two or three.
Tip: Balance sweet, woody, or floral scents with a more bright, herbaceous or citrusy scent, such as lavender + eucalyptus or rosemary, chamomile + lemongrass, sandalwood or cedarwood + peppermint, or jasmine + sweet orange.
Working with essential oils and scenting salves is a craft of its own! It can take some experimentation to find the right amount and blend of oils to meet your desired results. Therefore, I suggest to start small: with a small batch of salve, and a light amount of just one or two types of essential oils. Gradually adjust as needed.

Instructions to Make a Homemade Salve or Balm
Last but not least, here is how to make a salve or balm in 6 easy steps. Have all your supplies clean and ready before starting. You’ll want to work fairly quick once the mixture melts!
- Measure and/or weigh the oil, wax, and optional butter and add it to the top portion of a double boiler. Be sure to put water in the lower portion of the double boiler; enough so the bottom of the top pan is resting in water.
- Heat the ingredients over medium-high heat until all of the ingredients are completely melted and combined. Stir occasionally. Do not cover the pot while heating; any condensation (water) can negatively impact the salve or balm.
- Turn off the stove and remove from heat before adding essential oils and/or vitamin E oil. Essential oils are very volatile by nature, and thus will quickly dissipate on high heat.
- While it’s still hot, carefully pour the liquid into storage containers of choice. If you have one handy, it can be easiest to transfer the melted mixture into a heat-safe pitcher, confectionery funnel, or glass measuring cup with pour spout (in batches if needed) and then use that to fill the containers.
- If the mixture starts to harden before you’re finished pouring, simply return to heat to re-melt.
- Once the balm or salve has completely cooled and hardened, add lids or caps and labels. This will take several hours or potentially overnight.


Clean Up Tips
For the easiest clean up, immediately wipe the pan out with a paper towel. If the wax residue starts to harden inside, lightly heat the pan to help it melt once again. Otherwise, it should all wash right out with hot soapy water. We also repurpose the already-hot water from the bottom of the double-boiler to wash the top portion.
And that’s a wrap!
I hope you enjoyed this lesson on how to make homemade salves and balms, and feel prepared and empowered to do so. Like I said, the options are truly endless once you get your feet wet and feel confident to get creative. Please let me know if you have any questions in the comments below, and leave a review once you give it a try! Thanks for tuning in today.
If you’re interested in straightforward guides to make specific salves and other natural products, check out these related tutorials:
- How to Make Calendula Salve for Healthy Skin
- Soothing Homemade Lavender Salve Recipe
- How to Make Cannabis Salve (including CBD)
- Homemade Chickweed Salve Recipe for Itching, Burns or Rashes
- DIY Natural Lip Balm Tutorial
- How to Make Medicinal Herbal Infused Oils, Two Ways
- DIY Bath Salts Recipe: Natural Beautiful Soaking Salts
Simple Homemade Salve or Balm Recipe (Flexible and Customizable)
Equipment
- Double boiler pot
- Measuring cups and/or kitchen scale
- Storage containers (tins, glass jars, or lip balm tubes)
- Heat-safe pitcher, glass measuring cup with pour spout, or confectionery funnel
Ingredients
- 1 cup herbal oil or plan natural oil of choice e.g. jojoba oil, olive oil, sweet almond oil, etc or homemade herb-infused oil
- 1/4 cup beeswax pastilles or pellets
- 1-2 Tbsp (optional) shea butter, cocoa butter, or mango butter
- 1 tsp (optional) essential oils up to 1 tsp or 100 drops maximum for safety, but a strongly scented salve). We use 1/4-1/2 tsp or less
- 1/2 tsp (optional) vitamin E oil
Instructions
- Measure and/or weigh the oil, wax, and optional butter and add it to the top portion of a double boiler. Be sure to put water in the lower portion of the double boiler; enough so the bottom of the top pan is resting in water.
- Heat the ingredients over medium-high heat until all of the ingredients are completely melted and combined. Stir occasionally. Do not cover the pot while heating; any condensation (water) can negatively impact the salve or balm.
- Remove from heat before adding essential oils and/or vitamin E oil.
- While it’s still hot, carefully pour the liquid into storage containers of choice. It may be easiest to transfer the melted mixture into a heat-safe pitcher, confectionery funnel, or glass measuring cup with pour spout (in batches if needed) and then use that to fill the containers.
- If the mixture starts to harden before you’re finished pouring, simply return to heat to re-melt.
- Once the balm or salve has completely cooled and hardened, add lids or caps and labels. This will take several hours or potentially overnight.


22 Comments
Paul Olsen
thanks heaps for the recipie and tips. I am looking for a comfrey salve that will soak into my crushed leg. I have made the salves with leaves and root powder, olive oil, bees wax and they all seem to sit on top of the skin. The bought cremes soak into my leg leaving it dry to the tough. Is there something I can add to the olive oil or replace the olive oil with to achieve this result.
Paul
Queensland , Australia
Aaron (Mr. DeannaCat)
Hi Paul, we make all of our salves typically using sweet almond oil and high oleic sunflower oil, the resulting salve really soaks into your skin without being too greasy. If those oils are available to you, that is what I would recommend using as olive oil is considered a “heavy” oil and doesn’t readily absorb into the skin. Another option for you if you want to try and makes use of the salve you already made is to reheat it all while also adding some shea butter into the mix which will help the oil more readily soak into the skin. Our regular salve recipes use these proportions: 4 parts oil: 1 part beeswax: 1/4 part shea butter. Hope that helps and good luck healing your leg, reach out if you have any more questions.
Sara
I want to make salves using herb infused castor oil. Do you have any pros or cons in it?
Aaron (Mr. DeannaCat)
Hi Sara, we don’t have the most experience using castor oil in general but you should be able to infuse the oil with whatever herbs you prefer and then use that to make a topical salve, hope that helps and good luck!
imelda
May i ask if preservative is no longer needed in the formulation? Thank you in advance.
Aaron (Mr. DeannaCat)
Hi Imelda, no preservative in needed in the salve or balm recipe. We have successfully made salve and used it over a years time with not issues whatsoever as far as shelf life is concerned. Hope that helps and good luck!
Nancy Parris
I just finished reading this and want to thank you for such a comprehensive article. It has been very helpful.
Aaron (Mr. DeannaCat)
Hi Nancy, that is so great to hear, we hope you are able to enjoy some homemade balms or salves here in the near future!
Jonathan
Your recipes sound great. However, I haven’t tried any as I am confused about the racios used. You use racios for the most part, which make sense, but when you switch to weight/ounces, it doesn’t make sense. You keep referring to 1oz as being 1/4 cup, but 1oz is 1/8 of a cup. So do you use 1/4 cup/2oz? or do you use 1/8 cup/1oz?
Aaron (Mr. DeannaCat)
Hi Jonathan, we make our salve and lip balm recipes by cup measurements but the 1 ounce measurement came about by us weighing 1/4 cup of beeswax pastilles so people using blocks of beeswax could easily weigh out their beeswax portion. When we are talking about liquid oil measurements, we are referring to liquid measuring cups. Hope that helps and reach out if you have any other questions, good luck!
Margaret
Thank you so much for your phenomenal website and for this recipe, which as always, is a knockout!
We live in a very warm climate and are looking to mail some of these to family and friends this summer. But don’t know if that is a good idea. What do you think? We don’t want them to arrive as basically empty tins and a wonderfully smelling but soaked padded envelope! Thoughts?
Aaron (Mr. DeannaCat)
Hi Margaret, thank you so much for the kind words! We have sent salves to places throughout the US through the summer months and have never had the salves melt, they may soften somewhat but they shouldn’t melt. The typical salve ratio we use is 4 parts oil, 1 part beeswax, and 1/4 part shea butter, hope that helps and good luck with your salve making!
Jorjeana Edwards
Hi!! First, thank you so much for sharing your knowledge! I’m going to be this recipe soon and was curious to see approx how many ounces this produces?
Aaron (Mr. DeannaCat)
Hi Jorjeana, if you are following the recipe pin at the end of the article, it ends up making around 10 ounces or so of finished balm or salve. Hope that helps and have fun!
Irene
Thank you so much for sharing your salves recipes and ratios. I’ve used the CBD recipe last year, and last night I made my second batch after the first one was a HUGE success! I was so happy for the pain relief it brought me and some family and friends too. Although I already made the second batch last night (before seeing this post) I’ll now refer back to your post even more so to get other salve and balm recipes. PS I was so skeptical about the salve, but a friend to whom I gifted a jar told me how well it works! Haha, I thought that was too funny. Then I started applying it to my very sore shoulder and in no time I was pain-free… quite amazing! Thanks again!
Aaron (Mr. DeannaCat)
Hi Irene, it’s great to hear how well the CBD salve has worked for your friends as well as yourself and we can now consider you a convert! When we are making cannabis salve, we typically make it using our calendula salve recipe as far as ingredients and the amounts of each, although we will typically scale the recipe up to make a larger batch. We infuse the decarbed cannabis in a double boiler over heat with the combination of sweet almond oil and virgin sunflower oil (instead of using coconut oil which is what our cannabis salve recipe is mostly made of) and the salve seems to soak into the skin better without feeling as greasy. Hope that helps and have fun making salve!
Fran
What a very thorough site you have! I greatly appreciate all of the in-depth information for creating salves and balms. I have a question… I was to make my dandelion salve today…. I infused with a breathable Lid (coffee filter) and set outside for a couple thinking that would help prevent any mold growth. Well, last evening I forgot to bring it in for the night and it rained a good shower this morning and I’m sure got water in the infusion. Is this doomed to mold after I make the salves or should I try it? I wanted to put them in my farmstand for Mother’s Day but I don’t want to put anything out that will mold. I would appreciate you advice. Thanks!
Aaron (Mr. DeannaCat)
Hi Fran, thank you so much for the kind words. Now to your question, unfortunately water getting into your oil based infusion makes it highly likely to spoil or mold so we wouldn’t bother with proceeding further. Check out our article on How to Make Medicinal Herb Infused Oil: Two Ways as it may show you a better way to properly infuse the oil for salve. While you may not have time to include a salve in your farmstand by Mother’s Day, you should be set up to do something in the future once you have a little more time beforehand. Hope that helps and good luck!
Kathleen Reinhart
Deanna,
Thanks so much for generosly sharing your knowledge. I have infused oil and made several small batches of salve using your directions, which I have shared with friends and family. It’s so empowering to make quality products from my garden and kitchen.
I truly appreciate all the knowledge you share and love following along on your garden adventures
Take Care💗
Kathleen
Aaron (Mr. DeannaCat)
Hi Kathleen, that’s so great to hear that you have been able to make and share your homemade salves made with homegrown goodies with your friends and family!
Mary W
I’ve tried for several years to grow calendula and chamomile – with no luck. Maybe too wet in FL since Lavender is also a no-grow. But, I bought a large pot of calendula filled with flowers and it is growing wonderfully – and I pick the just opened flowers every day and the next day, it’s filled again. AMAZING. So now I have a pile of flowers to dry and wanted to learn how to make salve as I’ve read that calendula salve is very helpful for skin irritations, bug bites, other stuff. Your article is so TIMELY but also filled with tons of beginner information – nother left to the imagination. Thank you for this in-depth article. I also have Rosemary’s book on hand but haven’t read it thoroughly so didn’t realize I could have gone there for recipes. It is a great book and helped me grow herbs. I do have a QUESTION: Is it only the blossoms of calendula that are medicinal or also, the leaves and stems?
I did apply Tulsi leaves as a poultice to sand gnat bites that covered my grand kids after a fishing trip at the beach. They asked me if I had anything. I googled that basil would work as poltice. It couldn’t hurt to try since I had no idea if it worked or not but knew it was edible and safe.They chewed some leaves then stuck it on their bites. Within 15 minutes of sitting still – the hardest part, they removed the poultice and the red and raised bites were GONE and they didn’t itch ever again. I was shocked and of course they were happy, but now when their friends visit and play outside (FL) they get mosquito bites and ask for the basil also. I had to grow extra plants just to help them and afraid their parents won’t let themcome back if they tell as that might be witchcraft, LOL.
Aaron (Mr. DeannaCat)
Hi Mary, so great to hear about applying the Tulsi as a poultice as it is an extremely medicinal plant. It’s also great to hear that you are now having success growing calendula as we find the flowers to be extremely medicinal and they do wonders on the skin. We harvest the whole flowers, the petals as well as the green ball/base of the flower, however, we do not use the leaves or stems as they don’t seem to contain the same medicinal resin as the flower heads. Hope that helps and good luck making your calendula oil and/or salve!